Don't laugh too hard...It's my first attempt!

interurban

Active Member
Aug 21, 2002
4,407
0
36
76
Pickering. Ontario. Canada.
Visit site
Hi Steve I know what you mean, I never did paint my rails either, But when I got into close up photography I needed to do it for a better shot.

Your Painted rails look Great Steve.


91rioja
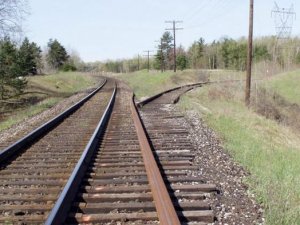
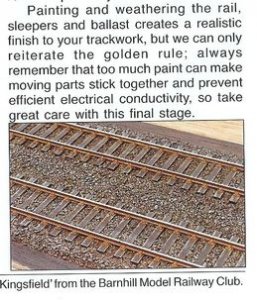
Here are two pictures for you to look at.
One point I will make. Rust gets every where on road bed and rails.
 

Attachments

  • rusty.jpg
    rusty.jpg
    62.4 KB · Views: 299
  • rusty memo.jpg
    rusty memo.jpg
    34.4 KB · Views: 346

Nazgul

Active Member
Jan 22, 2006
992
0
36
63
Ohio
Thank you Chris (interurban) for your kind words. I've painted the rails at all tunnel entrances and am still ballasting those areas. I'm starting to get the hang of it but it is still a slow process (at least for me). I can, however, say that I'm happy with the result.
I will be glad to go back to other scenery elements for a while. I guess the one thing to remember in all this is...............................
BALLASTING STINKS!!!!!......................well... it does!
 

viperman

Active Member
Mar 13, 2006
959
0
36
41
Carol Stream, IL
Not sure if it was mentioned or not, but what paint are you using? I plan to paint the tracks too, and want it to look like rust, but keep the top un-rusted (just like real)
 

Nazgul

Active Member
Jan 22, 2006
992
0
36
63
Ohio
viperman,
I'm using Delta Ceramcoat "Autumn Brown". Can be bought cheap at any craft store. It is brown with an orange tint. I like it straight out of the bottle but you could add a little black to tone it down. Others use brown for their mainlines and rust for spurs.....I thought this was a good compromise for both.
 

Nazgul

Active Member
Jan 22, 2006
992
0
36
63
Ohio
I'm going to paint some ties here and there varying shades of brown/black/gray. Just enough to break up the mono-tone. eventually I will "grimy up" the center between the rails to give it a more realistic look (I hope).
 

fsm1000

Member
Jun 4, 2006
467
0
16
63
Coquitlam BC
fsm1000.googlepages.com
I finally went through the whole post. If I was half as good when I started ,,,, wow, good stuff there.
I really liked the way that you did the rocks there. I would not have guessed thatit was foam.

Keep up the good work and I hope to see many more pics :D:D:D
 

ocalicreek

Member
May 4, 2005
824
0
16
48
Puyallup, WA
groups.yahoo.com
been a long time...

Steve,

It's been a while since I piped up with a comment. Sometimes The Gauge sends me an email when a person has posted on this thread, sometimes it doesn't...not sure why. Anyway, I just checked in today and the balast looks splendid. Also I really like the lettering on the bridge...a classy addition. Keep up the good work!

Galen
 

Nazgul

Active Member
Jan 22, 2006
992
0
36
63
Ohio
fsm1000, thank you, your words are very much appreciated. Just to let you know, I've been checking out your site and learning. Love your hand-laid work! Also, I hope you do another video tutorial. Besides being the victim of an inferior camera, it was quite good and you should pursue it.

Galen, always glad to hear from you. Thank you for the encouragement......as long as I'm ballasting, I'll need all the encouragement I can get! LOL! Things seem to be shaping up nicely, although, time is at a premium with school starting back up and the summer over.:cry:
How's things going at your new locale?
 

Nazgul

Active Member
Jan 22, 2006
992
0
36
63
Ohio
Falling Rock Zone!

Finally finished ballasting all future tunnel entrances....exciting stuff! I'm in negotiations with Warner Bros for the rights to make it into a summer block buster. I'm thinkin' Brad Pitt can play me (my wife thinks it should be Danny DeVito)...........
Any way, ROCKS, that's what I'm doin', in this area:
Picture 057 a.JPG

The first thing I did was to glue real rocks in various places
scenery 001.jpg

Next I added Sculptamold all around
scenery 006.jpg

To be continued....
 

Nazgul

Active Member
Jan 22, 2006
992
0
36
63
Ohio
Falling Rock Zone continued...

The only rocks I had were gray, of course I needed Brown...break out the $4.99 airbrush...first I painted everything black:
scenery 013 small.jpg

Next every thing gets a heavy misting of a dark brown (camel):
senery 015 small.jpg

Using a sea sponge cut to the size of a quarter, I dabbed on a lighter tan color:
scenery 016 small.jpg

This is the finished product minus greenery
scenery 020 small.jpg

I'm sure there's a better, faster way, but I like the idea of painting it myself. The plan now is to.........who am I kidding....you know I don't have a plan!sign1
 

fsm1000

Member
Jun 4, 2006
467
0
16
63
Coquitlam BC
fsm1000.googlepages.com
Nazgul said:
fsm1000, thank you, your words are very much appreciated. Just to let you know, I've been checking out your site and learning. Love your hand-laid work! Also, I hope you do another video tutorial. Besides being the victim of an inferior camera, it was quite good and you should pursue it.

To be honest, you are the only one so far that says I should continue in spite of the bad video. Others have suggested I continue once I get a better camera.

Thanks for the kind words about the track work. I am currently bullet proofing it which is why I have not updated for a while.
But your work looks great and I showed my sweetie who was impressed and she does not impress easily [well not with model RRing anyhow LOL].
She even suggested I try your idea [the cheek sheesh LOL]. Anyhow, you are doing good.
 

Nazgul

Active Member
Jan 22, 2006
992
0
36
63
Ohio
fsm1000, You said:
your work looks great and I showed my sweetie who was impressed and she does not impress easily [well not with model RRing anyhow LOL].
She even suggested I try your idea
I like her already! and so perceptive!sign1
seriously...thank you and her for the complement. As far as the tutorials go, use the camera you have for the time being and keep doing them. You don't need to post them. Do it as practice and to work the bugs out (camera positioning, editing, ect). That way when you get a better camera, you'll be all ready to use it to the best advantage. I just wanted to encourage you to continue with it. It's a great idea.

viperman, you said:
Steve, those rocks look great. I miss the progress shots like this, keep em coming
The "shots" are easy....It's the "progress" part that I'm havin' trouble with!
Thanks for the encouragement.
p.s. I like the prison idea for your layout!
 

viperman

Active Member
Mar 13, 2006
959
0
36
41
Carol Stream, IL
I get next to no time to work on my layout either. Only time is on the weekends, since it is at my parents house, and even then I still only get a few minutes here and there when I bring the fiance and kid with, unless I go alone
 

Nazgul

Active Member
Jan 22, 2006
992
0
36
63
Ohio
David, I can't believe there are 16 pages to this thread. It was never my intention to actually post updates on a regular basis. I just needed advice from those of you who knew what they were doing and hopefully come up with a track plan. Well I certainly got that and a whole lot more! I know I'm not doing anything new for experienced modelers, but I hope maybe some newbie can learn along with me and all the know-how shared by the members here. You know if I could change the name of this thread I would call it: The Railroad The Gauge Built!
viperman...I'll have you know, I never make mistrakes!