

Copper Ridge Railway under construction
- Thread starter roryglasgow
- Start date
You are using an out of date browser. It may not display this or other websites correctly.
You should upgrade or use an alternative browser.
You should upgrade or use an alternative browser.
C
Catt
Thanks for the compliments. I'm getting really excited now that I see it forming up. I can't wait to put in the grass and trees!
No, the top level isn't powered...yet... Power only goes up to the turnout on the second level. I finished pinning down the track on the third level while my son was taking his bath. He enjoys watching me work on the layout while he plays in the tub. When I finished I came out to the living room to talk to Kristi and Bryan started yelling, "Daddy, come back and work on the railroad!!!"")
Tomorrow I will power up the rest of the track.
I haven't pinned down the track on the top loop at the right. I'm leaving those loose (or I might pin them down in a couple of places and not use glue) until I can build the trestles.
Now, should I go with modern steel trestles, or should I make wooden ones? Decisions...decisions...
-Rory
No, the top level isn't powered...yet... Power only goes up to the turnout on the second level. I finished pinning down the track on the third level while my son was taking his bath. He enjoys watching me work on the layout while he plays in the tub. When I finished I came out to the living room to talk to Kristi and Bryan started yelling, "Daddy, come back and work on the railroad!!!"
Tomorrow I will power up the rest of the track.
I haven't pinned down the track on the top loop at the right. I'm leaving those loose (or I might pin them down in a couple of places and not use glue) until I can build the trestles.
Now, should I go with modern steel trestles, or should I make wooden ones? Decisions...decisions...
-Rory
C
Catt
Why not do both?The steel ones have been around a long time and there are still wooden one in use here in Michigan and other places too no doubt.
Rory, you can't beat a fully detailed timber Warren truss bridge.
All you need is scale lumber, 26 gauge steel wire, nut/bolt/washer detail parts ........ Oh yes, a microscope and the patience of Jobe! . But what a model! ... Wunderbar!
What's the holdup???
Errol
All you need is scale lumber, 26 gauge steel wire, nut/bolt/washer detail parts ........ Oh yes, a microscope and the patience of Jobe!
. But what a model! ... Wunderbar! What's the holdup???
Errol
Rory, if you are interested, go to Paul(Shamus)Templar's web site and he has a good tutorial on how to make trestles.
You really are making some serious progress there. Good to hear that your son prompts you to keep going.
You really are making some serious progress there. Good to hear that your son prompts you to keep going.
Thanks for reminding me of Shamus' tutorial, Robin. I just now took another look at it.
I thought about that, Catt!, doing one of each... The bridge in the front crosses one track, but the one in the back crosses two. That might make the rear one a better candidate for the steel trestle, but I think a wooden one would look better...
I suppose the holdup, Errol, is time and building materials. I can make the time (and probably will here very soon), but I gotta get ahold of some appropriate building materials. Maybe I can arrange a trip to the hobby store later this week...
But my first priority is to power up the top level!
-Rory
The track is all powered! Woohoo!
I ran my first train of hoppers up to the mine this afternoon. I'm so excited!
Now the real fun begins: SCENERY!!
I think I might go with a steel trestle up front and a wooden one in the back...
-Rory
I ran my first train of hoppers up to the mine this afternoon. I'm so excited!
Now the real fun begins: SCENERY!!
I think I might go with a steel trestle up front and a wooden one in the back...
-Rory
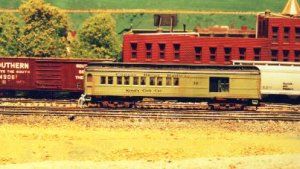
Well now that the track is powered guess you need some way to get those workers to the mine and woodyard. Here my best brakeman, Tom (No Fingers) Nolan gives your combine one last going over before the L&N hauls it to Texas, er, I mean some place in Tenn. Hope to get it on the way tomorrow!
Attachments
Wow! That's really cool, Tyson! Thanks!
I couldn't wait to show it to Kristi, so I showed her the picture.
I can't wait to get started on the foam scenery. Unfortunately, construction will have to be halted for a short time while my landlord puts in a new floor in our bedroom. The layout will be temporarily stored in the master bath. If all goes well, we'll be back in our bedroom tomorrow night, but who knows what might come up. Anyway, I feel like I've reached a milestone at least!
There are still a few...um...questionable spots along the track. I'm working through the problems, though. I'm still having trouble with those %#$@! turnouts. Sometimes everything runs fine, other times not.
I gotta go update my web site with the pics I posted yesterday...
You know Rory, when your landlord gets the old floor up tell him not to put down the new one. All those foor joists will make great open grid benchwork !
!The foam, the Foam, oh mercy...THE FOAM!!!!
My landlord got the wood flooring put in today, but he isn't going to start staining and polyurethaning (is that a word?) it until tomorrow. So, I had a chance to try out some Great Stuff. It worked great, except in a couple of spots where I miscalculated how much I needed. It expanded...and expanded...and expanded... The end result was that it pushed the track way up in one spot, and caused one of my inclines to tilt a little to one side. So, I've been hacking, cutting and chopping away the excess foam. I think I've got it all straightened out!
That Great Stuff is really great stuff!
Rory,
Yes polyurathaning is a word. I've done alot of it.
Not to derail here but what kind of wood floor is it?
Ever wonder why they call it "expanding " foam?
Hope to get some more pics soon.
Yes polyurathaning is a word. I've done alot of it.
Not to derail here but what kind of wood floor is it?
Ever wonder why they call it "expanding " foam?
Hope to get some more pics soon.
I have no idea what kind of wood he used. It wasn't anything like that Pergo stuff. It was just regular boards. Whatever it is, though, I'm sure it's fairly cheap. But at least I didn't have to pay for it!
Yeah, emphasis on the "expanding" part. The instructions said to fill it to 50% of the area. But I guess I went a little overboard in a couple of spots. I got some more foam today so I can finish up the layout...when I can get to it again.
You want more pics? Here is the layout, sitting in the bathroom, patiently waiting for the floor between the bedroom and the bathroom to dry... hehehehe
Attachments

Well at least you didn't have to pay for it. I'm in a rent to own deal with only two years left. It was rent for a year then own it in five more. Well its been three and I still havent seen my name on the deed yet.
anyhow is there a quick link to your web site from here I think you posted it some where but could you post it again? Please?
Just think soon the floor will be dry and you'll be back in action.
anyhow is there a quick link to your web site from here I think you posted it some where but could you post it again? Please?
Just think soon the floor will be dry and you'll be back in action.
Rory,
I just got back from your webpages. Fast loading and very well laid out. I loved it. And your new layout sure is coming along a treat. You almost have enough material to make a project writeup for a magazine. Well done sir.
Errol
I just got back from your webpages. Fast loading and very well laid out. I loved it. And your new layout sure is coming along a treat. You almost have enough material to make a project writeup for a magazine. Well done sir.
Errol
Shane,
My web address is http://user.mscc.net/~theglasgows. You can also access it by clicking the little "www" button that appears under my posts.
I once participated in a rent-to-own situation, but I quickly realized that my landlord just wanted to sucker someone into making repairs to the house and property. BEWARE!
The floor dried a lot quicker than we thought it would, so we moved back into the bedroom tonight. The layout is now sitting in its home corner again. I even got to work on it a little bit tonight, putting on some more foam. So far I've used two cans of Great Stuff. The third one should finish it out, and I'll post some pictures of the results.