

Well, I wasn't too impressed with the results of the layered rock experiment. So, I took some squares of foil and molded them around a big chunk of petrified wood I found in my yard, then filled the "molds" with plaster. It worked really well! I made three test castings and have found homes for them on the layout. I'm going to make some more tomorrow!
Copper Ridge Railway under construction
- Thread starter roryglasgow
- Start date
You are using an out of date browser. It may not display this or other websites correctly.
You should upgrade or use an alternative browser.
You should upgrade or use an alternative browser.
Nothing like being inovative eh! Rory. Good for you.
I have heard you can use tree bark for rock formation if you can find some.
I have heard you can use tree bark for rock formation if you can find some.
Hey Rory,
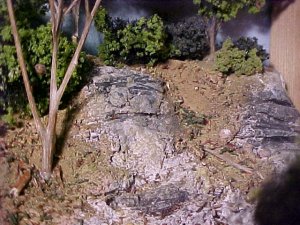
Don't know if you're interested, or not, but here's a picture of some real fast & easy rocks I made for a diorama...
The scenery base is foam, & I just doloped on some thick plaster of paris, & after it had set for a while, I roughed it up with a big screwdriver, going in a horizontal direction to simulate striations in the rock.
Attachments
Well, I'm impressed, too! That might be a more appropriate technique for several areas on the layout. The castings I made are better suited for cliffs. But your technique might be better for outcroppings on hillsides. I might give that a shot sometime today!
Charlie,
I use basicly the same technique myself for rock detail. I apply the plaster, and start working the detail in while the plaster is setting up. The harder the plaster gets, the finer the detail, until I get to scratching in the fine lines with a dental pick. If the diosol I've used to clean the airbrush is the right color, I'll use it to stain the rock carvings. I've also used latex paint thinned with water as a stain.
Pete
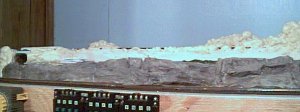
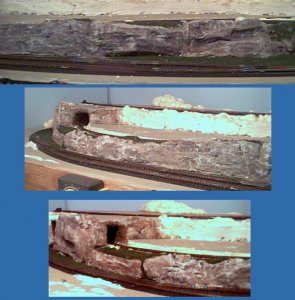
I've been busy on-and-off working on rocks. I've been using a combination of techniques: aluminum foil molds, plaster chiseled-in-place (ala Charlie), and directly painted foam.
I've got the cliffs installed on most of the front side of the lower level. There are still many details to add, of course...like trees, bushes, boulders, etc...
I've got the cliffs installed on most of the front side of the lower level. There are still many details to add, of course...like trees, bushes, boulders, etc...
Attachments
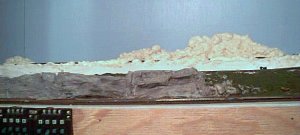
A wider angle shot...
The left half of the cliff is one giant casting. What I tried to do was wait until the plaster was partially hardened, then place it on the layout. Unfortunately, I waited a little too long, and the cliff cracked in several places. I had to patch it up a bit. After the plastered hardened some more, I went back and added more texture with a screwdriver. It doesn't show up too well on the camera, though...
The left half of the cliff is one giant casting. What I tried to do was wait until the plaster was partially hardened, then place it on the layout. Unfortunately, I waited a little too long, and the cliff cracked in several places. I had to patch it up a bit. After the plastered hardened some more, I went back and added more texture with a screwdriver. It doesn't show up too well on the camera, though...
Attachments
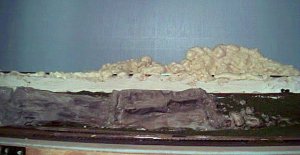
A closeup of the transition between the cliff and hillside. This area shows most of the methods that I used to make the cliffs/hillsides. The "green" area on the right is GS foam that has been painted and covered in ground foam. The boulders between the ground and top of the hill are "bubbles" of GS that I simply painted. The center portion of the picture is a single casting that I set in place. The one to the left was dried beforehand, then set. I arranged them so that it looks like the edge of an ancient fault line.
I used a variety of acrylic paint colors: black, white, Country Gray, caramel, and brown oxide. The effect is best when lit from above, but my camera wouldn't have picked up the image unless I lit it from the front!
I used a variety of acrylic paint colors: black, white, Country Gray, caramel, and brown oxide. The effect is best when lit from above, but my camera wouldn't have picked up the image unless I lit it from the front!
Attachments
Very nice work Rory. Artistic too to blend colours the way you do.
You railroad is coming along at a very fast pace.
Thanks for sharing the progress.
You railroad is coming along at a very fast pace.
Thanks for sharing the progress.
The rocks look great Rory...
Might I make a suggestion, though?
Get some white paint on a bug brush, & then wipe most (not all) of it off on a towel...then VERY LIGHTLY dry-brush over the rocks.
The white paint will only hit the high spots, bringing them out.
Subtlety is the key here...don't over-do it.
Might I make a suggestion, though?
Get some white paint on a bug brush, & then wipe most (not all) of it off on a towel...then VERY LIGHTLY dry-brush over the rocks.
The white paint will only hit the high spots, bringing them out.
Subtlety is the key here...don't over-do it.
I added in some more cliff faces today, which pretty much completes the rock work on the first level. When I paint those, I'll go back and add more highlights to the rock that's already painted.
What's a "bug brush?" I've just been dabbing a little white paint on one corner of a sponge brush, then fading it into the rock face with the other corner (that has some gray paint on it).
What's a "bug brush?" I've just been dabbing a little white paint on one corner of a sponge brush, then fading it into the rock face with the other corner (that has some gray paint on it).
Sorry, either these keys are too small, or my fingers are too bug...er...I mean big !
I'm not sure how well a sponge brush would work for dry-brushing...I've never tried it.
I prefer a brush with fairly stiff bristles.
And remember, too little paint is better than too much.
And if you find any creepy crawlies trying to make a home on your layout, then you're gonna need a "bug brush"!
I was waiting to find out about that bug brush to.
Looking great Rory, I haven't had any time to work on mine lately so I'll just sit here and admire your's.
Looking great Rory, I haven't had any time to work on mine lately so I'll just sit here and admire your's.
WOW!!
Hey, Rory that "bug brush" worked pretty good! Looks like I'll have to take some of my own advice sometime!
Here's another tip for you, if you want to play around with the rock color some more...Using the same method as with the white paint, use some earth colored paint, & make streaks, like where rain has washed mud down the face of the rock.
They really do look great as is though.
This is great seeing it come together for you!
Hey Rory, you laying down on us???? We haven't had a progress report in awhile now, you haven't taken up fishing or something instead have you?
We haven't had a progress report in awhile now, you haven't taken up fishing or something instead have you?