

Walts Stumps
- Thread starter shamus
- Start date
You are using an out of date browser. It may not display this or other websites correctly.
You should upgrade or use an alternative browser.
You should upgrade or use an alternative browser.
I said it before and I'll say it again AWESOME! If I was modeling logging his stumps would be a MUST HAVE! However I don't think I could do them the justice that you do. 
Great stumps and I am developing a logging area on the MAT and will be in need of some N scale ones but not until this fall.
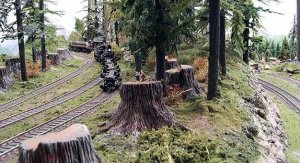
Thanks for the photo Shamus
Thanks for the photo Shamus
A Review
Walt and I have been good friends for some time and email each other every day. Back in mid-April he sent me some early production samples of his stumps and asked if I would "review" them. I did so and posted the review a week later in another forum. Since that time, Walt has had a number of orders for his stumps as well as requests for other logging accessories. This past weekend he decided to "ramp up" production of the stumps as well as cut logs, and uncut trees.
Since some of you may be curious about these after seeing Shamus' beautiful photo of "Rusty's Stumps," I thought I would post my original review here. BTW: you don't have to be into logging to have a set of these on your layout. They look great in general scenic treatments.
The Review
I model the Missouri Ozarks. Ozarks-style logging in HO scale, to be specific. White oak. Red oak. Short leaf yellow pine. Trees that grow 50 - 80 feet in height, with trunks that are typically 18” - 24” in diameter. They’re what I grew up with, they’re what I’m surrounded by, they’re what I model on my layout. So you can imagine my surprise when I opened the package of resin stump castings Walt had sent me, and out tumbled 6 huge tree stumps that appeared to be so far out of scale I wasn’t sure what I would do with them.
But then I looked at them a second time and a third. And I realized that they really weren’t out of scale. They were, in fact, just right for HO scale western-style logging. You know... tall pines, giant sequoias, Douglas firs. Really BIG trees. None of those scrawny mid-western oaks that I was used to seeing.
Of course, the next thing I realized was that they would probably be perfect as ordinary stumps on an O scale layout. Just to be sure, though, I got out my scale ruler and measured them.
One of the things that makes them appear so large initially is that Walt modeled not just the stump but also the root structure. So I started with the base. The largest scaled in HO at a little over 24’ across the roots; in O it measured almost 13’. The rest were of similar sizes. Next, I measured height. The tallest measured 13’ at the top of the butt (about 6.5’ in O); the others were of varying sizes ranging from 7’ to 10’ in HO. The diameter of the actual butts averaged 6’ in HO and 3’ in O.
One of the more impressive things about these stumps is that not just bark texture is modeled. Walt also scribed grain, age cracks, felling breaks (with splinters), and peeling bark at the top of the butt. All in all, great detailing and some pretty darned good modeling.
Since my castings were pure white resin, straight out of the mold, the next step was to see how they looked once they were painted and all dolled up. I arbitrarily selected three for this. The first thing I did was soak the castings in a sink full of lukewarm water and dish detergent for a few minutes and then gently scrub them with a brush to remove any traces of mold release. After they were thoroughly dry, I began painting.
Two were painted with various shades of Floquil, including Earth, Rail Brown, Roof Brown, and some left-over Oak Flo-Stain. I say “painted;” actually I dabbed, freely mingling the colors and making no attempt to wait until one color had dried before starting another. The idea here was to create a mottled gray-brown appearance all over each stump. After the Floquil had dried but not cured, I flowed a black alcohol mix freely in the bark crevices.
The next step was to drybrush gray over the surface of the bark. I wound up using Ceramcoat’s Quaker Gray acrylic and Apple Barrel’s Pewter acrylic because all of my Floquil grays had apparently gone south for the winter (or maybe for all of eternity), as they eventually do once they’ve been opened.
The final step was to add some texture to the bark itself. To this end, I scraped the edge of my X-acto knife along a stick of raw umber chalk and a stick of gold ochre chalk, creating two small piles of dust. I then applied the dust to the painted castings using a soft round brush.
I followed the same steps for the third casting, the only difference being that I used Polly Scale colors instead of Floquil. I wanted to see if water-based acylics covered resin castings or adhered differently than solvent-based paints.
Does all of the above mean these castings are perfect, free of flaws? In no way. Even Walt would be the first to admit there are flaws. For one thing, I had to cut away a bit of flash and excess resin from the base of each before I painted it. For another, I noticed several several air bubbles (also called air bells) on the surfaces. But, even the most professionally cast detail parts - whether resin or styrene - typically have flash that has to be cleared away. And I didn’t even notice the air bells until I looked at the castings under my lighted 3X magnifier while painting them.
All in all, you can’t go wrong with a set of these - especially if you’re a sawdusthead. But they’d also make great scenic additions to any S or O scale layout. And one other thing: if you’re into forced perspective, these would make great scene “starters” in HO.
Contact Walt if you’d like a set.
Shamus, Casey, thanks. I appreceiate the kind words. As with all things of this nature you continually try to improve. And to that end I have experimented with various resin products till I have now settled on a particular one that when a little brown coloring agent is added gives a nice natural wood tone. As Casey has pointed out I will be expanding the various items available such as fresh fallen trees, logs, tree trunks with stumps and stump sleeves to use with your own dowel trees.
A new website is in the works called of all things "www.rustystumps.com" and should be up and running within the month. As with most new ventures this too will evolve over time. Right now it's a little crude!
Shamus' photos are great and I thank him for letting me use a few of them for flyer sheets and such. Casey has been a source of inspiration from the start and I thank both for their kind words and encouragement.
Rusty Stumps
A new website is in the works called of all things "www.rustystumps.com" and should be up and running within the month.
As with most new ventures this too will evolve over time. Right now it's a little crude! Shamus' photos are great and I thank him for letting me use a few of them for flyer sheets and such. Casey has been a source of inspiration from the start and I thank both for their kind words and encouragement.
Rusty Stumps
C
Catt
Hi Catt,
The medium 5' HO dia. and the small 3' HO dia. should equate to 10' and 6' respectively in N. The bark detail might prove a little heavy but they are resin so you could sand that down a little to make it less pronownced. They will come 18 medium or 24 small assortments at $39.95 plus $6.50 S/H. Wait though as I don't have enough variety of the small, only three right now, and I want to add a number more. I'll try and tone down the bark detail a little so they can be "cross scale compatible!" (chuckle)
Keep an eye on the website, hopefully it will be up and running this week or early next. As I add items it should reflect it over time.
Rusty Stumps
PS: hope I'm not violating any rules with the above info, if so let me know and I'll refrain from posting such info.
Hi Walt,
If you want, you can use the photo above for your website if that will help friend.
By the way, here's the website
http://www.aimtrainers.com/fall_creek_rr.htm
Shamus

If you want, you can use the photo above for your website if that will help friend.
By the way, here's the website
http://www.aimtrainers.com/fall_creek_rr.htm
Shamus
Thanks Paul,
That's much appreceiated. I'd like to use that photo on the front page and maybe even a flyer sheet. Of course, becuase of your quality workmanship and help you will be referenced as will be your website.
I'm building a new site that should be on line as soon as the credit card company finalizes everything. It's http://www.rustystumps.com or http://www.rusty-stumps.com
It's a complete e-commerce site and now I have to learn how to work with it through FrontPage2000. EarthLink, the host, has their own designer interface and they don't give tech support for any other design software. Kind of makes it hard.
When does your article coming out or have you heard yet?
Walt
hey walt we need them in n-scale theres no trees around here that are that big be hard to model redwoods in pennsy rich
richHi Paul, I may take you up on that when I get the book on the e-commerce site. I use FrontPage2000 quite a bit and I'm real farmilar with it as you can tell by my main site http://www.aimtrainers.com but incorportating a e-commerce together with a FP site is something else. You have to maintain the controls that go to the database and verification, etc. That's the big part.
Walt
Walt
Rich, It's all relative! It's hard to model something as small as you want even with a magnifing glass of X10! They do have 6' trunks in Penn. I'm sure. So the 3' HO would work in N!
As I said earlier, I intend to create an number more of that size with a smoother detail just got to get my workbench set up.
It's hard to model something as small as you want even with a magnifing glass of X10! They do have 6' trunks in Penn. I'm sure. So the 3' HO would work in N! As I said earlier, I intend to create an number more of that size with a smoother detail just got to get my workbench set up.
For those who might be interested my website for the stumps is now up and running, taking orders!
It's: http://www.rustystumps.com
Stop by and take a gander I will be adding items later this year as I'm a little busy with my regular company right now.
Walt
It's: http://www.rustystumps.com
Stop by and take a gander I will be adding items later this year as I'm a little busy with my regular company right now.
Walt

Hey Paul,
Thanks for the kind remarks on the site, but, no, there have been no sales at all. I've just downgraded the site to a basic one taking out the Ecommerce part. It was costing me $75 a month now it's $20. Got to save money somehow!
Have you tried going back over to Railroad-Line Forums lately? Joe shut it down. We don't know if it's permanent or not. A few of the fellows got into flame wars and then one guy started acting line a little Hitler demanding they prove they were legit members and all. It got real measy. Phil quit as moderator over it all and Joe pulled the plug. It was a good site while it lasted but had it's problems.
Mike and I keep in touch almost on a daily basis, if nothing else commenting to each other on the childness of the group over there. Now we won't have anything to talk about!
I sent Press Kits to most of the major MRR magazines. Trains had an article on their website but they scroll so fast who know how many saw it.
I've sold more stumps on eBay than just about anywhere. It will take a long time before I get my investment back, a long time.
Hope everything is going good with you and your wife and you have enjoying your "railroad years."
Take care,
Walt
Huh, I'm surprised.
(1) Those are great-looking stumps, I don't know why nobody bought 'em off the website. I'm just waiting until I get to the stage where I need some, and then your website is bookmarked under my "Vendor" directory.
(2) I hung out over at RRL a lot . . . had no idea anything was up, but I also stayed out of the more volatile forums - DCC being the prime one of course. Other than that, there were some great people over there. Hopefully they find their way over here; and none of the bad people.
Hi Mike,
(1) It could be just an as needed product, who knows. Some have expressed interest in other items like fallen logs, etc. but the cost of developement is such that I have to start getting something back on my initial investment first. Plus as a consultant business is tough at best right now so every $ counts.
(2) It was a good forum, about the best, but there where those who wanted to tear it down and succeeded. Your right, the DCC forum was a leader in the "Flame wars" and was a major contributor to the problem. After one note worthy individual left that forum some of the others migrated to the regular forum area and brought along their excess baggage. I stayed out of it as I know a few others did but when asked by the moderator why we had gone to the back-row, we explained. That's when the hammer came down on one individual and there evidently where a number of behind-the-scenes heated Emails going around. That took it's toll on Phil and he upped and quit also. I think that's what lead Joe to pull the plug. Maybe he'll bring it back up after awhile who knows.
I even miss the daily "your a nice guy, I'm a nice guy" posts in the general forum area. It got a little much at times as most where just trying to run up their counts but at least it was something to read and was a pretty active forum. I don't think what was going on warranted taking the site down, it just needed a little extra administration effort for awhile.
Walt
Those look fantastic!
Did you consider sending some samples to someone like 1stplacehobbies.com (Ft. Wayne)?
BTW: Walt, I'm an hour N. of you in Laf.
jon
Did you consider sending some samples to someone like 1stplacehobbies.com (Ft. Wayne)?
BTW: Walt, I'm an hour N. of you in Laf.
jon
Hi Jon;
I did send out five Press Kits which consisted of a half dozen samples, press release, catalog sheet, photo disk, etc. to leading model railroad magazines such as Model Railroader, Timber Times, Small Gauge Gazzet, etc.
Trains.com had a right up on their web site and a few of the magazines have indicated they are doing articles on them. Pau wrote an article about his new layout section that utilized these stumps and pictures from that are featured on our box cover and website.
I haven't sent samples to hobby shops, even though a few have requested them, simply because of time and costs. This is a part time venture and my "real" income is in jeprody right now so all my efforts need to be pointed that way or it won't matter much if the stumps do sell! The stumps will never pay a living wage as I would have to sell 10 dozen a day to do that and I don't believe that would be realistic, well unless I could convince the whole World that they must have them to survive.
I have used 1st Placehobbies quite a bit my self and just might follow through on your suggestion. I also thought of sending some to Walthers.
Problem is you must discount items quite a bit to get them into these places, that cuts profits which means you need to increase volume to make up for it. Some times that can become a wash that has you working a lot harder for the same or less money.
I started this to make my hobby pay for itself, so far I'm in the hole quite a bit. But that's business!
Walt
I did send out five Press Kits which consisted of a half dozen samples, press release, catalog sheet, photo disk, etc. to leading model railroad magazines such as Model Railroader, Timber Times, Small Gauge Gazzet, etc.
Trains.com had a right up on their web site and a few of the magazines have indicated they are doing articles on them. Pau wrote an article about his new layout section that utilized these stumps and pictures from that are featured on our box cover and website.
I haven't sent samples to hobby shops, even though a few have requested them, simply because of time and costs. This is a part time venture and my "real" income is in jeprody right now so all my efforts need to be pointed that way or it won't matter much if the stumps do sell!
The stumps will never pay a living wage as I would have to sell 10 dozen a day to do that and I don't believe that would be realistic, well unless I could convince the whole World that they must have them to survive. I have used 1st Placehobbies quite a bit my self and just might follow through on your suggestion. I also thought of sending some to Walthers.
Problem is you must discount items quite a bit to get them into these places, that cuts profits which means you need to increase volume to make up for it. Some times that can become a wash that has you working a lot harder for the same or less money.
I started this to make my hobby pay for itself, so far I'm in the hole quite a bit. But that's business!
Walt