Innovative Photography

shamus

Registered Member
Dec 17, 2000
3,489
0
36
87
UK
The "Foggy Morning" thread got me to thinking about this thread about "innovative Photography"

So lets see how you can come up with using two photographs,

1 a real backdrop and 2 superimpose your modelling in the front.

I will start this off with my old Badger Creek sawmill and a backdrop of nice mountain scene.
Shamus
sf1.jpg


roryglasgow

Active Member
Jun 3, 2001
1,223
0
36
55
Huntsville, TX USA
web.wt.net
This is a shot from my old R&K layout. I placed a white sheet in the background. Using the "Magic Wand" selection tool in Paint Shop Pro, I selected all of the areas that matched the color of the sheet, then pasted in a photo of the sky.

Bryan3.jpg
 

Vic

Active Member
Feb 1, 2002
1,699
0
36
79
Columbus GA
Visit site
Ahhh Haaa!... "Professor Shamus" has given us an assignment!!!!:D :eek: :eek: :D Hope this isn't the "final exam":D :D :D I may "withdraw" from the class:D :D :D but I'll be "studying" on this one!!!:D :D :D
 

shamus

Registered Member
Dec 17, 2000
3,489
0
36
87
UK
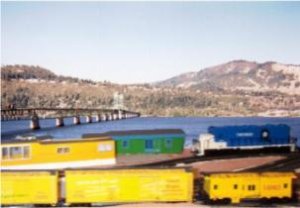
Okay, here's the first picture with all the background cut out, and here's another photo with a different background. All done in paintshop pro.

sf5.jpg


sf3.jpg

----------------------
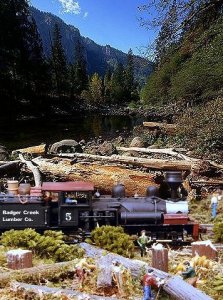
Starting with the picture at the top, the first job to do was remove the existing back scene, leaving the power cables intact. Then using various photographs from my collection, paste a new back ground behind. As you will notice, all have the same foreground but with different back grounds.

If you want to have a try yourself, use the picture at the top if you want, (Right click - save picture as) or do one of your own. If you do your own pictures, then your first task is to remove the back ground using the ERASER (Looks like a rubber) tool. This work can take quite a lot of time. (Well worth it in the end)

Okay, - load the picture into Adobe Photoshop or Paintshop Pro.


Select the magic wand tool and left click into top left of picture, now hold down shift and click into every available clear part. when finished go to SELECT and inverse the picture then save the selection from the SELECT button. Go to EDIT and copy the picture. Now minimize the picture. The reason you saved the picture was to be able to use it for another background later, just click on SELECT at a later date and re-load it.

Now open up another picture that you want to use as the background picture, The main picture is 608 by 431 pixels. make sure that the other picture you are going to use is the same size. If not then go to IMAGE and Image Size and re-size to 608 only, the rest will take care of it's self. Now go to EDIT and paste. Once the picture is in, use the MOVE TOOL and position the picture properly. NOW go to LAYER and flatten image.

All that remains is for you to save your new picture.

Shamus
 

shamus

Registered Member
Dec 17, 2000
3,489
0
36
87
UK
This one took quite abit of time cutting out all the model trees and inserting the prototype background.


Attachments

  • forrest.jpg
    forrest.jpg
    83.6 KB · Views: 129

shamus

Registered Member
Dec 17, 2000
3,489
0
36
87
UK
Hi Mike, nice picture showing the mountains behind, keep um coming.
Do you still play Dungeons and Dragons? Wow, I used to years ago.
Shamus
 

rockislandmike

Active Member
Nov 6, 2001
1,257
0
36
56
Edmonton AB
dayfornight.qazam.com
Yep, every Monday night, 8pm-11pm local time. I don't think my wife's a big fan of it, but she also figures it's better than going and playing poker and getting drunk every Saturday night. So she just sighs and puts up with it...............
 

shamus

Registered Member
Dec 17, 2000
3,489
0
36
87
UK
Here's the model RDC crossing the big waters, which skyline is it guys, need to know for my own reference. Here in the UK, we ain't got nuttin like that. Looks fab.

Shamus
 

Attachments

  • rdc.jpg
    rdc.jpg
    85.8 KB · Views: 86