Howl's Moving Castle - Epson Freebie

Nov 28, 2005
80
0
16
Fareham UK
A little further...

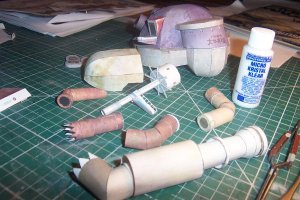
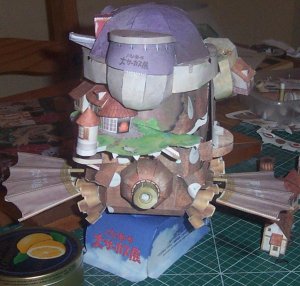
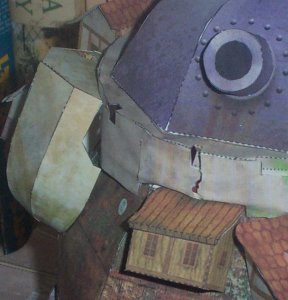
Still at it. I'm around page 15 now. The dome comes out quite neatly but I had a bit of stretch to do the dome's base side. I'm not sure if I should add the left side terrace yet as there doesn't seem to be a positive location. If there are any more parts for it on later pages I may just hold off adding it for now.

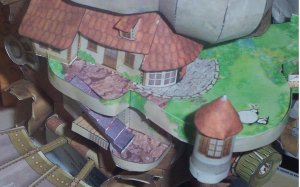
The right side plating has had a little problem attaching to the inner skin.

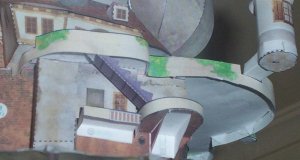
I generally have trouble attaching flaps that are folded underneath and are supposed to stick down flat to a surface (like dome to it's base). I'm just wondering if anyone has tried cutting slots through the lower surface and pushing the tabs through and glueing them down to the underside of the lower surface instead?

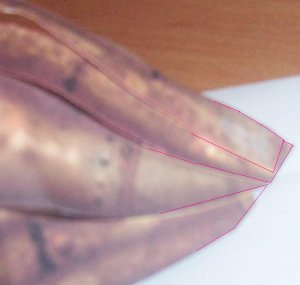
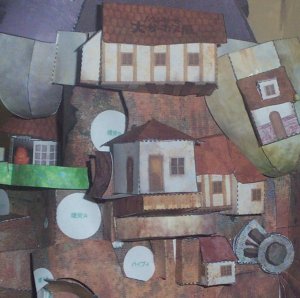
I am a little stymied by the mouth - please could I have a close up of a finished mouth at the side edges? There appears to be overlaps but peering at the photos already posted I can't make out how they fit together.
 

Attachments

  • howl 001.jpg
    howl 001.jpg
    204.1 KB · Views: 117
  • howl 002.jpg
    howl 002.jpg
    69.9 KB · Views: 74

Kaz

Member
Jul 27, 2005
28
0
16
64
Cambridge
Those flaps, I usually crease them to a razor sharp crease, and pull them out a little, once the glue is added I push them to its anchor points and the creasing allows them to lie flat. I just hope the glue strengthens the weakened edge!

Not exactly sure what you need for the mouth photos, but heres mine attached to the head
http://www.flickr.com/photos/38532082@N00/

(one day I'll figure out how to attach photo's in a thread :) )
 
Nov 28, 2005
80
0
16
Fareham UK
Thank you Kaz

Thanks for the photos Kaz. I should get the mouth right now.

The I16 looks insane BTW - very bad for the eyes!

Kaz said:
(one day I'll figure out how to attach photo's in a thread :) )

Try the Manage Attachments button. I've noticed if you do "quick reply" you get the link type attachment. "Reply" gives you the on screen picture.

Woah! Extreme Veteran? That was a bit quick! We grow up so fast these days.
 
Nov 28, 2005
80
0
16
Fareham UK
Rolling rolling rolling....

OK so I am a bit stuck.

The mouth continues to baffle. I can see how the edges overlap now but how do the top and bottom edges attach? I can see the line on the front face for the upper edge. I think I should add tabs to the edge on the mouth and secure that edge on the model. Tentative efforts so far show that the top edges on the side faces do not want to butt up the the main body and I can't seem to get a join of the mouth on the bottom edge without bulges and gaps. Can anyone suggest the right approach to securing the mouth so that it does line up well or have I severly goofed? I am prepare to accept that the main body needs doing again in a stouter paper - some of the attached parts such as the wings are salvagable.

Meanwhile I've done some of the pipe work and the turret. In a moment of madness I tried cutting out the railings on the viewing gantry with a new 10A scalple blade. My luck was in as I only sliced through one rail but I don't think I would want to do many railing like that.

I treated myself to a fresh bottle of Microscales Kristal Klear. I use it when modelling in the other stuff to secure transaprencies or glaze portholes/small windows. It's a very quick drying PVA. I only used it previously as I'd run out of PVA and I've found it much better to use. On inkjet printed paper it bonds almost instantly.
 

Attachments

  • Picture 002.jpg
    Picture 002.jpg
    107.9 KB · Views: 229

Jackrum

Member
Jan 23, 2007
79
2
16
Plastic Bonsai said:
OK so I am a bit stuck.

The mouth continues to baffle. I can see how the edges overlap now but how do the top and bottom edges attach? I can see the line on the front face for the upper edge. I think I should add tabs to the edge on the mouth and secure that edge on the model. Tentative efforts so far show that the top edges on the side faces do not want to butt up the the main body and I can't seem to get a join of the mouth on the bottom edge without bulges and gaps. Can anyone suggest the right approach to securing the mouth so that it does line up well or have I severly goofed? I am prepare to accept that the main body needs doing again in a stouter paper - some of the attached parts such as the wings are salvagable.

Meanwhile I've done some of the pipe work and the turret. In a moment of madness I tried cutting out the railings on the viewing gantry with a new 10A scalple blade. My luck was in as I only sliced through one rail but I don't think I would want to do many railing like that.

I treated myself to a fresh bottle of Microscales Kristal Klear. I use it when modelling in the other stuff to secure transaprencies or glaze portholes/small windows. It's a very quick drying PVA. I only used it previously as I'd run out of PVA and I've found it much better to use. On inkjet printed paper it bonds almost instantly.

I don't quite see whats wrong here. All u have to do is make the points meet up, the shape forms because of that. Then u just glue the chin flap to the underside of the main assembly and the corner points to the sides of the main assmebly.
 
Nov 28, 2005
80
0
16
Fareham UK
The points being...?

Jackrum said:
I don't quite see whats wrong here. All u have to do is make the points meet up, the shape forms because of that. Then u just glue the chin flap to the underside of the main assembly and the corner points to the sides of the main assmebly.
Jackrum

If you are saying that I haven't got the points at the end of the mouth in the same place then that's certainly true. Several of the points have lines midway down them that look like alignment points for the next layer - at least that's what I thought on my second cut. I'm trying to get a picture of it....this is the best I could do - pathetic really. A quick scribble in paint and at least you can see the segments. My defence is they lined up with the white lines and looked like they fitted the attachment points on the face sides. Kaz's pictures looked like I was on the right lines but I've been peering at all this brown and I'm beginning to see anything I want.

Could someone please mark up the photo to show how they should line up? This appears to be the source of my problem.
 

Attachments

  • mouth.JPG
    mouth.JPG
    29.7 KB · Views: 182

Jackrum

Member
Jan 23, 2007
79
2
16
Oh I see! from the looks of it your about right with it actually. Don't forget that any untidyness will be covered by those two keyhole shaped gears that go over the corners of the mouth. I'll try and take pics of mine and see it thats any help to u. Wait till you get to fitting the terrace.. thats a real headache.
 
Nov 28, 2005
80
0
16
Fareham UK
Thanks guys. I have a bit more confidence now. I'm going to secure the top lip and see where the corners of the mouth sit to get the best fit. Meanwhile I have been doing some of the delightful houses and the props. Once I have the mouth sorted I should be on the home stretch, appart from the terrace maybe. Still forewarned is four-armed - which would probably help in fitting the mouth ;).
 
Nov 28, 2005
80
0
16
Fareham UK
Some success

Well the mouth went on pretty good. A big tab under the front top lip and anchored it firmly to the body. I pulled the mouth corners around the sides until I got a snug fit on the top edges and secured them firmly. There was a little buckling on the underside but nowhere near as bad as I had it before.

I decided the bottom former in the turret needed to be made of something stiffer that 80 gm paper. I used some heavy duty card I had lying around. I had a little problem getting it into the turret resulting in the stress fracture you can see top centre. I hope I can cover it up. The turret did'nt seat easily, large gobbets of glue being the order of the day and the rear cupola had to distort the top rear wall on the body slightly.

Putting it aside for a long drying period now. The 80gm paper is begining to look a bit flakey in places. Hopefully the extra gubbins will hide a lot of the buckling
 

Attachments

  • howl 005.jpg
    howl 005.jpg
    58 KB · Views: 56
  • howl 006.jpg
    howl 006.jpg
    53.6 KB · Views: 51

Kaz

Member
Jul 27, 2005
28
0
16
64
Cambridge
Nicely done there Plastic Bonsai
80 gsm paper... hmmmmm..... Have you tried anything thicker, especially on larger models? mine was made from 160gsm, it has less 'give' either making it harder for me to get it right, or easier for me, cos when it is right, theres no warping, or sagging errors. Just a thougt.
 
Nov 28, 2005
80
0
16
Fareham UK
Thicker?

Hi Kaz

I have used some thicker paper - not sure what grade. I just got a job lot from the local Paper Mill shop. In general I have been surprised at how strong the 80 gms paper is when the structures go together. The thicker paper/thin card has usually been less flexible but I fully accept a thicker grade on this model would have been a good idea. I am not averse to having another go at a model. I'm still learning a lot.
 

Jackrum

Member
Jan 23, 2007
79
2
16
I tend to use 160 gsm card, readily available from partners stationers in the uk for a fiver for 50 sheets. Not too thick to be clumsy to work with but not so thin that it ends up looking a mess. Takes the ink nicely too when it's set to best print quality on plain paper.
 
Nov 28, 2005
80
0
16
Fareham UK
I have had a ponder on the issue of thickness. I think thinest is best!

It's a little counter intuitive but given a materials tensile strength is constant then the forces it can withstand is in proportion to it's cross-sectional area but the forces it has to support - i.e. it's own weight is inproportion to it's volume. So heavier stiffer paper is more prone to sag than the lighter paper.

This explains why we don't machine airframes as solids ( appart from my avatar ;)). the light weight structures are stonger and why Jackrum's wings sagged - mind you I did use a lot of glue.

The problems are that the thin paper will warp and buckle if not properly braced or supported and that's where the design comes in. Witness the extra rigidity a tab folded over to 90 degs an an edge will give.

I still should be using thicker paper though!

Meanwhile I have mucked up the terrace by attaching the sidewalls upside down. I shall reprint that sheet and try again.
 

Kaz

Member
Jul 27, 2005
28
0
16
64
Cambridge
Interesting thought process on thickness/strength there Plastic Bonsai. I think it ought to have its own thread, though I'm sure its already out there, back to the threads initial aim... I cant remember how many reprints I had to make to get it finished, but hang in there, I'm sure you are nearly done. Post more pics!
 

Jackrum

Member
Jan 23, 2007
79
2
16
Plastic Bonsai said:
I have had a ponder on the issue of thickness. I think thinest is best!

It's a little counter intuitive but given a materials tensile strength is constant then the forces it can withstand is in proportion to it's cross-sectional area but the forces it has to support - i.e. it's own weight is inproportion to it's volume. So heavier stiffer paper is more prone to sag than the lighter paper.

This explains why we don't machine airframes as solids ( appart from my avatar ;)). the light weight structures are stonger and why Jackrum's wings sagged - mind you I did use a lot of glue.

The problems are that the thin paper will warp and buckle if not properly braced or supported and that's where the design comes in. Witness the extra rigidity a tab folded over to 90 degs an an edge will give.

I still should be using thicker paper though!

Meanwhile I have mucked up the terrace by attaching the sidewalls upside down. I shall reprint that sheet and try again.

Wee thats a lot of big words, I just glue em together and it looks purty. Best of luck with your build.
 
Feb 26, 2006
71
0
18
68
Rotterdam, Holland
I would certainly use some thicker cardstock, like 160-200gsm type,you will be amazed with the result...but sofar it looks very cool
But inspired by this thread, I went out and actually bought the DVD, I had only seen trailers of it, but what a beautifull story!, my kids have seen it three times since yesterday....and now they want to build the castle
Cheers, Billy
 
Nov 28, 2005
80
0
16
Fareham UK
Onwards

I have added several of the houses to the front and right sides; the right side ones sort out the free side plate quite nicely.

Now the terrace. I'm sort of halfway so this could still go terribly wrong. I attached the houses to the terrace floor and then added the sidewall incorrectly - I had missed that the thin strip was the inside of the edging's top lip and had stuck the edging on upside down. I was resigned to rebuilding the terrace but I found I could remove the edging quite easily. It is suprising how much you can Cntrl-Z these models! The siting of the terrace looked tricky so as the only line-up I knew that had to be right was the stairs down to the lower platform so I attached them and wriggled the terrace into position. The terrace houses were snug up against the cupola and the rear upper wall distorted a lot more. I have no idea if that is the intended shape but it looks OK and will behind some trees eventually. I applied the usual gobbets of glue to the rear of the houses and the top of the lower appartments and slid if back into place quickly. I then edge glued several sections of the body wall to the underside of the terrace and left it alone for a while.

Anyway it appears to be OK. Here's a couple of shots of the terrace in position. Sorry for the size but I have been peering at very small pictures of this area trying to see what the terrace fit should be so I may be able to save someone else the eye strain.

The next item is to attach the terrace edging. As I am not sure how it is supposed to go. I shall try attaching the inside edge from a logical point and wrork it around. The bit around the top of the stairs will be interesting.

Yes the film is wonderful. Apparantly the book is very different and not so appealing to No 1 daughter who tried to read it. I can heartly recommend all the Ghibli studio films. They make for excellent family viewing though sometimes the kids have to explain bits to you.
 

Attachments

  • howl 009.JPG
    howl 009.JPG
    113.8 KB · Views: 49
  • howl 010.JPG
    howl 010.JPG
    129.2 KB · Views: 43
Nov 28, 2005
80
0
16
Fareham UK
The terrace

The edging went on OK. I attached the inner wall to the outer wall at the begining of each section and glued the inside and outside walls to the terrace at the same time. The wall went around the stairs OK with no problem. the last piece went under the end house just any old how.

Round the other side the houses attached OK, the middle set were glued to each other first, The top house I opened up the back wall and folded them inside the house. Gobbet of glue and it fitted onto the turret rim.

I have got a bit of a gap between the observation tower base and the turret rim/body that the other build's don't seem to have. I wasn't sure I had the turret seated right on the body and I may have been foolhardy to stick (sic) to the base location points shown on the turret rim.

Anyway this model is so ramshackle looking it, it is not so bad.

The rear entrance was a little fiddly to put together and it ended up a bit lop sided when attached to the model but it's out of the way.

I keep dreading the next step on this model and then finding it is not so bad when I get to it. So to keep the magic going I'll just say "The pipes! The Pipes!" and "Ooooerr!" and hope that does the trick.
 

Attachments

  • Picture 001.jpg
    Picture 001.jpg
    132.2 KB · Views: 45
  • Picture 002.jpg
    Picture 002.jpg
    76.8 KB · Views: 36
  • Picture 004.jpg
    Picture 004.jpg
    95.1 KB · Views: 37
  • Picture 005.jpg
    Picture 005.jpg
    71 KB · Views: 54