Here's my first N Gauge Layout

Biased turkey

Active Member
Very nice work Her Driver.
Your kids are lucky to have a dad like you who spend some time to build a layout for them. Even if I suspect that the father spend more time running the trains than the kids do :)
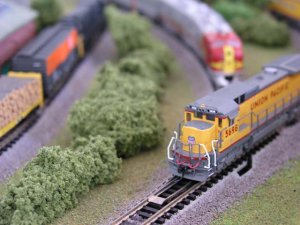
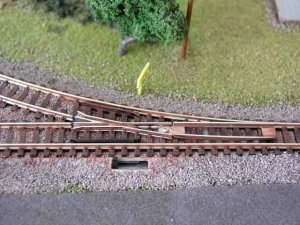
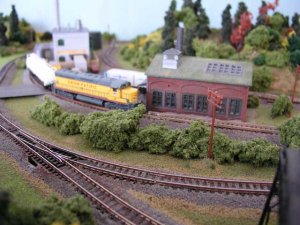
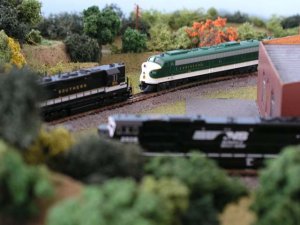
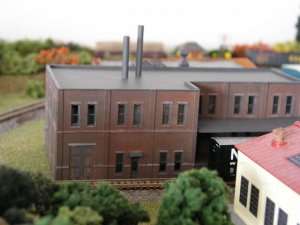
The various pics show that your layout is really progressing.
I think you created a very nice and complete beginner layout: simple but still including the basic features a model railroad should have, like passing track and industrial siding.

Are you using Atlas code 80 track ? ( I didn't see any mention of the track code in your post )
Nice ballasting work . Is the ballast from Woodland scenic ?
What size is it ?

Once again, from a newbie, congratulations.
 

CraigN

New Member
Herc Driver,

You did a very nice job on your layout. It does not look like a 1st attempt model railraod at all.

Go with the MT couplers, you won't regret it.

Craig
 

davidstrains

Active Member
This looks like a layout that both dad and the kids could enjoy. Talk about "quality" time. What better way to spend some time with the youngsters?:thumb: We should all be so lucky.

Nice work, Herc.
 

Biased turkey

Active Member
davidstrains said:
This looks like a layout that both dad and the kids could enjoy. Talk about "quality" time. What better way to spend some time with the youngsters?:thumb: We should all be so lucky.

Nice work, Herc.

Yes Davidstrains, you just resumed it in 2 words: Quality and Time
 

3railguy

Member
I will believe it's your first N scale layout but have trouble believing it's your first layout. Very nice work and looks like something I want to accomplish in N scale.

Someone else asked this too. Is that Kato Unitrack?
 

Herc Driver

Active Member
Sorry for not replying quickly

Thanks for all the kind words about the layout. Yes, it is very much a beginers layout...one where I'm trying new techniques and scenery changes. Some particulars...the track is Bachmann EZ Track N-gauge, ballasted with Woodland Scenics fine gray ballast (twice to finally get it right). The trick I discovered is adding a small amount of carpenter's glue to the alcohol/water/dishsoap mixture. The plastic sides of the track bed allowed my first attempt at ballasting to run off the edges more than I desired, so a small amount of carpenters glue thickened up the mixture just enough to provide better adhesion of the ballast/glue mixture. Since my LHS doesn't stock railroad paints, I used the model paints they had mixing burnt umber/sienna/rust together until I got the desired rust color on the rails. Had to paint them twice with a 00 brush, but it was worth it. I also darkened the mixture for the turnouts to hide the extra metal that connects the rails of the switch so that they look less noticable. That one thing might have been my best addition to the layout. The turnouts by Bachmann are not very prototypical-looking, but covering up the extra metal that joins the rails made them look much better. There are many many small details I'd like to improve and incorporate on this layout...and yes, dad may not run them as much as the kids do, but certainly enjoys working on it (and buying new engines/cars for it too). These three pictures show (1) first ballast attempt: notice the ballasting didn't stay beside the rail ties and all the shiny metal on the turnout that holds the rails together (2) second attempt at ballasting and weathering the rails/turnouts and (3) final weathering and darkening of the turnout rails. There's still a long list of things to improve upon...and weathering the track was first on the list. Hopefully the turnouts look better and don't draw attention like they did before.
 

Attachments

  • Copy of PC240044.JPG
    Copy of PC240044.JPG
    61 KB · Views: 265
  • Copy of P1010250.JPG
    Copy of P1010250.JPG
    53.2 KB · Views: 255
  • Copy of P5160316.JPG
    Copy of P5160316.JPG
    66.1 KB · Views: 264

Herc Driver

Active Member
Thank you for the kind words. SD45 by Bachmann (Spectrum line) that is waiting by the engine repair station for new knuckle couplers on order from the LHS...I mean engine supply depot. The UP by the switch in close up is a Dash 8-40B. Since I fly around the country, I always try to visit a LHS when I can...you sometimes find some great deals or hard-to-find items. It always seems like when I'm on the west coast, you can find all the east coast RR's at a bargin, and when flying around the east, you get a price break on the west coast lines. The internet is great...but I like visiting the local shops and talking to the folks about the products. Plus you can see the train run, pick 'em up and hold them, and check them out before making a buying decision. Plus, I get many weird looks from the TSA xray scanners going through the airports trying to figure out what that little electronic item is. A couple of times I've had to take out my new purchase and explain to them, "hey...it's only a Dash-8".
 

Herc Driver

Active Member
$99 in Portland, OR at a great downtown hobby store. Maybe not the absolute best deal...and I'm guessing I could have done better on line, but I spent two hours talking about trains/layouts, getting tips and information about the product that you just can't get on line. That's worth the extra $$ to me.
 

Herc Driver

Active Member
First DPM kit

Wanted to add this picture of the first DPM kit I built/weathered. I need help on highlighting the offset brick areas around the window ledges/doors and building...just doesn't look righ yet but I can't put my finger on why?!? Any ideas?
 

Attachments

  • Copy of P6290382.JPG
    Copy of P6290382.JPG
    58.3 KB · Views: 160

TruckLover

Mack CH613 & 53' Trailer
:wave: Hi Herc Driver,

You have a pretty sweet N-Scale layout here. You also got some pretty nice engines and the track looks very good.

Keep up the good work. O and, more pictures.
 

shaygetz

Active Member
Sweet:thumb:

Herc Driver said:
I need help on highlighting the offset brick areas around the window ledges/doors and building...just doesn't look righ yet but I can't put my finger on why?!? Any ideas?

Are the raised areas solid or do they have a brick pattern. If solid, they would be concrete lentils and would need to be tan for old concrete, light grey for newer. If brick, the would mormally be the same color as the surrounding brick, the detail itself being the only highlighting.
 

CraigN

New Member
Herc Driver said:
Wanted to add this picture of the first DPM kit I built/weathered. I need help on highlighting the offset brick areas around the window ledges/doors and building...just doesn't look righ yet but I can't put my finger on why?!? Any ideas?
I think it looks pretty good.

A couple of ideas here:

Add some stains to the roof- you can also add some more detail to it like air moving equipment. I have even glued down extra fine ballast onto my roofs before I paint them to take away the smooth look. I've heard of some people gluing down fine sandpaper too.

Add some "soot" to the smoke stacks to make them look used.

Also add some stains under your windowsills.

Take a look at some older brick buildings and you will notice some of this kind of detail.


You're doing a great job so far!

Craig
 

MasonJar

It's not rocket surgery
Take a look at spitfire's website. I think her modular building is still on the front page. It's HO, but will give you some ideas:

www.parkdaleyard.com

I think that the window sills look fine. It's the roof that needs work... It is far too clean! ;) :D There's no aggregate (gravel) which may or may not be protoypical. There should be some air handling units, vents, air conditioners, generators, access hatches, water tank(s), etc, etc depending on what the building is used for and/or what era. Maybe a sign/billboard. Birds on the roof?

If you wanted to change the sills and/or headers for the doors and windows - the sills often collect dirt and dust, which is then washed down the area immediately under the window. Try drybrushing some lighter colours underneath all windows. The headers look like they are the cast concrete tyep, which you have highlighted with a whitish colour. Weather them with a bit of black, instead of the red from the brick.

Hope those suggestions help.

Andrew
 

Herc Driver

Active Member
Good suggestions and my thanks to everyone...this was my first attempt and more needs to be done. Now I know why so many have a "spare parts" bin to draw from - the kit gives you the basic building and nothing more. I'm going to create some of the roof details to add realism...and get some guys up there to tar that shiney roof! Thanks again for all the great suggestions.
 
Top