

Here's my first N Gauge Layout
- Thread starter Herc Driver
- Start date
You are using an out of date browser. It may not display this or other websites correctly.
You should upgrade or use an alternative browser.
You should upgrade or use an alternative browser.
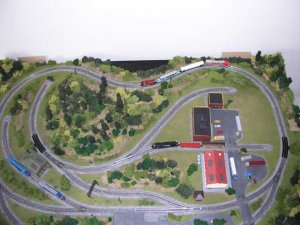
Sorry for a rather hard to make out picture...I'll take a better one soon. Much of the detail was lost as was some of the track layout.
The layout measures 70" x 38".
My prime goal was: Keep everything light weight and accessable - my young kids would be the prime users and I wanted all switch controls and turnout locations easy to reach so if there are any derailments, they'd be able to see it quickly, stop the operations and fix the problem.
I used a finished interior door (cut to size) for a rigid surface that would allow the kids to move it without any problems. When picked up, the door does not flex or bend. (Note: after cutting an interior door you end up cutting off the rigid wood and the end of the door. Unless something is done, this will allow the door face to bend...the cardboard honeycomb inside of this type of door isn't strong enough to prevent the flexing and bending. I found a common yard stick is the perfect answer. Cut to length, it exactly fits inside the door faces and can be glued in place giving the end of the cut section of door the rigidity it needs.) I installed furniture glides on the bottom of the door to allow them to slide it easily under a bed...therefore the height was also controlled so that no structure/mountain would exceed 10 inches finished height. The entire layout (I'm guessing) weighs less than 12 lbs. Everything (trees/ballast/structures) is glued in place so that they could turn it upside down and nothing should fall off. Only the vehicles are not glued in place.
Both freight and passenger operations are possible allowing a passenger train to park on a siding while the mainline freight train blasts by (sorry, that is not pictured). The switching area is small - again to allow my kids to move small numbers of rolling stock between the shipping/manufacturing buildings (we're a few buildings short yet...more to come). The track is blocked to allow (after I buy a second power pack) one engine to "feed" cars to the mainline engines. When completed, the switch engine will move cars from the industry area to the blocked track portion and leave them there. A freight train engine will pick the car up and add it to it's string and continue on its way. A passenger train will wait on the siding by the passenger station (located at the extreme south of the layout just out of the picture) until the freight train is parked and make a loop around the layout. This is simple and basic, but right in line with the kids can handle now. I can have one switching cars while the other runs the mainline. And since they like as many engines as possible on the layout at one time, and because I wanted to use all the track I bought leaving nothing left over, I created a seperate parking area for an engine and small string of cars (an engine repair shop will be there one day). Normally, I'll park an engine and cars there running opposite the normal clockwise operation - just to give them something interesting to think about and break up the routine. It also gives them some interesting switching problems to figure out.
Blue insulation board was used to create the hills. I didn't finish them smooth because everyone liked the rugged/jagged look to them. There are no elevation changes anywhere on the layout.
No wires can been seen...all wiring is routed through and under the board. All the track/switches are Bachmann EZ track. The switch controls are all connected and (it sounds crazy but works well) velcro'd to the side of the door so the kids never have to look away while the trains are in operation. (There are no provisions to mount the Bachmann switch controls...so instead of opening them up and drilling holes to mount them...industrial strength velcro solved the problem). They are also wired together and grouped logically. (I guess I did it right because my 6 yr old understands it).
That's about it. Not as elaborate as some, but right in line for what we needed. Right now, this is a non-DCC operation - but some of the engines are "DCC ready" so if we ever graduate, we'll have a selection of engines available (after modifying the track properly). I can also add to the layout in the future with minor modifications by adding some turnouts in key areas to create an "L" or "T" shaped layout as space permits.
What's left to do??? Adding to the scenery, realistic detailing, people, vehicles, do something with the water (that turned into a black lagoon looking thing - I'm convinced only God can create realistic looking water because I certainly can't), more detailing...it's a long list but that's what I like working on while the kids have fun running things.
But as always...any ideas about operations or scenery would be appreciated. I'm still pretty new and learning...and this is my first layout so I'll thankfully take all suggestions you more experienced guys may give.
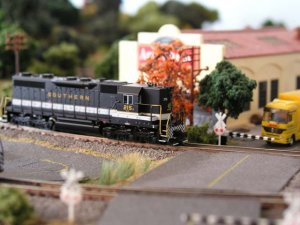
I have quite a boxcar assortment from years gone by that will work...an Amtrak set...and several newer diesels (mostly AC4400s and SM70Ds of Bachmann and Kato, and a few others that I just enjoy to watch). For the layout's industrial base, I plan on manufacturing industries where their products would be boxed and rail shipped (yet receive production materials as well on the inbound). I envisioned this layout just outside the city limits...where the passenger station was just on the edge of town allowing the industries the road access they would require. So for a backdrop, I'm going to look for something that fits that theme...or just end up making it myself. Right now, my biggest dilemma is whether I should switch all the couplers to a knuckle-type from the rapido's that most of my rolling stock has. The Kato's have their own knucklers and I've bought a few microtrains for demonstration/evaluation purposes...so once I decide exactly what coupler everything is going to have...I'll start modifying only those cars I'll plan on running, and maybe having a few cars with a different coupler on each end in case the kids want to see an un-modified car just for their enjoyment. So far, the microtrains are great...the Kato couplers seem rather touchy, prone to releasing a few of the knuckle-type cars (microtrains and roundhouse)...but until I gauge everything, finish tuning the track, I won't blame the couplers.
I'll work on a better picture to post. I'd be interested in comments about my ballast job, and how to better blend changes in scenery (going from a hill to the grassy areas then up to the ballast edges etc). I've been studying the work posted on these boards and must say I'm impressed with the level of the work...so very realistic and instructive too.
I'll work on a better picture to post. I'd be interested in comments about my ballast job, and how to better blend changes in scenery (going from a hill to the grassy areas then up to the ballast edges etc). I've been studying the work posted on these boards and must say I'm impressed with the level of the work...so very realistic and instructive too.

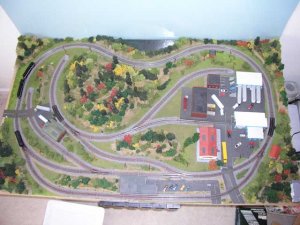
Layout Progress
Thought I'd post some latest shots of what I hope are viewed as improvements to my layout. Road work was finally approved by the state, new buildings added by interested real estate investors, rusty rails and a new ballast job all were recent additions. More building is in the works which necessitates removing a small hill between the two curved tracks on the left of the layout, and other building projects are planned once zoning concerns are addressed at the next city planning meeting. Southern RR Historical Society has been running a restored E8 passenger consist on "executive tours" as well as Santa Fe and UP. Norfolk Southern and Southern diesels dominate the engine roster...but rumor is BNSF and Amtrak will soon be seen running across the main line. UP, CN, and CSX are always present. As always, comments are appreciated.
Thought I'd post some latest shots of what I hope are viewed as improvements to my layout. Road work was finally approved by the state, new buildings added by interested real estate investors, rusty rails and a new ballast job all were recent additions. More building is in the works which necessitates removing a small hill between the two curved tracks on the left of the layout, and other building projects are planned once zoning concerns are addressed at the next city planning meeting. Southern RR Historical Society has been running a restored E8 passenger consist on "executive tours" as well as Santa Fe and UP. Norfolk Southern and Southern diesels dominate the engine roster...but rumor is BNSF and Amtrak will soon be seen running across the main line. UP, CN, and CSX are always present. As always, comments are appreciated.
Attachments


Herc, I think this looks just great. May you have many hours of enjoyment with your kids. They grow up very quickly!
Everything looks great! :thumb:
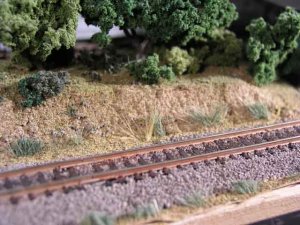
The before and after pics show that you've made quite a few additions, and they all add to the dimension of the layout. Your close-up pics show what a nice job you've done on the ballast and trackside details, such as the tufts of weeds and grass. In my mind, it's the little things like that that make a layout great...not the size.
The before and after pics show that you've made quite a few additions, and they all add to the dimension of the layout. Your close-up pics show what a nice job you've done on the ballast and trackside details, such as the tufts of weeds and grass. In my mind, it's the little things like that that make a layout great...not the size.
Herc Driver, Excellent photos!!! I espically love the second one in the most recent post, I could sit there all day! 8) The only thing I think you could improve is very small, make sure to paint your crossing gates silver! BTW beau-tee-ful high hood SD unit you have there! :thumb:
Nice work! The high altitude photos (did you rent a plane? ") ) show a neatly finished layout and the close ups confirm that. I really like the close up shot of your track with the weeds. The plan looks like switching cars will be challenging and fun. Enjoy!
) show a neatly finished layout and the close ups confirm that. I really like the close up shot of your track with the weeds. The plan looks like switching cars will be challenging and fun. Enjoy!
Ralph
) show a neatly finished layout and the close ups confirm that. I really like the close up shot of your track with the weeds. The plan looks like switching cars will be challenging and fun. Enjoy!Ralph
C
Catt
Chessie6459
Gauge Oldtimer
You're all very kind and I really appreciate the tips for areas to improve. I'd like to improve the realism of the layout...and picking up good ideas from this website is the best place I know. (I need to improve the picture taking abilities too...but that's another story.) Next on the list is weathering the buildings/rolling stock/engines and finishing the track detailing...