Come along on our adventure

cabdriver

Member
Jan 23, 2005
207
0
16
68
Well all, IT'S FRIDAY !! :thumb: :thumb: :thumb: :thumb:

It's been quite a week and as you can tell, we have not made that much progress on our layout. The weekend is here, full of possibilities! :D :D

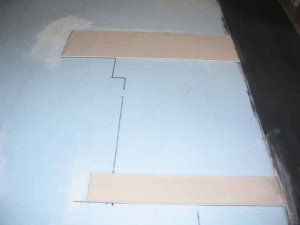
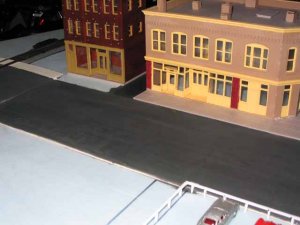
We are determined to get more of the buildings completed to the point that we can set them on the layout to determine spacing, alleys and placement of the cross road. Since our CA+ problem, we have been going slowly and carefully on the models, and think we will move away from this glueing material to more non-toxic, model/window friendly glue. (It's just so handly since it will connect the pieces in a matter of seconds). Anyway, once we have that, this weekend we plan on laying the new road and alley way and then painting said surfaces. Don't know if we will get to laying the gravel bed for the gravel company, but that is slated as one of our big milestones. I'm personally looking forward to getting the roads and alley done and then striped (obviously not the alley). I'm still a bit worried about the best way to stripe the roads, so I am studying up on the topic on this forum.

We'll hopefully make some great progress this weekend and will be posting pictures as we go. Thanks all for following along with us and for all your great suggestions! :wave: :wave:
 

cabdriver

Member
Jan 23, 2005
207
0
16
68
Wooo Hoooo !!! :thumb: :thumb: :) :) :) :) ACCOMPLISHMENTS !!! :thumb: :thumb:

Well, we've been workin' on the railroad....or at least the layout. Went to work early this morning on getting the buildings laid out on the bench so we could determine where the secondary road should be. In the process, we realized that we did not have to finish building the "building" to get the layout since the base of the building gave us the layout including sidewalk areas -- duh! :eek:ops: :eek:ops: Once that embarassing moment was addressed, we got the layout finalized. Decided to run the secondary road next to the multi-purpose building and have it make a T connect with the main road. We decided not to continue the road across the main street and instead decided to put a gravel based area next to the car dealership where cars could be displayed (not done yet). With a bit of a hint from our local car dealership here, we designed and built a rather low "fence" that surrounds the dealership gravel area. I'll show you the fence in another post, but I must say I am really pleased with the results -- I have never thought of something like this fence, visited the LHS to get some styrene, and then cut and built this fence with the results very close to what I was hoping. I am getting so hooked on the modeling side of this hobby! Also got the alley laid out in asphalt.

Here are some pictures in progress. Here is the road and alley unfinished.
 

Attachments

  • Secondary Road Unfinished.jpg
    Secondary Road Unfinished.jpg
    24.1 KB · Views: 75

cabdriver

Member
Jan 23, 2005
207
0
16
68
OK, then we painted the road and alley with Woodlands Scenics Asphalt color. Sanded with 220 grit then painted and smoothed again "literally by hand". I'm still having trouble with the reflection off of the layout at night, so I'm taking pics at some odd angles. Hope you get the idea.

Here is a pic of the secondary road and you can see the alley in the background. I don't have a sidewalk built in front of the last building, so you can see the paint overflow and the foam bed in front of the building. Please ignore this. :p
 

Attachments

  • Alley and Car lot fence.jpg
    Alley and Car lot fence.jpg
    41.9 KB · Views: 78

cabdriver

Member
Jan 23, 2005
207
0
16
68
Can't really see the secondary road in that pic. Here it it.
 

Attachments

  • Secondary road high level.jpg
    Secondary road high level.jpg
    37 KB · Views: 132
  • Secondary Road low level.jpg
    Secondary Road low level.jpg
    36.8 KB · Views: 104

cabdriver

Member
Jan 23, 2005
207
0
16
68
OK. Now here's the stuff I am really excited about :) I know that to some of you professional modelers this must look sooooo amatuerish (sp ?), but you know what, I envisioned something, built it, and it looks good to me!! :D :D :D

Here's how it happened. Once we had determined that we wanted to have our car lot next to the dealership, we decided that we wanted the surface to be gravel with an entrance on one side (near the dealership) and an exit on the other side. One of the kids said that we should put up a fence, not a chain link fence, but the type of fence you often see made out of metal that is really a set of bars laid on top of other bars that would keep anyone from just driving off with the car. Well, I thought about it all morning, then went to the LHS and found some styrene that looked like the type of steel we had seen. We then cut it up and glued it together, then placed it on the layout to see the effect. We don't have the gravel in yet, and the fence is not yet painted, or glued down, but I have to say it has the desired effect. We'll get it painted shorly and can now move on with the gravel works.
WOOO HOOO :thumb: :) :) :)
Cabdriver
 

Attachments

  • Car lot fencing low level shot.jpg
    Car lot fencing low level shot.jpg
    44.4 KB · Views: 80

cabdriver

Member
Jan 23, 2005
207
0
16
68
Let us know what you think! :rolleyes: :rolleyes: Here's one last shot of the parking area with the new, unpainted, fence. Hope you all ejoy it.
 

Attachments

  • Car lot with fencing.jpg
    Car lot with fencing.jpg
    44.9 KB · Views: 109

Shlitz

New Member
Sep 6, 2004
25
0
1
56
Bartlett, IL
trains.acsipc.com
My Two Cents

I'll admit I'm a browser too. :eek:ops: I love to see the pictures. I am in the process of building my fourth layout all in the same space in my basement. Model railroading is an ongoing learning process.

When I was younger and learning to remodel my basement my mentor would tell me ah, your next house will be great.

I believe it is impossible to do everything right the first time and that is the fun of it all. Someday you may be the one offering help to others.

Thanks for posting your efforts so far. I look forward to seeing more of your posts and progress.:thumb:
 

cabdriver

Member
Jan 23, 2005
207
0
16
68
Hi Shlitz, thanks for the note. :wave: I certainly browse many more threads than I post. We're glad to know that there are other model railroad fans out there like you enjoying our pictures and progress. Hope you keep browsing. Fourth layout -- I can only imagine.
 

cabdriver

Member
Jan 23, 2005
207
0
16
68
Livesteam, yes, in my little HO world that is my car and I am driving it around all over town -- you probably can't tell but that's me sitting on the hood.:cool: Don't worry that I'm parked at the dealership -- I'm just visiting. ;)

I did tell the kids that its interesting that so far the only vehicles in our town are sports cars (with the sole exception being the VW bus). :eek:
 

FiatFan

Member
Jul 16, 2004
191
2
16
Cabdriver, you and your family are doing a great job. One thing I learned (one of the forums but I don't remember where) is now that the road is black, take some white powder and swirl it on the road with a paint brush. It really makes a difference. You don't want too much and remember to swirl it on. If you just brush it on in a straight line, it wonn't look right. You can use talcum powder or what I did was after I sanded the road smooth, I collected the powder and put it on after the paint was dry.

Good luck!

Tom
 

cabdriver

Member
Jan 23, 2005
207
0
16
68
FiatFan,
Thanks for the post. We have been thinking about making the road surface a bit lighter to indicate age. We have tried to put some powder (mostly from road surface sanding or plaster dust) on the road several times, but we're not happy with the results so we remove it (and touch up with paint if necessary). Not sure exactly what we want to do here. Do you have any pictures of the technique and results you are talking about? We'd be interested to take a look.
 

cabdriver

Member
Jan 23, 2005
207
0
16
68
Ralph, thanks for the note -- I'm flattered. :D I'm not totally happy with the picture, but now that you mention it, I might try to mock something up -- will need to get the gravel lot in first and see if I can get a better shot. I'll check to see when the contest ends -- if end of March, then no prob. Do you have a "Total Amatuer, First Time" category? :p :)
 

cabdriver

Member
Jan 23, 2005
207
0
16
68
OK. Here we go.....Another design point project. :) We've decided to modify our train station by making a wooden platform underneath it. We really don't like the plastic platform and aren't happy with painting it cement color like a sidewalk. We saw an article on refinishing train stations in the February issue of Model Railroader magazine entitled "Suburban station renovation" (page 72). In it, the author adds a wood surround platform. We're going to try something similar, but slightly different. We really like the idea of having a wooden platform for the passengers to stand on while waiting for the trains to arrive. So, we'll give it a try and post some pictures here. This will take a few days so stay tuned.

Other projects are still in active progress on the layout. :) We're multi-tasking here guys ! :)