Come along on our adventure

Pitchwife

Dreamer
Apr 23, 2001
1,728
0
36
71
The middle of nowhere Oregon
Visit site
What a lot of towns do is cut out a square of sidewalk and plant the trees in the middle of it. Cut down deep enough through the sidewalk to plant the base of the tree in it and cover with a thin layer of dirt to hide the base. Then you have the support of the base without seeing it.
Looking better all the time. :thumb: :thumb:
 

Doc Holliday

Member
Oct 27, 2002
613
0
16
Big Valley, California
Many urban areas use tree well covers like those shown HERE to cover the hole in the sidewalk to keep people from falling in them. You can probably find a top view and reduce it to your scale and glue a picture around the tree trunk to help hid the fact that you cut off the base.
Doc
 

cabdriver

Member
Jan 23, 2005
207
0
16
68
Guys, you have given me so many options on the downtown tree front. :eek: First thing I am going to do is get the base off of the trees as you all suggest, then drill down through the sidewalk and "plant" the trees. :thumb: Not sure exactly how I'm going to model around the base of the trees -- will try a few things and see what you all think. :eek: :D I like the tree covers that Doc suggests -- I've seen those many times myself. I still haven't given up on the idea of putting a metal "basket" around the tree. :D :D Guess I would need to model it then get some feedback from the-gauge. :) :eek: :wave: :thumb:
 

cabdriver

Member
Jan 23, 2005
207
0
16
68
WHOO HOO -- We're Back

Well, after a relatively long hiatus, I'm happy to say that we are back at the Railroad! :wave: The summer was an amazingly busy time for our family. I can't believe I had to go to the 5th screen in this forum to find our thread. :eek: Anyway, here goes.

Dusted the track off, made sure everything was still running (yeah :thumb: ). All's well. I am working on the last main town structure for the layout -- once in place, then we'll be able to do some scenery work around town.

I finally got a 55 chevy for the laout -- this was one of my favorite cars growing up. My Dad had one, passed it down to me, then we sold it many years later -- drove it well into the 70s. Wish I still had it. Seeing that car on the layout really makes the whole scene real to me. What fun :p .

Here are a couple of pics to get things started back up.
 

Attachments

  • 55 Chevy2.jpg
    55 Chevy2.jpg
    51.3 KB · Views: 77
  • 55 Chevy.jpg
    55 Chevy.jpg
    41.8 KB · Views: 85

Ray Marinaccio

Active Member
Aug 4, 2003
1,940
0
36
66
Dewey Az.
Visit site
Welcome back.
Sometimes a hiatus is a good thing,
I have been taking a break on my layout and working on locos and rolling stock.
I'm due to dive back in and build a mining scene soon.
 

cabdriver

Member
Jan 23, 2005
207
0
16
68
Thanks, Ray....

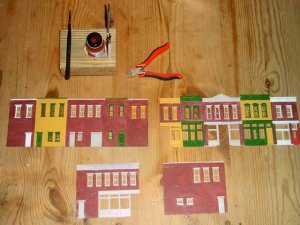
Well, one of the main anchor pieces remaining is the Cornerstone Merchants Row I section. I have been looking for this piece in the LHS as well as eBay, and finally found it locally for a great price. I bought some paints from the LHS as follows: All paints are Floquil -- Mineral Brown (for the side walls), MKT Green (for the accents), Reefer White (for accents), UP Armor Yellow (for accents and brick color -- have to have the UP colors, you know), and then ATSF Red (for the door accent color). Having used many other color manufacturers, I must say that the Floquil is very easy to use. I undersprayed the entire model with a base of flat gray spraypaint (can) specifically designed for plastic. I let this dry, and found that once I had done this, the Floquil painted very nicely in an even coat -- My previous experience without the underspray was that the paint had a hard time sticking to the plastic. And no, I'm not using any fancy airbrush for the paint -- all is by hand with brushes. I found the Floquil literally flowed nicely over the surface area and was easy to work with, no thinning required.

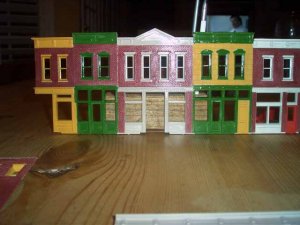
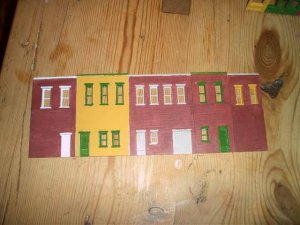
Here are a couple of pictures of the various panels being having been painted, but not assembled.
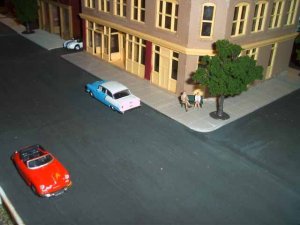
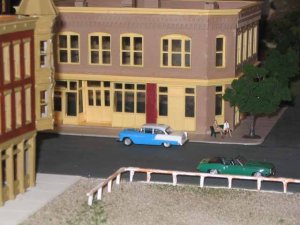
 

Attachments

  • merchants I 1.jpg
    merchants I 1.jpg
    51.2 KB · Views: 32
  • merchants I 2.jpg
    merchants I 2.jpg
    46.3 KB · Views: 31

cabdriver

Member
Jan 23, 2005
207
0
16
68
Will need to clean up a few of the lines, then dull the whole thing down to get the sheen off. A lot of the sheen you see is due to the flash -- it doesn't really look that shiney in reality. One more picture.....
 

Attachments

  • Merchants I 3.jpg
    Merchants I 3.jpg
    46 KB · Views: 76

cabdriver

Member
Jan 23, 2005
207
0
16
68
I've also added a water tower to the layout -- here is a picture of the tower -- not yet in its final resting place -- just placed on an open spot for sizing purposes. I plan on adding the name of the town on the side of the water reservoir and then weather the whole thing.
 

Attachments

  • water tower 1.jpg
    water tower 1.jpg
    37.9 KB · Views: 36
  • Water Tower1.jpg
    Water Tower1.jpg
    41.4 KB · Views: 74

cabdriver

Member
Jan 23, 2005
207
0
16
68
One more shot of the chevy :D -- Gratuitous, I know, but heh...:) :D :D
 

Attachments

  • 55 Chevy.jpg
    55 Chevy.jpg
    49.2 KB · Views: 77

cabdriver

Member
Jan 23, 2005
207
0
16
68
Oh, and yes, the store in the background needs painting. :p Will have to get the crew out there soon. ;) :thumb:
 

Bill Nelson

Well-Known Member
Dec 14, 2008
2,680
467
78
Clarksville Tn
I just stumbled across this wandering around the site. This is shaping up nicely


Bill Nelson (Hiding out in the logging, mining, and industrial section.)