Bashed Atlas Turntable Project.....

Iron Goat

Member
Apr 9, 2004
559
0
16
85
Missouri
Visit site
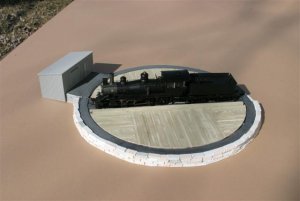
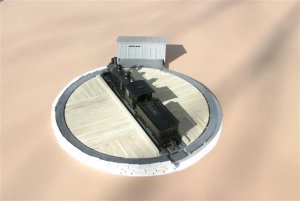
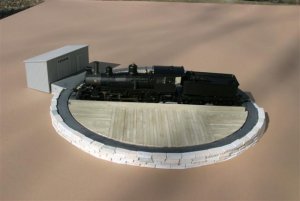
I model the Montana Western Rwy (circa 1948-50)... which was small feeder line that served the GN, and had two small lokeys and one gas-electric. I wanted to have a prototypical Laws type covered turntable to just turn the engines, as they only had a two stall engine shed that didn't require a T/T for that function.

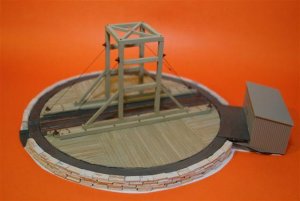
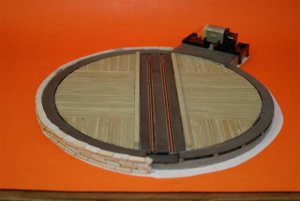
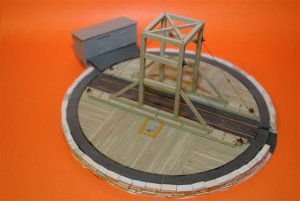
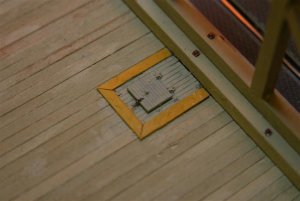
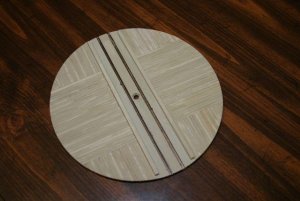
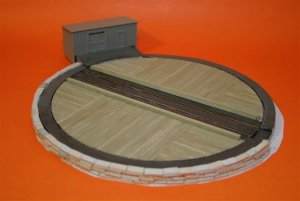
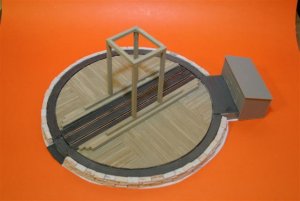
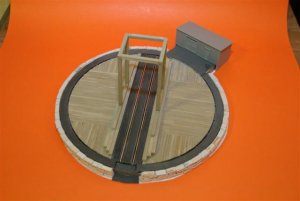
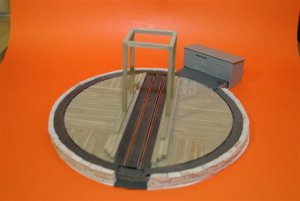
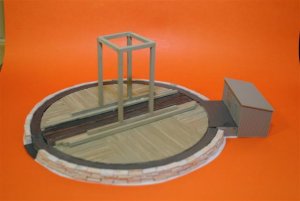
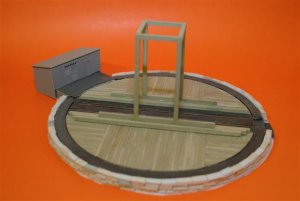
The Atlas HO table is nicely engineered, but it is not the best looking piece of equipment.. so I decided to try my hand at bashing the little Atlas... I first wanted to lay a wood deck made of driftwood stained stripwood, and then add styrene "diamond pattern" steel deck plate walkways, and track area. Next I wanted to add a stone wall around the perimeter of the deck & walkway. I have the stone wall half finished, and when that is completed I will add the Laws framework (timbers & anchor chain devices), and finally a scratchbuilt supply shed to house the T/T motor (as the Atlas shed can certainly be improved upon).

I would appreciate any critique comments... Bob
 

Attachments

  • IMG_4524 (Small).JPG
    IMG_4524 (Small).JPG
    43.4 KB · Views: 513
  • IMG_4537 (Small).JPG
    IMG_4537 (Small).JPG
    32.8 KB · Views: 514
  • IMG_4539 (Small).JPG
    IMG_4539 (Small).JPG
    31.3 KB · Views: 504
  • IMG_4542 (Small).JPG
    IMG_4542 (Small).JPG
    30.8 KB · Views: 514
  • IMG_4541 (Small).JPG
    IMG_4541 (Small).JPG
    31.4 KB · Views: 502

Iron Goat

Member
Apr 9, 2004
559
0
16
85
Missouri
Visit site
Here is the latest progress photos on the T/T project.... and yes, Russ, I'll be weathering it after I am finished with the bash & scratchbuild process.... and yeah, Kevin, these are fun to modify and bash. I've always wanted a turntable, but the space just wasn't there so I decided to squeeze one in anyway!

Bob
 

Attachments

  • IMG_4556 (Small) (Small).JPG
    IMG_4556 (Small) (Small).JPG
    35 KB · Views: 432
  • IMG_4555 (Small) (Small).JPG
    IMG_4555 (Small) (Small).JPG
    31.2 KB · Views: 436
  • IMG_4553 (Small) (Small).JPG
    IMG_4553 (Small) (Small).JPG
    30.3 KB · Views: 427
  • IMG_4549 (Small) (Small).JPG
    IMG_4549 (Small) (Small).JPG
    30.3 KB · Views: 415
  • IMG_4545 (Small) (Small).JPG
    IMG_4545 (Small) (Small).JPG
    30.8 KB · Views: 418

Iron Goat

Member
Apr 9, 2004
559
0
16
85
Missouri
Visit site
Thanks, Josh... but this one has really racked up the man-hours for me. All that stone work, and cutting & gluing stripwood really adds up. I'm glad I did this one, but I'd need to think hard about doing another anywhere in the near future.

I am waiting on turn-buckles and wire at present, so I am working on the scratch built shed in the meantime.

Bob
 

ocalicreek

Member
May 4, 2005
824
0
16
48
Puyallup, WA
groups.yahoo.com
Looks great so far, Bob!

Are you using actual 'driftwood' floquil stain? Careful - that's strong stuff!

What are you using for stone?

And finally, I just love the orange backdrop, btw. A refreshing change from the oft employed gray or subdued tones we usually see/use.
 

Iron Goat

Member
Apr 9, 2004
559
0
16
85
Missouri
Visit site
Thanks, Galen...

I ran out of the "real thing" a while back, now I am using "Aged Driftwood Solution" that I get from: Dr. Ben at www.drbens.com . This is a lot easier to work with, and it delivers the same results IMHO.

I also get the stone blocks there, look for Dr. Ben's Baby Building Blocks (how's that for a tongue-twister...).

Bob :wave:
 

Iron Goat

Member
Apr 9, 2004
559
0
16
85
Missouri
Visit site
Thought I'd post the latest progress shot of my turntable project. I still have to finish the scratchbuilt shed to replace the Atlas one, and then do some serious weathering.

Bob
 

Attachments

  • IMG_4581 (Small) (Small).JPG
    IMG_4581 (Small) (Small).JPG
    36.5 KB · Views: 286

CAS

Member
Apr 10, 2005
242
0
16
61
Chicago, Illinois
but this one has really racked up the man-hours for me. All that stone work, and cutting & gluing stripwood really adds up. I'm glad I did this one, but I'd need to think hard about doing another anywhere in the near future.

I am sure it took some time to do this bash. The wood, and stone carving looks awesome.
Great job, Bob.
Keep those pictures rolling.

CAS
 

steamhead

Active Member
Apr 16, 2005
2,360
0
36
75
Brownsville, TX
That's great work, Tom...!!!

I bashed the older version, but built-up a bridge so I could sink the base. Turned out OK, but last night, it sounded like a gear is giving up....Do you know if the new version is a drop-in replacement for the old one?

Keep them pics comin'...:thumb:
 

Iron Goat

Member
Apr 9, 2004
559
0
16
85
Missouri
Visit site
Thanks, guys.

Gus: I've heard that they are interchangable, but not 100% certain.

Loren: I bought Plastistruct sheet styrene in the "diamond" safety tread pattern (the kind of steel sheet material that they make cat-walks, running boards, etc. out of in real life) and I cut it to fit the perimeter area and simply glued it to the tops of those wedge shaped dividers between each indexed track position, covering track positions that I was not going to use. The prototype T/T was used only to "turn" the loco's, but if I need to add "indexed" tracks later, two cuts with my Exacto blade and it's done. The stone wall and the walk-way were both attached with GE-II silicone adhesive, so that it would not be a problem to modify either one.

I cut out a pattern of my walk-way first, then did most of my stone wall work, and then added the "steel" walk-way. I hope the attached photo helps you visualize it a little better. If you have any other questions, fire away.

Bob
 

Attachments

  • IMG_4531 (Small) (Small).JPG
    IMG_4531 (Small) (Small).JPG
    32 KB · Views: 264

Iron Goat

Member
Apr 9, 2004
559
0
16
85
Missouri
Visit site
Nope!!! That's a Plastistruct sheet (comes in Grid and Diamond Safety Tread designs)...
it took long enough to do all the other stuff without scribing my own styrene.

Bob
 

ocalicreek

Member
May 4, 2005
824
0
16
48
Puyallup, WA
groups.yahoo.com
wall1 No no no, what I meant was, did you scribe lines into the plastruct sheet to make it look like individual PANELS of the diamond plate material. In other words, real diamond tread sheet metal (I'm guessing) doesn't come in a giant ring, it was probably in big sheets that were torch cut to fit in place on the turntable and welded to each other.

It's not a major detail and most folks probably won't be looking for it...it'd be a nice added touch, however, and a place to make any rust effects really stand out...perhaps also to have weeds grow through any gaps between the plates...

It really does look awesome as is, I'm just picking nits.:thumb:
 

Iron Goat

Member
Apr 9, 2004
559
0
16
85
Missouri
Visit site
Right you are, Galen... but I really did score lines, but I am afraid I did not scratch deep enough as the two coats of paint filled them in. I plan on re-scribing when I start my weathering process, which will be my last task on this project.

At present I am working on a small detail that are among many that I have omitted... and that is a hatch in the deck of the T/T for maint. and clean out purposes.

Thanks, Bob
 

Iron Goat

Member
Apr 9, 2004
559
0
16
85
Missouri
Visit site
One of the guys from the train club that I belong to, posed the question of how they would access the below deck area of my T/T to perform maintenance, and clean-out? (This guy's got Eagle Eyes like Galen!)

Well, the more I thought about that one, the more I knew the little workers on the Montana Western would be on my case if that wasn't fixed pronto. I dug thru my parts box, and slam-bammed an access hatch together... I usually try to follow the old rule, Less is More, so I hope I didn't over-do it with this latest add-on.

Now, back to the shop.... Bob
 

Attachments

  • IMG_4587 (Small) (Small).JPG
    IMG_4587 (Small) (Small).JPG
    37 KB · Views: 174
  • IMG_4589 (Small) (Small).JPG
    IMG_4589 (Small) (Small).JPG
    35.9 KB · Views: 172