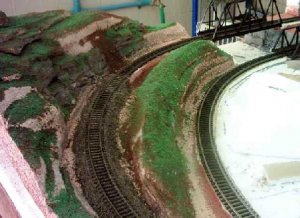
Base paint color

This is my first genuine attempt at building a model train. I want to model mountainous/hilly terrain which is found in the Rockie Mountains of Canada, but can't seem to get the proper paint tone. I use a foam base for my hills and mountains. I've tried three different shades of acryllic paints already, and have not been satisfied with any. The first one was too red in color, the second too dark brown, and the third one (as seen in the attached photo) seems too "pink" and only makes my hills look like something from Australia or a tropical country. I bought these paints at a local TOA paint store here in Thailand and they all have numbers indicating the tones (unfortunately the numbers are written on receipts which I keep at work). I don't know whether the numbers are part of an international coding system or only apply to the local paintstores here. They do use a computerized system to mix the paints however, so the chances of them using an international color coding system seems likely too me. I would appreciate if someone could suggest some good color 'numbers' to use for the base if I am modelling the mountains of western Canada. I won't be able to go on with the rest of the layout (such as adding trees and shrubs) until I'm satisfied with the base color of my layout. This is my first post, but I've been visiting this site for tips over the last 6 months and must say that I admire how very friendly and helpful everyone is. It's a very good forum.
moz-screenshot-1.jpg
 

ezdays

Out AZ way
Feb 3, 2003
6,339
0
36
Arizona
bigbluetrains.com
Too start with, welcome to the Gauge.

There is a paint standard used by printshops and could be used for color matching just about anything else. It is called Panatone. It is a universal array of colors which are defined by numbers. That could be the numbers your paintshop used, unless, they are mixing colors, then you would have a series of letters and numbers like:C4, E8 and so forth. That represents the tint color (letter), followed by the amount of that color added to the base white.

Now, if you go to the photo forum, there is a thread there at the top taking you through how to post a picture here. You need to upload your picture using "manage attachments", you cannot link to a picture on your hard drive, which is what you're trying to do. Go there and follow the steps,, and if you need more help, let us know. We can then be able to comment on your color problems.
 

Woodie

Active Member
Mar 23, 2001
2,093
0
36
Northern Rivers NSW Australia
Douglas,

Have you put anything over the foam base you are using? Are you trying to paint the foam directly? You need to put something over the foam that will take the paint correctly. Say, plaster bandage, or plaster soaked paper towels. You can then use plaster to mould some rocks and crevices that you'd like to put on the hills.

You also don't say if you are using the paints straight from the tin/jar/bottle/tube. If they are acrylic paints, then you need to water them down considerably. 1 part paint, to, say, 10 - 20 parts water. Then daub this all over the plaster and let in run down the crevices. repeat (after letting the first coat dry a bit) using the colours you've got, until you get the right "look" of weathered rock.

This help at all?? :wave: :)
 

Will_annand

Active Member
Jan 12, 2004
1,464
0
36
69
Huntsville, Ontario
www.muskokacomputes.com
Actually Woodie, I am using the Blue Foam and I bought a "miss-mixed" can of brown stain from my local hardware store. It was 1/2 price so I figured I could not go wrong.

I just painted it right over the foam full strength and the stain soaked in and it looks great. Looks like the red clay of the area I am modelling.
 
Hi All,

Thanks for the great advice. I will attempt to upload the picture with this posting (again). The paint color/shade which I used is simply numbered 8615. I chose it from a bunch of sample cards at the store. It seems too pink after it dries. I was painting directly onto the foam straight from the can (no water added). It is called super acryllic emulsion paint and the folks at the shop told me that it is a 'latex' based paint. I think that once I get the right color of paint for modelling the rockies in western Canada then I will start over and try the paper towels soaked in plaster as I would like to have a more natural look with rocks and crevices mentioned by Woodie. I hope the picture attachment works and you can give me some more ideas about the proper paint color or any other good ideas to get the desired look.
 

Attachments

  • Hills (47B).JPG
    Hills (47B).JPG
    34.8 KB · Views: 98

ezdays

Out AZ way
Feb 3, 2003
6,339
0
36
Arizona
bigbluetrains.com
OK, it looks like you can upload pictures now, good, we can now see what you're talking about. What I did was go to Wal Mart and like you, have them mix me a gallon of flat wall paint in a light tan. I also have some of their small bottles of acrylic paint from the craft dept that I use to tint the tan to suit the color of the terrain I am trying to achieve, sometimes darker, sometime lighter.

I am in the process of expanding my layout. The original area has a lot of hills and I covered it all in either paper soaked in plaster, or just pre-mixed joint compound. The new area will be mostly flat, so I just painted a base coat of medium brown right over the blue foam. It may eventally all get covered over, but if any of it peeks through, I hope it will look like spots of dirt. Incidentally, the foam covered fine with just one coat.
 

spitfire

Active Member
Jul 28, 2002
3,448
0
36
75
Toronto, Canada
www.parkdaleyard.com
That looks pretty good to me Douglas! The thing is that earth is light tan when dry, darker when wet, and rocks are usually various shades of grey. Painting on plaster will give you different colour results from painting on blue or pink foam, so if you're ultimately going to use plaster, I would experiment on a small patch first.

The rock of the Rockies is made of limestone, dolomite, sandstone and shale. These are sedimentary rocks, layered and the mountains formed by being pushed up due to plate techtonics. Here's a good site that talks about the composition of the Rockies.

http://www.mountainnature.com/Geology/Deposition.htm

And here's another with a good picture showing both the mountainous rock and some earth and vegetation:

http://soils.usda.gov/gallery/photos/landscapes/rockies.html

Hope this helps.

Val
 

Woodie

Active Member
Mar 23, 2001
2,093
0
36
Northern Rivers NSW Australia
Douglas,

If you have a look at my "ahhh. that's better" thread click here ,I've actually deliberately made it look like some parts of Australia, with the red, as you suggest yours turned out looking like accidentally!! :cool: .

I use cheap artist acrylic paint from the local hobby/art shop in a small tub or tube.

That rock was made using the method I suggested, then put a layer of plaster over the "cutting" of about 1/2" thick, and scoured it with a fork as it was setting. I put about a teaspoon of yellow ochre into the paster mix to colour the plaster. (you could use a grey type of colour) so if it chips, it won't have white holes showing through.

I then got about 1/4 teaspoon of the red oxide (you could use a browny type colour, in about 1/2 cup of water, and just daubed that all over it, and let it run down and puddle at the bottom.

Next I got a brown (burnt umber) and did the same (but not as heavy), and then black and did the same again. I did it to ALL the sccenery, including the flatter parts where I would put ground cover.

You need to pick colours that are "earthy" in nature.

For yourself, I'd even be a little daring, and go with a dark "moss" type green in there as well, but used very sparingly as a "wash". (that is what the watered down method of painting is called). to represent the moss/weathing/water staining runnoff of what you are looking to acheive.

There would be no problem in covering what you've already done with paper towel/plaster, even though, from the pic it looks quite OK. I've re-covered stuff I'm not happy with a number of times.

Good luck. :)
 

MasonJar

It's not rocket surgery
Oct 31, 2002
5,362
0
36
Ottawa, Canada
Visit site
Douglas,

Experimentation is what it is all about... ;)

I don't think that you will ever find that "one" perfect colour. In fact, you will probably get a better result with multiple colours - browns, blacks, greys, tans, "burnt" colours, purple (purple? - yup! :)) whites/off-whites, etc. Real rocks are a combination of many or all of these colours, and more.

The advice of a "base" colour is good, but remember that since much of it will be covered with other materials (vegetation, debris, rock castings, etc, etc) it is really not essential to be absolutely perfect to start with. Any "unaltered" base colour can also be tinted with washes of dilute paint, or the old standby - "inkahol". Put a few drops of india ink in quite a bit of isopropyl alcohol, and spray/brush it over anything that needs to be toned-down.

Hope that helps.

Andrew
 
Hi All,

Thanks for all the really great info and tips. I did go through all the links that you've all recommended and they were all very useful. I'm going to try a light tan color over paper towels soaked in plaster over the weekend and will let you all know how that goes and we'll take it from there. I do have one more question though. When you all talk about plaster, I'm a bit confused because there seems to be so many different plasters to choose from. Is it plaster of Paris, or the stuff you use to fill cracks in the walls? Woodie, your trains look absolutely great and bring back memories of the time I used to spend with my great aunt in Junee, NSW (near Wagga). That was a railroad town. Andrew, thanks for the advice on 'experimentation' - I used to think there was a formula to all this. I'll post a new picture with the results of the experimentation I plan to do over the weekend.

Douglas
 

ezdays

Out AZ way
Feb 3, 2003
6,339
0
36
Arizona
bigbluetrains.com
Douglas,

When I use paper towels soaked in plaster, I use plaster of paris since it is fairly cheap and hardens quickly. One problem is that it dries very hard and had problems if it was underneath my rails and I had to drill holes for the rail nails. When I need to make rocks or other textured surfaces, I use joint compound since it take hours to dry and can even be worked somewhat the next day, dependent on the thickness.
 

Woodie

Active Member
Mar 23, 2001
2,093
0
36
Northern Rivers NSW Australia
douglasarcher said:
When you all talk about plaster, I'm a bit confused because there seems to be so many different plasters to choose from. Is it plaster of Paris, or the stuff you use to fill cracks in the walls? Woodie, your trains look absolutely great and bring back memories of the time I used to spend with my great aunt in Junee, NSW (near Wagga).
Douglas

Thanks for the comment, Douglas. :)

I just bought a big 10kg bag of plaster from the hardware shop. a scoop outa that, with about 1 litre of water. They tell me that adding a teaspoon or so of vinegar slows down the setting process, but I don't see it. Perhaps I should use more vinegar!! :eek: If you use plaster, then make it pretty sloppy. Sorta gravy/custard type sloppy. It goes off pretty quick so about 1 litre at a time should be plenty. Just use an ice-cream container/tub. You don't have to use paper towel, but it's cheap. Some use (if you're familiar with Aust) Chux Superwipes.

As the remains of the slop starts to set, then paint it on what you've done so far to thicken the paper layer up a bit. It can get pretty messy this way, and I'd prefer to use plaster bandage. You know, the stuff they wrap up a broken leg in. But that can get a bit expensive if you've got a large layout. But don't forget to colour the plaster slop a bit first, and use a "wash" for the other colours.

Good luck, and looking forward to seeing the results. :thumb:
 

Glen Haasdyk

Active Member
Feb 2, 2004
1,283
0
36
53
Kelowna, BC
Visit site
Douglas,
I'm modeling the Canadian rockies as well and I just finished making the cliffs for my layout, using hydrocal, it's a slightly harder and cheaper version of plaster(got a 50 pound bag for 30$) I made rock castings to form the cliffs using latex rubber molds of real rocks (I made my own but woodland scenics sells them)
For painting them I went to the local craft store and bought cheap bottles of acrylic paint (1$ each) For my rocks I used :Sandstone, storm cloud grey and Iron oxide. Iron oxide is a redish brown, raw sienna will work as well.
First I painted the entire rock with full-strength sandstone which gives it it's base color.
then I thined the storm-cloud-grey with water and a couple drops of liquid dish detergent (the detergent breaks the surface tension of the water, making it flow better) Thin the paint till it almost has the constistency of water so you create a stain-like liquid. now you can apply it to the rocks by either a brush or what I use, a cheap water spray bottle. spray the rocks down thoughly and let it set in a bit, using the grey wash you can make the rocks as dark or light as you wish. It also adds depth as the darker color will seep into the cracks and crete shadows. let this dry overnight.
Finally take the iron oxide or raw sienna and 'dry-brush' the surfaces of the rocks. Dry brushing is when you put a little paint onto your brush and then rub it out onto a paper towel, taking almost all the paint out of the bristles, then lightly go over the rocks. when you do this you highlight the raised portions on the cliff, giving it depth.
I have taken pictures but then aren't ready yet. I'll post as soon as they are.
 
Hi Glen,

Thanks for the grear advice. I just wished I had some time to to work on my railroad. Very busy the last month. I did try the paper towel soaked in plaster approach like some of the others suggested. Unfortunaltely it didn't work out well and i have to start from scratch. The plaster didn't harden enough. I think my mix was all wrong and sure did get real messy. I'm waiting for some free time to try again though. I'd love to see some photos of your Rockie Mountain modelling progress too.