Walthers 2-stall engine house

HoosierDaddy

New Member
Dec 2, 2004
49
0
6
56
Enemy Territory
I just got this kit and I thought that before I got started on it, I'd ask if anyone else had built this kit. If so, any tips or tricks to building this, or any ideas for interesting modifications? I model the late '40s, so this will likely be a still used, but less than new facility for the railroad.

09330000003007.gif


HD
 

radar

Member
Jan 14, 2007
122
0
16
64
wichita , KS
ya I've built 1 could not get the doors to open fully by using Walther's parts. so i just glued them open. Its best not to glue on the roof so you can get inside for detailing and a stalled loco.
 

Attachments

  • DSCN0032.jpg
    DSCN0032.jpg
    199.1 KB · Views: 16
  • DSCN0025.jpg
    DSCN0025.jpg
    165 KB · Views: 22

HoosierDaddy

New Member
Dec 2, 2004
49
0
6
56
Enemy Territory
Dave,

Thanks for replying. That is a nice job you did on yours. The rust streaks around the smoke jacks looks really good. The bit of advice about gluing on the roof is a great tip that I might have overlooked.

HD
 

wjstix

Member
Nov 18, 2004
212
0
16
65
It's a good kit. The doors can be a little finicky but I was able to get mine to work OK. One tip is to paint it before assembly, perhaps paint the inside and outside of the walls light gray, then lightly sand the bricks on the outside so the red of the plastic shows thru, but the interior stays gray. With the large windows and doors, it's a good building to light and add interior detailing too. The gray will look better (real enginehouses or roundhouses were often light green or gray inside) and help the building from "glowing" when you light it up, plus of course it will look like mortar once you sand the bricks.
 

doctorwayne

Active Member
Sep 6, 2005
3,516
0
36
Canada, eh?
A good way to strengthen the roof to help it to stand-up to repeated removals is to use some .060" sheet styrene to make gussets. Trace the shape of a gable end on the styrene (you can make the gussets so that they extend from the peak down to the tops of the side walls, or from the peak down only partway), then cut out at least three for that structure. (The more, the better.) ;) After you've assembled the walls, cement the halves of the roof together, then place the roof atop the walls. Use elastic bands to hold the roof in the proper position, then add the gussets from the underside, leaving everything in place until the assembly is completely dried. Unbraced, removeable roofs have a habit of "lifting" along the sidewalls over time - the gussets should prevent this.

Wayne
 

HoosierDaddy

New Member
Dec 2, 2004
49
0
6
56
Enemy Territory
I've gotten the kit that I ordered, and I have started working on it, so I thought I would give a little progress update if anyone's interested.

First thing I did was brush paint the brick sections with a color that I had mixed up previously. The paints were thinned, craft acrylics. The brick color was a mixture of barn red with a touch of black, and a bit of tan thrown in. Sorry I can't give you more infor on the paint mix, but it I mixed it more than a year ago. The funny thing is, as you can see in the first photo is that the color is a near dead-on match to the molded in color of the kit. compare the bricks to the sprue, and other than the shine on the sprue, they look nearly identical to me.
IMG_0192.jpg


After the base coat had dried, I mixed up four other accent colors, a dark reddish brown, a tan, a brownish gray, and a slightly darker red than the base coat. These, I individually applied to random bricks to give it some variation in brick color. You should be able to see at least a few of the various colors in the first photo, and more so in this slightly blurry second photo. You can also see the stone color I painted the keystones

IMG_0196.jpg


At this point, the brickwork looked a bit like a spotted dog to me, with a lot of contrast between the brick colors. Since I knew that there were at least a couple of other steps to go, I wasn't too worried.

The next step was to apply a wash of very dilute white acrylic craft paint to all the brickwork to give the brick a mortar effect. The attached photo looks a lot splotchier than it does in real life. The contrast between the brick colors was toned down, but still sufficiently evident to make doing it worthwhile. Overall, I was pretty pleased with how it's turned out so far. The next painting step for the brickwork is a dark wash, but I will probably wait until after assembly to do the weathering.

IMG_0193.jpg


I have also painted the roof a kind of a dull gray/tan color. I don't have any pictures of that, but I'll get some the next time I find time to work on this project. It won't be a quick build, but hopefully it will turn out well.

I've learned a lot from reading this site, so hopefully I can return the favor just a little bit with what I hope is a series of posts on this build.

Any and all comments and suggestions are welcome. You won't hurt my feelings if you post real criticisms.

HD
 

HoosierDaddy

New Member
Dec 2, 2004
49
0
6
56
Enemy Territory
Build Update

I've gotten the majority of this kit built now, and thought I'd share some update photos.

Here is a close-up of an area of the roof. The roof was painted with a mix of grey,black and tan that I mixed together, thinned with water, and brush painted on. The smoke jacks were painted with a mix of black, grey and raw sienna. The rust streaks were various blends of raw sienna and tan, raw sienna and red, and raw sienna, red and tan. All of the rust was dry brushed on, and blended with a cotton swab in some cases. The entire roof was weathered with a very thin wash of black acrylic with attention paid to making downward streaks, and extra color along the standing seams.
IMG_0216.jpg


Here is an overhead view of the roof on the structure.
IMG_0217.jpg


Next is an end view of the structure. It's dark, but I like the look of the back light shinning through the windows. I took these pictures with a lot of overhead light, but the overhang of the roof makes the walls dark.
IMG_0218.jpg


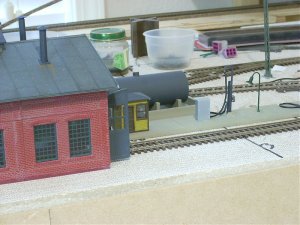
Here is a three quarter view of the structure that shows the front of the building with the doors open. This will be the way the doors will stay once on the layout since they don't clear the rails, and I don't want to trim them.
IMG_0222.jpg


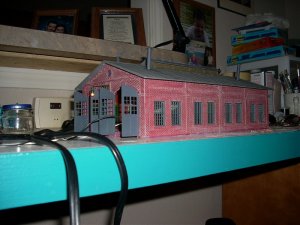
Finally, here is a side view, again kinda dark, but I think gives a pretty good view of what the structure looks like.
IMG_0219.jpg


After i took these pictures, I put the structure on the layout, and then immediately removed it, and started weathering it with some black chalk. No pictures yet, but I may update this thread later when all is complete.

Oh yeah, the roof is not attached, and will stay that way. I did add the one truss that the kit comes with in the middle of the roof to provide some strength. I will add more if necessary if I see that it needs it. I haven't painted the inside, and I probably should have done that before assembly. I may still tackle it, at least near the front, since you can see in the doors and see the unpainted walls and unpainted flange around the windows

I have a question that relates to engine houses, and the tracks into them. Would the tracks be ballasted, or would the rails more likely be set into the concrete floor, like street running tracks. I'm thinking the latter would look better, but I'm not sure how I want to do that, or if it's the right way to go.

Thanks for looking,

Steve
 

radar

Member
Jan 14, 2007
122
0
16
64
wichita , KS
Do not know for sure if the rails where in concrete or paving bricks.I'm going to do mine in concrete (aka) plastic sheet
 

HoosierDaddy

New Member
Dec 2, 2004
49
0
6
56
Enemy Territory
Thanks for all the kind words, I really appreciate it. I'm only now, after 4 years into the hobby, getting to the point where I'm starting to build structures. (Yeah, I'm slow) Since this is the largest one of the three I've built, I'm happy to hear that it looks like a success. I'll have to take some pictures of it now that I've weathered it with chalk, since I think it looks even better now.

Thanks again

Steve