Ting Yuen build report

pbhawkin

New Member
Apr 25, 2005
29
0
6
Mudgee, NSW, Australia
I thought I would do a build of the free-download paper model of the Ting Yuen, a Chinese battleship of the 1880’s (http://homelf.kimo.com.tw/yukiyuji/TingYuen.zip).

A bit of history first:
”These were constructed in the German Vulcan yard and were patterned after and smaller versions of HMS Inflexible. Armed with four 12-inch guns in two turrets amidships and single 5.9-inch guns in smaller turrets at the bow and stern, they were powerful vessels. The central citadel had 14-inch armour plate although the turrets, in reality gun houses, had only one-inch of armour. When they arrived in China in 1886, they were the most powerful warships in the Far East. During the Sino-Japanese War of 1894, they were both present at the Battle of the Yalu with Ting Yuen being the flagship of Admiral Ting. Hit hundreds of times during the battle, the two Chinese Battleships fought off the main Japanese squadron. The 14-inch armour of their citadels proved impervious to Japanese fire. At the conclusion of the war in 1895 Ting Yuen was struck by a torpedo from a Japanese torpedo boat and beached as a total wreck. Chen Yuan was taken into the Japanese Navy and renamed Chin Yen.” (The Chinese Steam Navy 1862-1945 by Richard Wright).

The original is 1/700 scale PDF file, but in order to fit in with my first two ships (V108 and Uruguay Cruiser) and future plans of a 1/250 scale navy I had to enlarge them.
As I have adobe reader V 7 and Paint Shop Pro V8 I simply cut and pasted between these two programs and then printed out sections at 280% (from 1/700 to 1/250 scale) enlargement in order to fit on an A4 page.
Unfortunately this meant that the longest sections were cut between two pages and would have to be joined back together again at time of construction.
The construction report with pictures is at (I don't have website to host pictures):
http://kartonbau-aktiv.de/wbb2/thread.php?threadid=3784


Pic 1. Note A4 page in centre is original size of 1/700 other pages are how many required after scaling to 1/250.


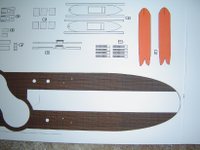
Pic 2. Shows close up of main deck and two ? torpedo boats and parts.
 

pbhawkin

New Member
Apr 25, 2005
29
0
6
Mudgee, NSW, Australia
Do people want me to continue with this report here in the above format or are they happy to link to the German site to view the pictures in all their glory?

regards
Peter
 

Jim Krauzlis

Active Member
Sep 26, 2005
1,490
0
36
68
Copiague, Long Island, New York
Hi, Peter!

It's up to you, I visit the Kartonbau site quite a bit, but it would also be nice to see your build here is you are able. I was wondering if you could set up the photos here so that they are visible when you log on, rather than using the attachment link. You can try using imageshack, which is a free hosting site:
http://imageshack.us/

Using someone like imageshack allows the photos to be displayed automatically. It's not really a problem the way you currently use the linkks, I'm just being lazy. ;-)

She's a nice looking build, and I am enjoying watching her develop.

Cheers!

Jim
 

pbhawkin

New Member
Apr 25, 2005
29
0
6
Mudgee, NSW, Australia
OK, I have worked out how to use imageshack, thanks for the tip Jim.

So I will continue with what I have done so far.

I recoloured the deck, as the original was a very poor striped tan, as well as some of the sky lights/windows and changed the embossed dragons from black to yellow (see Pic 3 below).


Pic 4, above. Instruction sheet!

Normally in card ships you build up an internal frame, attach to a base plate and add sides or deck. However, the designer of this model didn’t have any internal hull frames so I added one out of 1.5mm thick balsa as per Pic 6. The base plate was laminated onto 1mm thick card but despite putting weights on it to keep it straight it still warped (I did spill some water on it though!!). So I made a new one out of 3mm thick balsa (it’s still cellulose based!!) which fixed the warping problem. See Pic 5 for a comparison (also card deck joined together).


Pic 5, above. Warped card deck (top), balsa baseplate (middle), printed card deck pieces joined.


Pic 6. Internal framework and hull sides in place.

Regards
 

pbhawkin

New Member
Apr 25, 2005
29
0
6
Mudgee, NSW, Australia
Pic 3a shows what the original deck looked like prior to my recolouring it.


And this picture is of the deck of the replica of the ship that the chinese have recently finished.


At this stage I built the two ? Torpedo boats as well as the turrets, see pic 7 and 8 below.


Note that there is some conflict as to where the single torp tube is mounted!! Some photos/plans show it mounted in the bow, others show it mounted on top of the stern deck. The roof of the four turrets are convex and so I had to cut along the 4 lines as marked on their roofs and then using a teaspoon rub the inside of them to make them take a convex shape of correct diameter.

regards
Peter
 

pbhawkin

New Member
Apr 25, 2005
29
0
6
Mudgee, NSW, Australia
Pic 9 below shows the completed hull with main armament.


I have also made the front superstructure along with the armoured diagonal barbette, again there is some internal supports to these structures.

Pic 10 below. This shows the superstructure completed and some of the railings in place that were in hard to access areas.


Next it is onto the boat mountings and ancillary deck stuff and masts.
The designer’s plans called for 3 simple tube-like supports under each boat but the photos and plans I have found on the net showed a support framework for all the ships boats except the forward ones which had davits.
I made these out of thin balsa along with cradles to support the boat’s hulls.

The railings are laser cut card from a firm in Germany (Thomas Pleiner), although I have made my own for other ships on a wood frame with drawings of different railings (for correct spacing) and thread, see pic 11 below.


regards

Peter
 

Jim Krauzlis

Active Member
Sep 26, 2005
1,490
0
36
68
Copiague, Long Island, New York
Really looking outstanding, Peter!

This is a very interesting looking ship, and I am quite impressed with how the enlargement is working out for you. I note you are recoloring parts, and I can understand that having looked at the original in 1/700 scale. It's a bit more work, including enhancing some of the smaller parts that are probably deficient in detail once you enlarge, but you photos show how well and worthwhile the extra time spent is in providing a more detailed model.

Glad the photo links are working for you. You can also link using the code they provide for a full sized photo, if you prefer...I just started doing that on my thread and it seems to work out very well.

Looking forward to more updates when you can!

Cheers!

Jim
 

pbhawkin

New Member
Apr 25, 2005
29
0
6
Mudgee, NSW, Australia
Some more details added with the support struts, from balsa, added for the ships boats. see pic 12 below.
On reflection and examining photos of the replica ship, it appears as if the support struts do NOT go all the way across but are divided down the middle. Don't think I will change it though!


regards

Peter
 

pbhawkin

New Member
Apr 25, 2005
29
0
6
Mudgee, NSW, Australia
Hi all

Pic 13 shows her with the masts up and the ratlines in place.
I made the white ratlines out of two sizes of cotton thread on a simple wooden frame with nails to wrap the thread around. I used CA to spot glue each join (this caused me to have an allergy for 4 days!!).
The masts are a combination of old wood handled paint brushes, tooth picks and satay sticks!
Also note that there are bollards and anchors (from T.Pleiner) in place and covers over the anchor chain outlets.


Pic 13a is the same photo but with no camera flash. What a big difference in the colour!


Regards

peter
 

pbhawkin

New Member
Apr 25, 2005
29
0
6
Mudgee, NSW, Australia
Pic 15 , below, show a close up of how I tackled the mast rigging. Although I am unsure if these ships actually had sails or not they did appear to have the rigging for setting at least one or two sails from each mast!
The picture shows small bits of balsa used to get the same (correct?) spacing for each section.


Pic 15a shows half way across with the balsa removed.
I think it looks ok?


Regards
Peter
 

pbhawkin

New Member
Apr 25, 2005
29
0
6
Mudgee, NSW, Australia
You will also see some more detail in the form of tertiary armament added. I think these are 50 or 75mm QF guns like in the following pictures of the recently built replica, (the original pictures lapel them as 3 pounders ?Hotchkiss).


Rewgards

Peter
 

pbhawkin

New Member
Apr 25, 2005
29
0
6
Mudgee, NSW, Australia
Here is a overall view up todate.


I made the tertiary guns out of resin from a mold of the closest thing I had....a U-Boot deck gun (88mm) from a 1/144 Doyusha sub. The scale change resulted in a gun of about 50mm (2") which is about right in 1/250 I think!

Regards
Peter
 

Jim Krauzlis

Active Member
Sep 26, 2005
1,490
0
36
68
Copiague, Long Island, New York
Hi, Peter! :smile:

A wonderful adaption of the Yuki Yuji design!

I don't know if they actually carried sails on this ship, I rather doubt it since they wouldn't make must difference I would imagine given the size of the ship and the small masts, certainly not as a major mode of propulsion, but you did a very nice job on the masts and ratlines.

Great job!

Looking forward to more updates.

Cheers!

Jim
 

pbhawkin

New Member
Apr 25, 2005
29
0
6
Mudgee, NSW, Australia
small update

Hi all,

small update.
I have finished some of the rigging (hard to see in pictures) and put the bases of the coal scuttles on (the round dots on the deck!!).
pic177bj.jpg


And here is an bird's eye view.


Slowly getting there!
Will finish the rigging and railings and that should be about it.
 

bholderman

Member
Jul 21, 2004
112
0
16
pbhawkin said:
I thought I would do a build of the free-download paper model of the Ting Yuen, a Chinese battleship of the 1880’s (http://homelf.kimo.com.tw/yukiyuji/TingYuen.zip).

A bit of history first:
”These were constructed in the German Vulcan yard and were patterned after and smaller versions of HMS Inflexible. Armed with four 12-inch guns in two turrets amidships and single 5.9-inch guns in smaller turrets at the bow and stern, they were powerful vessels. The central citadel had 14-inch armour plate although the turrets, in reality gun houses, had only one-inch of armour. When they arrived in China in 1886, they were the most powerful warships in the Far East. During the Sino-Japanese War of 1894, they were both present at the Battle of the Yalu with Ting Yuen being the flagship of Admiral Ting. Hit hundreds of times during the battle, the two Chinese Battleships fought off the main Japanese squadron. The 14-inch armour of their citadels proved impervious to Japanese fire. At the conclusion of the war in 1895 Ting Yuen was struck by a torpedo from a Japanese torpedo boat and beached as a total wreck. Chen Yuan was taken into the Japanese Navy and renamed Chin Yen.” (The Chinese Steam Navy 1862-1945 by Richard Wright).

The original is 1/700 scale PDF file, but in order to fit in with my first two ships (V108 and Uruguay Cruiser) and future plans of a 1/250 scale navy I had to enlarge them.
As I have adobe reader V 7 and Paint Shop Pro V8 I simply cut and pasted between these two programs and then printed out sections at 280% (from 1/700 to 1/250 scale) enlargement in order to fit on an A4 page.
Unfortunately this meant that the longest sections were cut between two pages and would have to be joined back together again at time of construction.
QUOTE]

PB,

Unfortunately, I've been away quite awhile. The real life kept me from even sitting down at a computer for any length of time. I was hoping to build this myslef, I have a stalled thread around here somewhere. But I'm glad you picked up and look forward to the results.