Thank you everyone for all you kind words. Some people where wondering what ballasting technique I used.
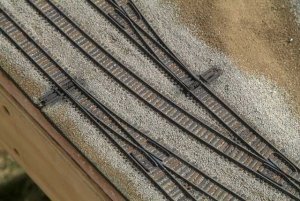
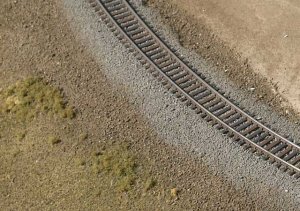
I pretty much did the standard process whith a couple of key differences. I used woodland scenics fine grey ballast. I spread the area between the ties first. I use a one inch wide flat bottomed watercolor brush to spread it initialy. Then I run my finger down the ties really smushing it down into the voids. After making sure every last little speck is off the ties and rails, I glued it doen with the standard method.
The key thing here is to use a better spray bottle for the wet water and glue. The normal misters completely blow away the fine ballast like a hurricane. I found that the smaller atomizers that spray nose spray or perfume are best. They produce an incredibly fine mist that does not disturb the ballast I just spent hours manicuring. So firt I misted with wet water which was about a half cup of water and a few drops of liquid dish soap. You'll know if there's too much soap because you'll get bubbles on the track!
The key here is to spray from high above the track (about 2 feet) so that the ultra fine mist from the atomizer gently floats down onto the ballast like mist basically. If you do it right, it won't disturb the ballast at all. After really soaking it, then apply the regular glue with an eyedropper like normal. I used woodland scenics scenery cement. It's already diluted to the perfect consistancy. The other key is to release the dropper really close to the track so as not to make craters and dents . It's really easy to mess up unsecured N scale ballast!.
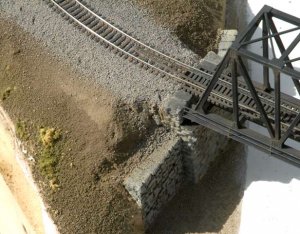
As for the shoulders, I spread a coat of glue on the roadbed with a small brush before laying down the first layer. This keeps that first layer from sliding down the slope. I let this dry first. Then I came back and filled the shoulders up to the desired track level. The first layer gives it some tooth to adhear to.
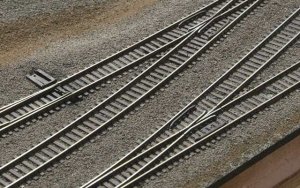
Arranging the ballast shoulders simply takes alot of time. I used the large flat brush to tamp it down to the shape I wanted, then came back with a smaller square brush to brush excess away from the tie plates and rails. Finally, I used a flat roller or any round cylander would work to actuall roll the ballast flat, starting at the ties and rolling down to the ditch. This makes the profile flatter than I could get with the brush.
Man, that was long-winded. But the biggest thing that worked for me was simply taking my time. I went really really slowly and carefully only doing a couple feet each session. It finally got done. Oh yeah, before ballasting, it was painted with Floquil Rail Brown. After ballasting was done I went back and hand painted each tie with different browns. The sides of the rails were painted with Polly S NATO tri-brown.
Anyway, I just experimented and found a technique that seems to work. It's definitely not the fast way, but who needs fast.


")