Photorealistic (Tiled) Space Shuttle "Discovery" [AXM Model] STS-95:
Greetings! I figured it was time to begin my first build log on this website and was pondering what I should build next, I wanted to build a Space Shuttle ("Discovery" because I may get the chance to work on "Discovery" when I work at the Air and Space Museum, or "Challenger" because we are coming up on the 37th "anniversary" [If you could call it that] of the disaster) I settled that I would do space shuttle discovery, with one of my favorite flights that the orbiter had taken, STS-95. I was looking at AXM's model of the orbiter and knew it was a challenge, it's the only model on the website that doesn't have an exact fit, many things need to be adjusted and changed to get the level of detail that I desired for my collection. I decided I'd tackle the task so I printed the model, bought the payload and got to work.
Chapter 1, The "eyes" of the Orbiter:
The original files provided for the kit do not contain and tiling or thermal blanket textures (which I can understand would be an absolute pain to add), so I figured I would add them myself. I took to the Smithsonian's wonderful page on the Orbiter ("Discovery") and they have 78 beautiful pictures up close and personal with the orbiter (https://airandspace.si.edu/collecti...ce-shuttle-ov-103-discovery/nasm_A20120325000) and it really gives you a good idea of the intricacy of the Orbiter. So there I was, following the photos and hand scoring each tile and each thermal blanket into the paper so 1. it would visibly have the tiling I desired, but 2. you could actually feel the tiling, because it was actually there. It took me about and hour to "tile" this (less than 1in by 1in surface), but it was worth it because the end result was breath taking, I then decided why not add simulated windows, so I grabbed my clear cellophane and put that on top of some gray paper, then added it onto the window section (after cutting out all the windows) The end result made the model look phenomenal and gives the model much more character as it reminds me of when I visited "Atlantis" in person back in October of 2019. Anyways here is a photo comparison of the original window section (Right) and the modified one (Left). I'll update you guys when I have another portion of the build finished. Until then thank you very much for reading and I hope that you all have a wonderful day.
-Deyson Morken (OSN Paper Models)
Greetings! I figured it was time to begin my first build log on this website and was pondering what I should build next, I wanted to build a Space Shuttle ("Discovery" because I may get the chance to work on "Discovery" when I work at the Air and Space Museum, or "Challenger" because we are coming up on the 37th "anniversary" [If you could call it that] of the disaster) I settled that I would do space shuttle discovery, with one of my favorite flights that the orbiter had taken, STS-95. I was looking at AXM's model of the orbiter and knew it was a challenge, it's the only model on the website that doesn't have an exact fit, many things need to be adjusted and changed to get the level of detail that I desired for my collection. I decided I'd tackle the task so I printed the model, bought the payload and got to work.
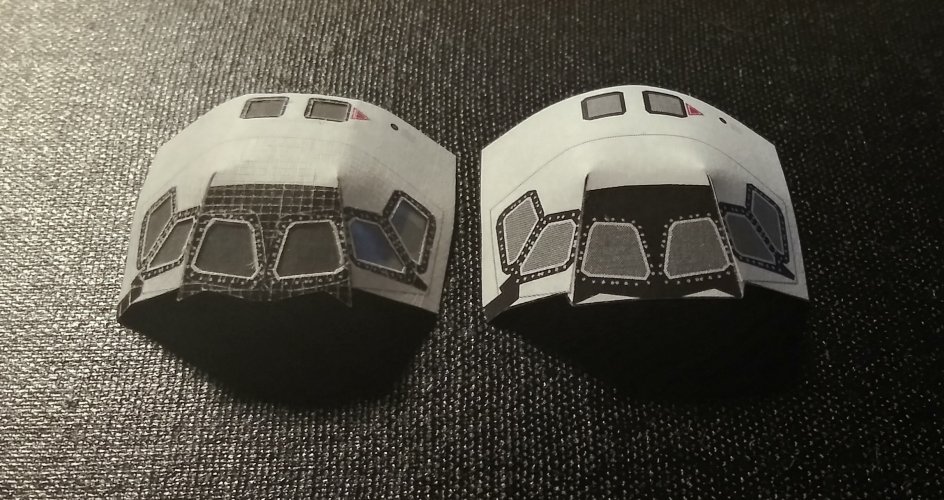
Chapter 1, The "eyes" of the Orbiter:
The original files provided for the kit do not contain and tiling or thermal blanket textures (which I can understand would be an absolute pain to add), so I figured I would add them myself. I took to the Smithsonian's wonderful page on the Orbiter ("Discovery") and they have 78 beautiful pictures up close and personal with the orbiter (https://airandspace.si.edu/collecti...ce-shuttle-ov-103-discovery/nasm_A20120325000) and it really gives you a good idea of the intricacy of the Orbiter. So there I was, following the photos and hand scoring each tile and each thermal blanket into the paper so 1. it would visibly have the tiling I desired, but 2. you could actually feel the tiling, because it was actually there. It took me about and hour to "tile" this (less than 1in by 1in surface), but it was worth it because the end result was breath taking, I then decided why not add simulated windows, so I grabbed my clear cellophane and put that on top of some gray paper, then added it onto the window section (after cutting out all the windows) The end result made the model look phenomenal and gives the model much more character as it reminds me of when I visited "Atlantis" in person back in October of 2019. Anyways here is a photo comparison of the original window section (Right) and the modified one (Left). I'll update you guys when I have another portion of the build finished. Until then thank you very much for reading and I hope that you all have a wonderful day.
-Deyson Morken (OSN Paper Models)