Ocalicreek builds (another) layout...finally!

The frozen North...

Well, the garage is insulated (WELL) and it usually stays in the low 50's without any additional heat. Of course, we haven't had the garage door itself open more than a couple times in the past few months. We'll see what happens when the last batch of donation stuff is removed and we can get the car in there regularly.

I have a small ceramic heater in there set to oscilate and blow hot air. It does a pretty good job of taking the edge or chill off the air if I turn it on a couple hours before I want to be out there. It'll keep the room in the 60's easily. Sometimes I prop open the door to the house for a few minutes to circulate the air in and out, especially if it's hot in the house.

My wife also got me a parabolic electric heater that's pretty directional to use when I want to just go out there and be at the desk. It will eventually heat the room but is really best to warm up one spot quickly.

I've also got carpet remnants scattered around along with small rugs to keep the feet off the concrete. This is especially nice if I want to just run out and grab a magazine quickly.
 
Learning Curve

Or should I say, never stop learning. Here are the latest learnings, good & bad.

You CAN scribe & snap Lauan plywood! :) It would have been a cleaner cut had I used a metal straightedge, but it's not bad and will be hidden by fascia eventually so I'm not too concerned. Just score most of the way through then bend and break. Photos later...

It helps to remove the thin plastic barrier from both sides of the white foam board BEFORE glueing it down to the wood. :eek:ops: I didn't notice the problem until after I had glued on the second layer - foam to foam. The first layer was better, foam to ply, since the ply is somewhat porous. But foam to foam meant barrier to barrier and so it pulled apart without too much effort.

SO a learning setback.:cry: I'm mostly annoyed since I was gearing up for trackwork when I noticed the foam layers pulling apart. It didn't take long to separate them and the plastic barrier pulled off the beady foam easily. In fact, that was the core of the problem. The adhesive was holding the barriers together just fine, but not the foamboard itself.

Earlier this morning I purchased 4 sticks of lumber - 1"x2"s in 4' and 6' lengths, 2 of each. I found the straightest hemlock I could...midrange price between pine and oak, but not that expensive. These will be wood-glued and brad-fastened (staple gun) around the edge of the board before the next attempt at glueing on the foam.

Hopefully later tonight I can do a bit more framing...I only have so many clamps so its slow going. I'll try to get a picture of this which will also show the remains of the adhesive on the ply after pulling up the foam. But Sunday is jammed full busy with a seminar at the church and I'm away at a conference Tuesday & Wed next week so Monday will be packed as well...gotta pay for this hobby somehow! SO any other progress will have to wait until Thursday after the catching up is done or Friday, my day off. Whew! I get worn out just thinking about it all!

Alrighty...thanks for reading the rambling.
 
layout base round 2 (ding ding)

OK folks, here's the latest progress. I glued and fastened the 1"x2"s around the outer edge of the ply, then last night attached the first layer of modified white foam board to the ply. Tonight I will attach the second layer and perhaps tomorrow consider trackwork if I feel the base is sturdy enough.

My initial reaction to the ply with just the framing attached was that it's still a bit wobbly...some diagonal bracing from corner to corner or in barn door fashion might alleviate that, but I don't think it'll matter once it's on the base. HOWEVER, I don't want it to be all wobby once I start laying track. I don't plan on moving it all that much, but inevitably it will need to be moved at some point, more than just back and forth in the garage to make room for this or that.

Tonight as I looked at the base with the first layer attached, well, it was still a bit wobbly but not as much. I thought to myself...hmmm...a couple more cross members from long side across to long side would probably stiffen it up...but that ain't gonna happen now that the first layer of foam is down there! SO, here's hoping the second layer of foam does the trick...otherwise, some corner triangle braces may help...we'll see.

REMEMBER, this is all very experimental, cutting edge stuff here. I fully expect that if it were to succeed (and it will eventually) in a major way, the model railroad industry police, Special Benchwork Unit, led by a consortium of lumber barons and middle management, would come and take my prototype away, burn the plans, and this thread will succinctly disappear. SO perhaps somebody out there should make a copy of this while you still can...you know, like that carbuerator that causes your car to get 100 mpg plus...what ever happened to that?

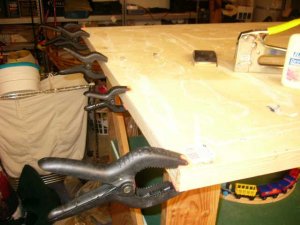
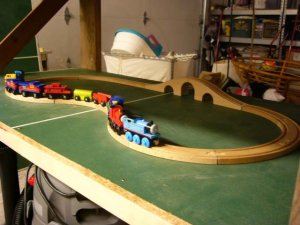
Anyway, here are some pictures. Daddy's benchwork experiment (clamping the 1x2 framing) and the kiddo's project down below the overkill benchwork.

P1040218.JPG

P1040231.JPG
 

wickman

Member
Galen I really enjoyed the old pics you posted. Nice to see some foam board getting fastened down. I used the white bead board for a couple of my moutains I found it works just as good as the blue stuff , its just a bit messy if you have to carve it.:wave:
 
second layer stability

Well, the second layer of 2" foam has indeed brought more stability to the layout base. SO, I have begun to look at the trackwork more closely. It'll take a few days, I think, for the adhesive to really set up hard but for now I'll be busy modifying trackwork.

Upon further examination of the Tru-Scale turnouts, I have decided to pull up the rail from the base (warped beyond salvage...actually split when I bent it, just in my hands!) and relay it on 'new' base sections. I'll get pictures of the process. The turnouts I plan to use have nickel silver rail and are already soldered in all the pertinent places. It should be a simple matter of removing it from one base and relaying it on the other...we'll see.
 

Nazgul

Active Member
Some people are never satisfied...you have that "awesome" Thomas layout and it isn't enough for you!:D
Galen...keep those feet warm and keep the progress coming!...also thanks for the supertree links...lookin' forward to your take on making them:thumb: :thumb: :thumb:
 
plans

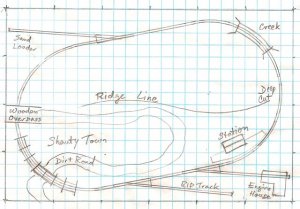
Here are two plans...well, one plan and a diagram, really. The first plan is what I'm considering for the current baseboard I've been building.

wmg 4x6 A.JPG

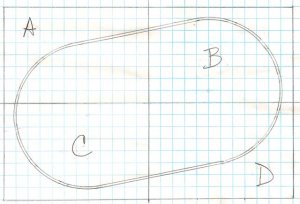
The second is for an open question/discussion. Perhaps I should put it over in the planning thread, but I decided to put it here in case anybody comes up with an idea I like better than the one above.

wmg 4x6 B.JPG

Currently, I've got my enginehouse located at D and my industry at A. The little switcher comes out of the house and heads out to work the sand loader, then returns the way it came shoving the caboose ahead. That's if I want some sort of operations.

Really, this layout is just for running in circles when I feel like watching trains after a hard day, or working on scenery, structures, etc. But, it's fun to switch a car here or there.

NOW...how could I do this differently? Putting the Enginehouse (or interchange) at D and an industry at B means a longer 'run' beteen them (I'm not a big fan of pretending it's a longer run by making laps before 'arriving' at an industry). OR, putting the interchange/enginehouse at D and the industry at A (as drawn in the first plan) makes the two as far apart as they can be physically.

Whaddya think?
 

pgandw

Active Member
Galen

I like the simplicity of the plan - it has a nice balance between scenery and track for a 4x6.

Operationally:

- All spurs face the same direction. Is that what you wanted?

- You might cautiously consider a runaround track on either side. On the C-D side, you could move the station to fit on the siding for a short passenger train to serve. If you put a runaround on the A-B side, it would let you put the train in proper order for the return trip from the sand loader. Again, you don't want to add too much track - a passing siding on both sides is probably too much.

my thoughts, your choices
 
I had a neat idea about the return trip from the sand loader. As the plan stands now, the engine would pull cars from the 'interchange' (actually the main line when in ops mode vs. loop mode), tack on the caboose from the RIP track (really a house or a yard track, I guess) and pull the train out to the sand loader.

Then after switching mts and loads the engine would shove the train back to town with a brakie or conductor riding the caboose platform. The trick would be changing the marker lights. It'd be cool to use two-color LEDs with red on the trip there and green for the trip back. This (along with caboose lighting and perhaps a lantern in the brakie's hand) could be controlled with a DCC accessory decoder.

Anyway, pgandw - thanks for the comments! The spurs all facing the same direction is exactly what I wanted...in the absence of a runaround. I figure with the runaround there's too much temptation to start adding an additional spur here or there and pretty soon the balance between scenery and track has been tipped.

I had also considered using the loop itself as a runaround, but the in-scenecerity of that just rubs me the wrong way. Maybe later I'll post another option I had been considering with two spurs facing the opposite direction to the enginehouse spur...which, btw, has been shifted a bit. Looks like I can move it toward the corner a bit more and run a long spur to it and put the RIP/storage track down the long side of the enginehouse.

Again, all this operation is just icing on the cake of what is really a scenery-oriented layout to begin with, a loop for the purpose of just letting a train roll a while.

And Steve, you're right, I just couldn't leave well enough alone! Someday, when it's set up like it ought to be, I'll get a picture of my son's 'layout' in his room to share with the Gauge.
 
Latest News

Okay folks,

Upon further evaluation of the Tru-Scale turnouts, I have decided to go ahead as mentioned above and lay them on new ties (left over from my hand-laid trackwork on the timesaver)...now the decision is what to lay the ties on? There is a dealer up the road about 45 minutes north of here that has homasote...but in keeping with the spirit of the project I'd really like to use something already on hand. The lauan leftover from the base (2'x4') is kinda wobbly...so we'll see.

Also, pgandw's question about the turnouts all facing the same way has stuck in my head and I think I'm actually coming around to like a revision of the plan better. Hopefully I'll get that sketched and posted soon.

I was down for the count fighting a cold on Monday and finally today I feel back to 95% or so. Of course my wife has it worse than I did so taking care of the kiddo, etc. comes first. And there's a wgh show down in Portland Saturday...that oughta be fun! But hopefully between now and then (on my day off tomorrow) I can get a bit of work done on the turnouts, or maybe just the workshop in general.

Thanks for reading the rambling.
 
Ehhh....nah, I'll stick with the original concept (turnouts all facing the same way), thanks. Did a bit of fiddling with the turnouts and some structures to see what would work scenically and I think I like the original concept best. SO that's the plan...for now.

Went down to the wgh show in Portland today and had a blast. I always come back from these shows ready to dive into a project so enough surfing, time to work!
 
Where do you live, Galen? I live just north of Portland, in Seattle, Washington. If you live close to there, I'd love to come over sometime when it's done and run my trains on your layout or something.
 
SoC, I live in Kelso, on the Longview side of the Cowlitz. So if you've traveled I-5 between Portland and Seattle you've been right past me.

Well, I ended up doing very little work in the garage last night and spent some quality time with the wife watching a little TV...taking a 2 year old (and two other surrogate-grampas) to a train show is hard work! So perhaps after the afternoon nap? We'll see. I'm on a break at work right now, dreaming of the next step to model railroad bliss....
 
Workin on a freight house made from cardstock...just follow the link in my signature. The layout is on hold for now while this project gets underway.
 

Dansco

Member
ocalicreek,
Im a noobie, but I live very close, im about 40 mins out longview, in the boonies between mist oregon and the bridge over the river. Are there any clubs near us?

Thanks
 
Did I mention I found another hobby shop in Vancouver (WA)? Well, went down there last night on the way to dinner (Panera Bread...mmmmm) and bought some track. A couple turnouts and a few straight sections, all steel EZ track with black base, just like what I've already got.

I decided that if I ever use the tru-scale track, it'll probably just be the rail since many of the base sections are warped or would require too much work to rehab into a usable state (well, they make good kindling as they are now...)

SO, I got a loop going - 18" rad curves with three 9" straight sections in between. After much sanding with a fine sanding stick and much rubbing with alcohol and paper towels, I got my little BS 4-6-0 to pull a short mixed around at a nice crawl. Very pleasant to listen to the clickety clack while working on the scalescenes freight house. Good to glance up every now and then and see it roll by. It'll be even more pleasant when I get a sound decoder in that thing someday.

Not even sure if I'm going to use the turnouts...I can return them if necessary. I will probably use at least one of them in order to have a place to put a car or two. We'll see. Just making all this up as I go along!
 
Oh don't use the steel alloy stuff, it corrodes too easily. Go with nickel silver. I have about twenty pieces of it from my old layout and it's not corroded at all, been about 10 years since I last used it too.
 
I am well aware of the pitfalls of steel track. However, it suits my purposes nicely and so for now it's what I'm going with. I've heard that flitz polish will hold back the corrosion if applied regularly, and of course, just running the trains on it will keep it nice and shiny. It's not laid permanantly yet, so we'll see if it causes too much trouble. It's only a display loop - just a blank canvas on which to build scenery and structures and, oh yeah, run some short trains.
 
Heh. All my steel track is too far gone to be "polished" back to working order...I'd have to soak them in rubbing alcohol sign1

Oh well. Maybe when I get my layout going I'll just stick with nickel silver; less maintenance-intensive!
 
Top