

New 1:35 Build in Progress
- Thread starter Fishcarver
- Start date
You are using an out of date browser. It may not display this or other websites correctly.
You should upgrade or use an alternative browser.
You should upgrade or use an alternative browser.
- Status
- Not open for further replies.
Building the "Junior Technician" 2P27 BRDM ATGM Vehicle
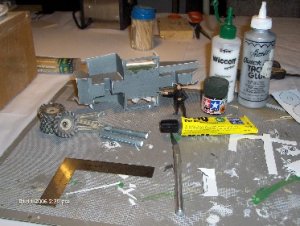
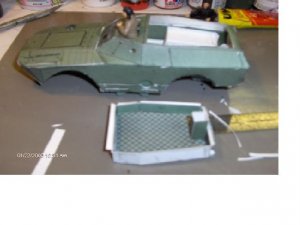
Work on this model is progressing slowly but surely.The hull assembly, springs and axle sleeves have been assembled. When /if I build this vehicle again, parts #25 (the sides of the belly wheel housing) need to be reinforced with heavier cardstock. So far, the fit of the parts has been reasonably good.
Next step is to assemble the wheels: 8 in all.
Attachments

Building the "Jr.Technician" 2P27 ATGM Vehicle (2)
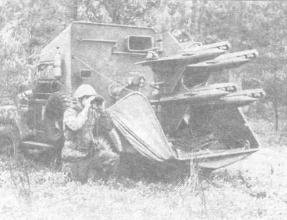
Note: This model, as it appears on its home website, http://jtdigest.narod.ru/dig2_03/museum2.htm is quite a bit over 1:35 scale. I had to use reference material to get the proper dimensions and "average" the model to scale. If you print the original .jpg files at 90% with 0.75" margins, you will be very close .
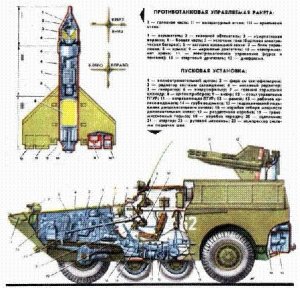
BRDM 1 Chassis Specifications
Crew: 5 (2P27 ATGM Version: 2)
Weight (empty): 5600kg (2P27: ?)
Dimensions:
Length: 5.7m
Width: 2.25m
Height: 1.9m (2P27: 2.25M)
Maximum Speed : (road) 80km/h (water) 9km/h
Engine: GAZ-40P 6 -cylinder in-line gas, water-cooled developing 90hp at 3400 rpm.
Note: This model, as it appears on its home website, http://jtdigest.narod.ru/dig2_03/museum2.htm is quite a bit over 1:35 scale. I had to use reference material to get the proper dimensions and "average" the model to scale. If you print the original .jpg files at 90% with 0.75" margins, you will be very close .
BRDM 1 Chassis Specifications
Crew: 5 (2P27 ATGM Version: 2)
Weight (empty): 5600kg (2P27: ?)
Dimensions:
Length: 5.7m
Width: 2.25m
Height: 1.9m (2P27: 2.25M)
Maximum Speed : (road) 80km/h (water) 9km/h
Engine: GAZ-40P 6 -cylinder in-line gas, water-cooled developing 90hp at 3400 rpm.
Attachments
Work in Progress: (2P27 ATGM Vehicle)
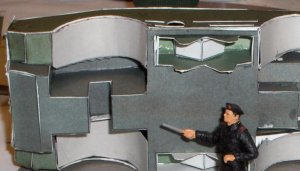
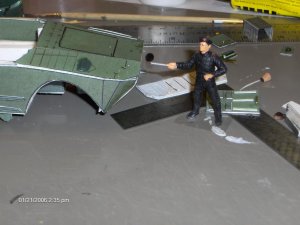
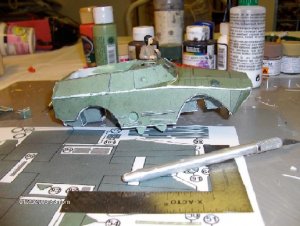
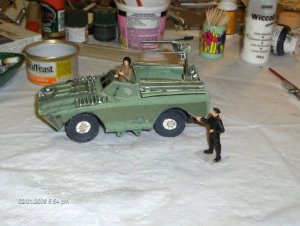
I added inner fenders so that the model would photograph better. The front and side armour is in place. Fit so far: so good.
There are no locating points on the body shell for the detail parts, so I had to mark these myself from a scale drawing. The intention is to airbrush the entire model with good ol' Soviet Armor Green. Note that I have opened the hatches and made provision for a figure.
The vehicle is pretty close to 1:35 scale. Now for the "fighting compartment and the ATGM launcher.
More to follow!
Jim
Attachments
Hi, Jim!")
She's coming along quite nicely!
I always wondered what the models from that site were like, never built one of them yet, so I'm happy to hear the fit is good so far.
How's Sergi doing? Seems to be directing things quite well, although he seems a little stiff to me.
That reminds me that I have Nobi's T-55 tank sitting around waiting for me to get back to it...maybe Sergi can come over and kick some factory butt to get things going....
Looking forward to seeing more as you go along.
Cheers!
Jim
Who are the little figures? They look good! and what are you going to use for paiting, airbrash or spray can?
Thanx for the kind words!
Jim/Dimas: Thanks for the kind words! This particular model is my first venture into finescale in a LONG time, and my 3rd card build (my 2 earlier card aircraft projects don't count ;-) )
This particular JT model is definitely not bad for a free model. The level of detail is quite good, as is the fit of the parts. I plan to detail it up to (at least) the level of a good 1:35 plastic kit without recourse to photoetched parts.
Material used in my build is 100# STRATHMORE SMOOTH BRISTOL, with 2 mm mat board to be used for the wheel cores.
I plan to seal the model with a couple of coats of TUFFILM matte fixative, and will then airbrush it with acrylics (Testors Russian Topside Green/Soviet Armor Green)
The figures are Dragon 1:35 Modern Soviet Tank Crew. Dimas: I have not forgotten your quest for 1/32 (54mm) Japanese pilots: they are next on my scratchbuild list!
Regards,
Jim
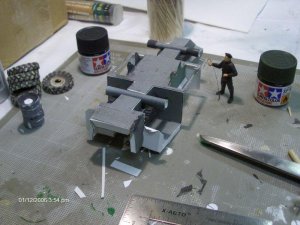
More W.I.P. Shots of the 2P27
Here are a couple of more pix of Work-in-Progress on the 2P27:
Jim
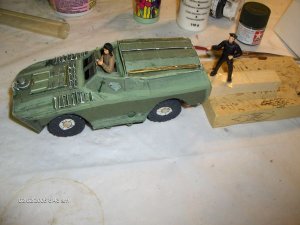
Here you will see the scratchbuilt trim vane for the front of the vehicle, awaiting attachment.
The rear section of the armour has not yet been secured to the vehicle sides, pending fabrication of the "fighting compartment". At this point, I discovered that the rear section of the armour was approximately 1/8" (3mm) too short, even allowing for the inward slope of the rear panel. This is, no doubt, due to an accumulation of errors in trying to fine-scale the vehicle. We will bash on regardless!
Here are a couple of more pix of Work-in-Progress on the 2P27:
Jim
Here you will see the scratchbuilt trim vane for the front of the vehicle, awaiting attachment.
The rear section of the armour has not yet been secured to the vehicle sides, pending fabrication of the "fighting compartment". At this point, I discovered that the rear section of the armour was approximately 1/8" (3mm) too short, even allowing for the inward slope of the rear panel. This is, no doubt, due to an accumulation of errors in trying to fine-scale the vehicle. We will bash on regardless!
Attachments
The factory has been on double shift, I see.:grin:
Really coming along brilliantly, Jim (nice name, by the way ).
I love the attention to details!
Looking forward to more as you continue.
Cheers!
Jim
Really coming along brilliantly, Jim (nice name, by the way
).I love the attention to details!
Looking forward to more as you continue.
Cheers!
Jim
For every Problem, there is a Solution
I have to say that this is indeed an interesting form of modeling! You really need to plan ahead, much like scratchbuilding, or doing a wildlife carving for that matter! The encouragement helps a lot, guys & gals!
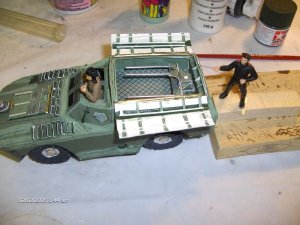
Here is a shot of the problem with the fit of the rear armour. It was solved by adding a strip taken from a spare sheet of parts (try doing THAT with a $35.00 plastic kit!!). The rear end of the vehicle has been tack-glued together after trimming (photo 10).
More to follow!
Jim
I have to say that this is indeed an interesting form of modeling! You really need to plan ahead, much like scratchbuilding, or doing a wildlife carving for that matter! The encouragement helps a lot, guys & gals!
Here is a shot of the problem with the fit of the rear armour. It was solved by adding a strip taken from a spare sheet of parts (try doing THAT with a $35.00 plastic kit!!). The rear end of the vehicle has been tack-glued together after trimming (photo 10).
More to follow!
Jim
Attachments
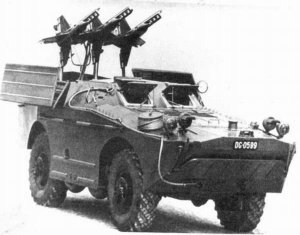
What's that Tshmel?
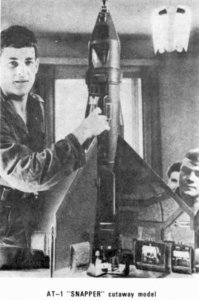
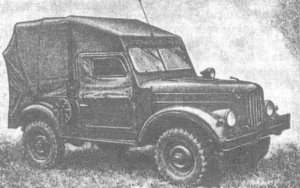
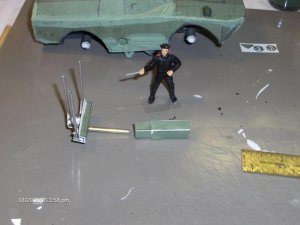
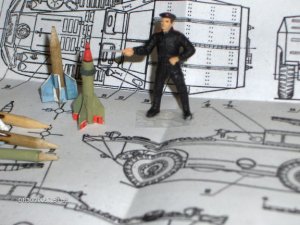
The build continues: more pix shortly. Right now, I'm gathering some reference on the business end of the 2P27: the 3M6 Tshmel ("Bumblebee") ATGMs (NATO code name AT-1 "Snapper"). In the process, I came upon this delightful little piece of kit, that just cries out for building: a GAZ 69 with a "sting"!
Jim
Attachments
A New Meaning to "Shoot and Scoot"
As the commander of one of these 2P26 detachments, I'd sure hope that my ATGM operator was a "Dead Eye Dmitri" that could get a kill with his first round so we could " get the H*** Outta Donetsk" right quick. Otherwise, the retort of incoming 7.62/ .50 cal would likely ruin our weekend. Imagine what a main gun round would do.......
No wonder this system went obsolete........
Attachments

Building the 2P27 ATGM Vehicle, Cont'd
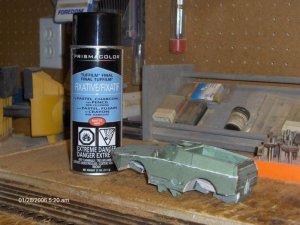
The model gets a couple of light coats of "Tuffilm" spray fixative. (This is like Testor's Dullcote, except much finer). This will seal the card surfaces to permit painting. Then the underside is painted with Tamiya Panzer Grey , and the "welds and joints" get a coat of light green acrylic "primer".
By the way: have plenty of ventilation when spraying TUFFILM!! Its vapors are quite vile......
Attachments
Rollin' Right Along.....
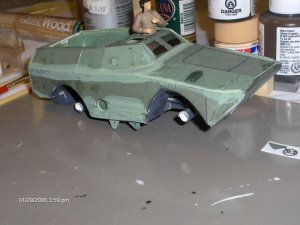
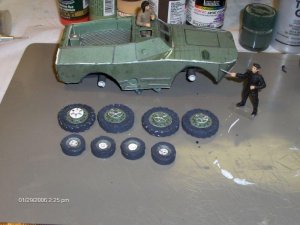
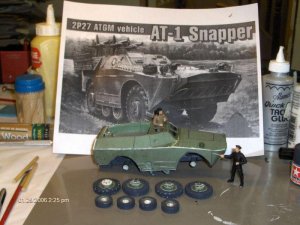
All the wheels are done. The vehicle is starting to look like the reference material, and we start work on the ATGM launcher assembly.
More to follow.....
Jim
All the wheels are done. The vehicle is starting to look like the reference material, and we start work on the ATGM launcher assembly.
More to follow.....
Jim
Attachments
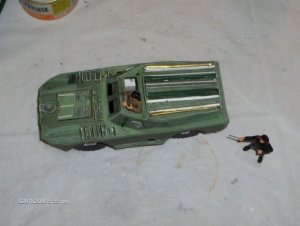
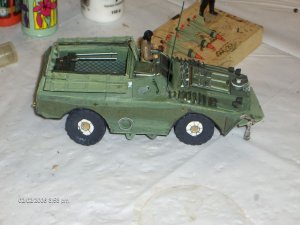
Socialist Industry?
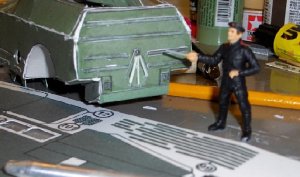
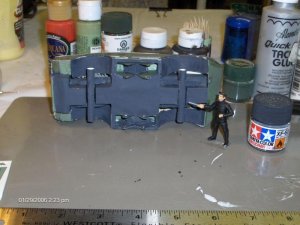
Here we see the vehicle so far. Some detail parts have been added, and the "Mark I" version of the overhead doors for the rocket compartment has been dry-fitted (as have the wheels). Note the "piano hinge" made out of .005 sheet brass and some rod. I do not like the overall appearance of these doors. I am going to re-make them, saving only the hinges.
More to follow!
Jim
Attachments
- Status
- Not open for further replies.