Food for Thought

TrainClown

Member
Apr 17, 2003
861
0
16
66
Saskatchewan, Canada
Visit site
Hello there, it's me again! The TrainClown with many hats! ;)

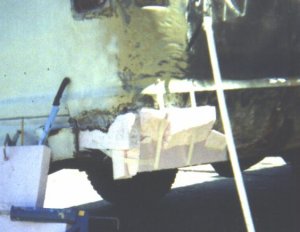
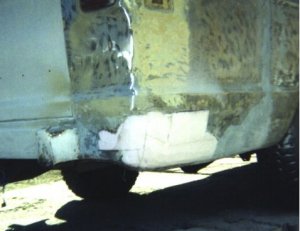
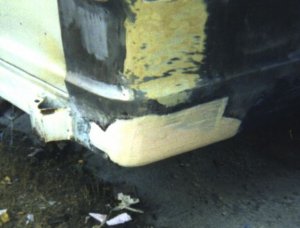
I know this is a little off the topic of trains but I have this idea in mind that the same process that I use to fix my van would also be a good way to make scenery for garden layouts. Mountains, cliffs, tunnel culverts, etc., could be made using the same process that I used to fix gaping rust holes in my van. So I thought I would share this information, for what it is worth, and maybe someone would see the germ of an idea for their own projects.

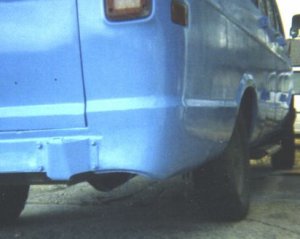
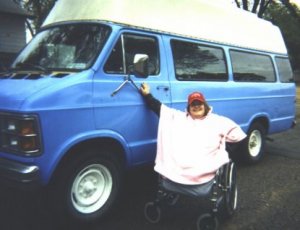
I used to call my van Snaggletooth because of all the rusted out quarter panels which gave it a decidedly toothy snarl and, no sir, I didn't like it. So earlier this summer I set about fixing it and this is how it went.

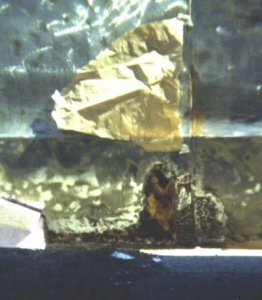
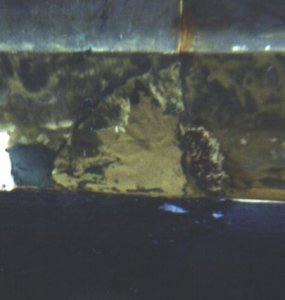
I'm not going to show you the whole project, just one little part to show you the secrets I have gained over the years.

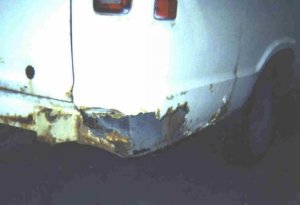
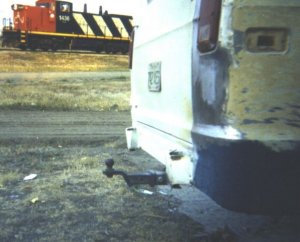
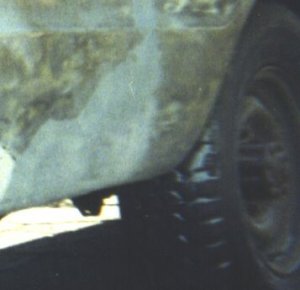
This first photo shows you the typical problem of the giant rust hole in the back corner of the van.
 

Attachments

  • rust hole.jpg
    rust hole.jpg
    15.8 KB · Views: 149

TrainClown

Member
Apr 17, 2003
861
0
16
66
Saskatchewan, Canada
Visit site
Step 1

The first thing I did was to sand off all the paint down to the bare metal to get rid of the gawd-awful previous paint job. Then I took a grinding wheel and cut out most of the loose, rusty, flappy bits. Then I bent the edges of the tin around the rust hole in just a little bit to give the new fibreglass skin a better purchase on the surface. Then I took some 2" pink styrofoam and a tube of styrofoam glue and glued pieces of styrofoam to the inner panel and filled up the hole with a jumble of styrofoam pieces and let the glue dry overnight.
 

Attachments

  • foam stuck in.jpg
    foam stuck in.jpg
    32 KB · Views: 143

TrainClown

Member
Apr 17, 2003
861
0
16
66
Saskatchewan, Canada
Visit site
Step 2

Next, I used a large knife to carve away most of the foam and pared it down to almost the body contour. Then I used my power sanders to complete the shaping job, making the surface a little less than what I wanted the completed surface to be.
 

Attachments

  • carved to shape.jpg
    carved to shape.jpg
    26 KB · Views: 119

TrainClown

Member
Apr 17, 2003
861
0
16
66
Saskatchewan, Canada
Visit site
Step 3 (The Secret Step)

This is called the Secret Step because without this step, you cannot put fibreglass on styrofoam because the styrofoam will melt and cause all kinds of problems.

What you do is cover the styrofoam with masking tape. Just the styrofoam and not any metal surfaces.
 

Attachments

  • taped patch.jpg
    taped patch.jpg
    32 KB · Views: 116

TrainClown

Member
Apr 17, 2003
861
0
16
66
Saskatchewan, Canada
Visit site
Step 4

Now it's time for the fibreglass. You do NOT want resin and matte type fibreglass. No, no, no. What you want is what's called Short Strand Fibreglass Filler. You can get this at any auto parts supply place. There are 3 types they sell. One is called Kitty Hair and it has 3" to 4" strands of fibreglass in a goopy, sloppy solution. You don't want this one. The second type is the Short Strand Fibreglass and this is more like a bondo type filler. The strands are so short, you can't see them. It spreads like butter, is very strong and easy to work with. This is the one you want. The third one is your basic bondo type body filler. This doesn't have any strands in it and is not very strong in itself. It makes a good filler once you have a good base to put it on. I did use a little bit of this here and there to even out the base that the Short Strand fibreglass gave me. The bondo type is a little cheaper and sands easily but is not necessary as the Short Strand fibreglass can be sanded smooth enough to paint and I found it sanded quite easily.

One thing I would like to point out for those of you trying this for the first time. Each application of either fibreglass or bondo has to have the surface sanded off it in order for subsequent coats to stick. On large flat areas I just use a 36 grit sanding disk on my sander, but for more intricate work I find a wire wheel in my drill gun knocks off the surface just fine. This would be a good tip if you were modeling mountain scenery.

Anyway, you apply a liberal coat of fibreglass overlapping onto the metal a good 4" to 6".

Having a train go by helps the work! :D
 

Attachments

  • bondo on.jpg
    bondo on.jpg
    43.6 KB · Views: 114

TrainClown

Member
Apr 17, 2003
861
0
16
66
Saskatchewan, Canada
Visit site
Step 5

So now you sand yourself silly! An orbital sander with 80 grit paper is what I used to do the fine work after I had knocked the surface off with my disk sander. Oh, and by the way! Those sanding disks can be cleaned out with a wire wheel as they get clogged with the fibreglass.

So you sand and apply more fibreglass or bondo to fill out the surface until you get it so it looks straight. Once straight as you can get it, give it a final sanding with 220 grit to get rid of small scratches. Spray it with some primer. Fill any air holes or small scratches that appear with Glazing Putty (this comes in a tube and is applied with a bondo spreader). Then paint on your final coat and it will look like this.
 

Attachments

  • fin corner bk.jpg
    fin corner bk.jpg
    17.9 KB · Views: 108

TrainClown

Member
Apr 17, 2003
861
0
16
66
Saskatchewan, Canada
Visit site
One More Little Trick

This styrofoam modeling technique is very handy when you have compound curves, say, on the corner of the vehicle. But if you just have a straight hole to fill on a flat panel, the Short Strand fibreglass stuff does wonderful things. Like this.

What you do is get some brown paper and cut a patch that's about 2" larger than the hole that you want to fill.

In this photo, you will see the hole below the paper patch that I will use to fix it.
 

Attachments

  • paper patch 1.jpg
    paper patch 1.jpg
    31.3 KB · Views: 107

TrainClown

Member
Apr 17, 2003
861
0
16
66
Saskatchewan, Canada
Visit site
Next!

You mix up a generous glob of the Short Strand fibreglass and spread it evenly all over the back of the piece of brown paper. Then you plaster the patch in place, being careful so that the paper conforms to the shape of the surface you are trying to patch, and smooth down the overlapping edges with a spatula.
 

Attachments

  • paper patch 2.jpg
    paper patch 2.jpg
    21 KB · Views: 106

TrainClown

Member
Apr 17, 2003
861
0
16
66
Saskatchewan, Canada
Visit site
Next!

Once that sets up, you take your sanding wheel and you sand off all the paper and start to shape the piece. More than likely, it will need another coat of filler and more sanding. And then it will look like this.
 

Attachments

  • paper patch 4.jpg
    paper patch 4.jpg
    14.4 KB · Views: 105

TrainClown

Member
Apr 17, 2003
861
0
16
66
Saskatchewan, Canada
Visit site
So There It Is!

Those are the tricks I wanted to share with you guys. I hope this gives you inspiration to build something out of styrofoam and then fibreglass it.

My wife is very happy and now calls our van Big Blue.
 

Attachments

  • deb & van.jpg
    deb & van.jpg
    22.3 KB · Views: 101

pomperaugrr

Member
May 21, 2003
120
0
16
Connecticut
Visit site
Nice job TrainClown! The van looks great! I'm sure the fiberglass technique would provide a lightweight and durable scenery structure for modules or portable layouts. Thanks for sharing your work and the great idea.

Eric
 

sumpter250

multiscale modelbuilder
Jan 19, 2002
3,073
0
36
80
Vernon Hills, Illinois
Visit site
Well!, that tears it!, by the time TC gets done dealin' wit' Jon, I'll be on Social Security!, and I know what that Subaru looks like, If I have to wait till that's done, some "indiana Jones type" will be tryin' to figure out why I'd scratched "damned subaru" on the inside of the coffin lid!:D :D :D :D
TC, if that's a scenery technique, you'll be makin' a scene all over town!:D :D :D :D
By the way, nice body work!
Pete