Bench work 101...

BcRailNameGuy1

New Member
Mar 30, 2002
18
0
1
60
British Columbia Canada
Visit site
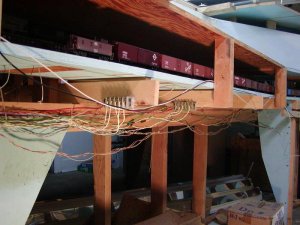
Ahh, the wonderful world of benchwork!! don't yea just love it?
I have tried almost every form, from angle brackets to free standing benchwork both made from 1x4 lumber. end result: nether one of them satisfied my need for a good sturdy bench.
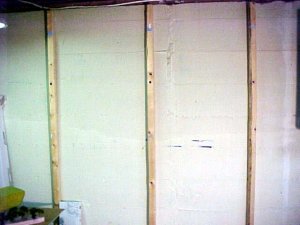
With my basement having a four foot cement foundation and a 6ft. 2 inch concrete foundation I had to resort to using a HILTI Gun inorder to fasten the 1x4 board of the angle bracket to the wall. Some of the brackets co-operated by not splitting in half while some were split like kindling for fire wood.
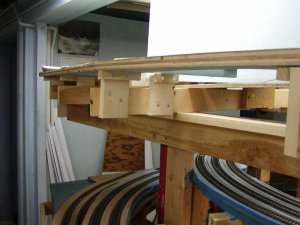
Even using 2x4's I found that this was a problem.
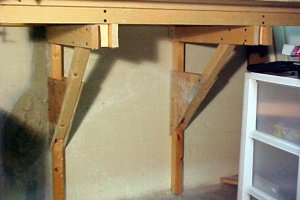
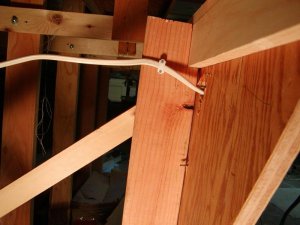
Perhaps running 2 - 2x4's face to face along side the concrete wall then fastening the brackets to the 2 -2x4's would be my solution?!?
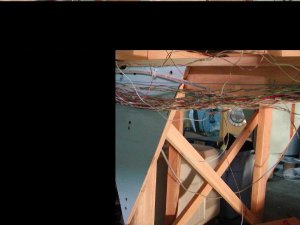
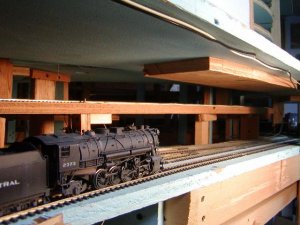
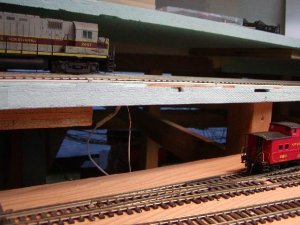
What I have done is fasten 2x4 frame work to the basement floor. using this as part of my bench work.
Any suggestions would be EXTREMELY appreciated!!!
Rgd's
Bill
 

Drew1125

Active Member
Jan 28, 2001
2,975
0
36
Hi Bill!
I don't know if this will help, but what I did for one of my previous layouts was to rip 2x4's into 2x2 firring strips, & attach them to the wall with masonary anchors, & Liquid Nails adhesive (heavy duty)
 

Attachments

  • mvc-010f.jpg
    mvc-010f.jpg
    36.2 KB · Views: 280

Drew1125

Active Member
Jan 28, 2001
2,975
0
36
On each side of the firring strips, I arttached 1x3 horizontals, angle-braced with 2x2's, & plywood gussets. On top of this I built standard L-girder benchwork.
This is incredibly strong support...in fact it was a little bit of overkill for a model RR...
Put it this way...it will support my entire 220lb carcass with no problem.
 

Attachments

  • mvc-011f.jpg
    mvc-011f.jpg
    35.4 KB · Views: 280

t. alexander

Member
Jun 20, 2002
540
0
16
61
Attalla Al.
Visit site
Nice work Charlie.

BC, Try doing the anchor methed Charlie used.
I don't know what kind of anchor's charlie used but the blue plastic ones work. The anchors and screws come in a container of however many, just pick the length of screw you'll need.
Be sure to pre drill and countersink the studs.
Get good name brand masonary bits like Bosch. They come in a pack of five or so.

t.
 

Drew1125

Active Member
Jan 28, 2001
2,975
0
36
The masonary anchors I mentioned are just large screws...like a wood screw, but made of a blue enameled steel. You will also need a hammer drill to drill pilot holes in the concrete.
 

Gary Pfeil

Active Member
May 7, 2001
2,510
0
36
Boonton NJ
Visit site
Charlie's photos show how to support benchwork on a wall. Here is how I build freestanding benchwork. Bear with me, it isn't pretty! Basically, I use L girders supported by leg assemblies. This isn't particularly strong by itself, but once the joists and risers for the roadbed are added, it will easily support me. First picture is a leg assembly, legs are 2x4, cross braces 1x4.
 

Attachments

  • p1010062.jpg
    p1010062.jpg
    85.3 KB · Views: 255

Gary Pfeil

Active Member
May 7, 2001
2,510
0
36
Boonton NJ
Visit site
This photo shows the top of one of the legs, notched to accept the 1x3 part of the L girder. The plywood to the right is a gusset, which prevents the leg from moving along the length of the girder.
 

Attachments

  • p1010063.jpg
    p1010063.jpg
    66.1 KB · Views: 249

Gary Pfeil

Active Member
May 7, 2001
2,510
0
36
Boonton NJ
Visit site
This photo shows several of the joists supported by the girders. Note the staging tracks roadbed supported directly on joist tops, while the visable lower level of the railroad is supported by risers from the joists.
 

Attachments

  • p1010064.jpg
    p1010064.jpg
    85.2 KB · Views: 236

Gary Pfeil

Active Member
May 7, 2001
2,510
0
36
Boonton NJ
Visit site
This photo shows that you can build a second l girder for a second level on a freestanding peninsula. The trackage on the blue roadbed is the hidden (eventually) staging for one end of the "lower" level. The under construction upper level is shown.
 

Attachments

  • p1010065.jpg
    p1010065.jpg
    75 KB · Views: 232

Gary Pfeil

Active Member
May 7, 2001
2,510
0
36
Boonton NJ
Visit site
This last shot shows another way to support an upper level. On this peninsula, there will be no backdrop, you will view across from one aisle to another. The upper level is supported from a center "wall", built with 2x4 studs toenailed into a 2x4 fastened to the conctere floor, supported laterally by attachment to the lower level. The "wall" has short pieces of 2x4 routed to accept steel u channel, which is drilled to allow screws to pass up into the bottom of 3/4 plywood roadbed.
 

Attachments

  • p1010066.jpg
    p1010066.jpg
    76.1 KB · Views: 227

shamus

Registered Member
Dec 17, 2000
3,489
0
36
87
UK
Hi Bill,
Always a good talking point is the art of benchwork, from Lgirder to cookie cutting. I use a similar method to Lgirder and also use cookie cutting, here are some photos of both.
The cookie method is 1/2" insulation (Sound board) on 1/8" plywood glued together.

Shamus
t02.jpg

don01.jpg

allcutout.jpg


Vic

Active Member
Feb 1, 2002
1,699
0
36
79
Columbus GA
Visit site
Like Shamus has said the subject of benchwork has always been a great topic for discussion. I too prefer the L-girder construction. It seems to give you the most flexibility for layout construction even with small layouts. I especially like it for being able to control grade transitions.

Here's a couple of things I hit on to make this construction faster and cheaper:

1. 1 1/4" Drywall screws are totally adequate for assembly of 1"
lumber. They are a heck of a lot cheaper than wood screws and
driven in with a cordless drill you can just "zip" thru the job.

2. 1X lumber has gone "outta sight" in price. If you have or have
access to a table saw buy 1X12 shelving board in 10 or 12 ft
lengths and rip your own lumber. Don't worry about the knots.
They don't cause any problems. You'll save 40-50% on your
lumber costs.
 

racedirector

New Member
Apr 4, 2004
48
0
6
63
Oz-stralia
australianspeedway.com
Originally posted by Gary H Pfeil
This photo shows several of the joists supported by the girders. Note the staging tracks roadbed supported directly on joist tops, while the visable lower level of the railroad is supported by risers from the joists.
Yup, I have dug this one up from the depths :)

Gary

This shot interests me. (See original post on first page) What is the separation between levels here? I have exactly that same concept in my benchwork that is soon to be started - hidden staging topped by the actual RR.

I am looking at going L-girder (was going to be open grid) but in a "moveable" form.

Cheers
Bruce
 

Gary Pfeil

Active Member
May 7, 2001
2,510
0
36
Boonton NJ
Visit site
Hi Bruce. There is 7" between the staging and visable levels. On a previous layout I used 3 1/2" and found that it was impossible to rerail cars if they derailed. So when I designed this layout I decided to give myself twice as much room. And it was a very good decision. The staging is 5 tracks deep and I can easily rerail equip. on the rearmost track. I would need to move trains in front of it of course, tho I can remove a car without doing so. Thankfully I haven't had derailments but I will eventually I suppose. I do have occasional stalls due to dirty wheels or track, so I do have occasion to reach in there. I'm posting a couple photos which show how I decided to shoehorn in more staging, going against my own advise by going with 3" seperation. My reasoning: My rr is two levels, not counting the staging. The upper level has stub end staging at one end, but had just a yard at the other end, with track going down a helix beyond the yard. The helix connected the two levels and provided interchange with the lower level RR. (Two different RR on the two levels) I was a little bummed that the yard ended the runs on the upper level and wished I could extend Eastward to loop staging. So I shoehorned in two tracks which are just behind the five lower ones, but 3" higher. Gives me a little over 3" clearance for these new tracks, but they are also pretty far back from the front. And, they have turnouts which I will not be able to service! I wouldn't ordinarily do this and don't recommend it, but my thinking is I will use the staging as long as it works. When something like one of those turnouts fail, I'll simply abandon the trackage. Been using it for a couple years now, already worth it in my eyes.

This photo shows one end of the staging area. You can see the added staging for the upper level (BTW, the upper level trains use this staging by using the helix) just above the loco. You can see the helix in the upper right portion of the photo. The lower level main line is on the roadbed over the bus wires.
 

Attachments

  • p1010462jpg.jpg
    p1010462jpg.jpg
    63.7 KB · Views: 64