I find that the Campbell siding is easy to work with and not too expensive. It comes in packages of strips: I think that the number in each package varies depending on the length of the sheets. There are various lengths available, but I find that the 8', 10' and 12' lengths are the most useful. If you only need a sheet or two at a time, cut them using a straightedge and either a razor blade or an X-acto with a new blade. If you're going to cut a large quantity to the same size, a NWSL Chopper is a useful tool. A tip to make the whole job easier, whether you use the Chopper or a knife, is to apply the glue before cutting the individual sheets. The key to this is to use contact cement, like Pliobond or Elmers, applied with a fairly stiff brush. You can clean the brush afterwards with lacquer thinner. This is the procedure, which is much less messy than applying glue to each individual sheet:
Decide on the proper length to use for the job: sheets varied from 4' to 16' in length, so buy the correct length if it's available, or cut the sheets to suit.
Now decide on the correct width: sheets varied from 2' to 4', I believe, but there may have been other sizes. I find that the 4' width works best with most lengths, unless you're doing a very small structure.
Determine the number of sheets that you'll need for the job. Don't forget that you'll have to overlap each successive sheet from side-to-side, and that each course, as you work up the wall or roof, will overlap the course below.
Take the large sheets, as they come from the package, and, using a suitable brush, apply a light coat of contact cement to one entire side of each sheet that you'll require. Lay out these sheets, glue-side up, on some old newspaper, making sure that they don't touch one another, as they'll bond instantly and permanently. While the cement dries, apply a coat of contact cement to the structure that you're going to cover. The contact cement needs to dry for about 15 minutes before making the bond, but you'll have several hours more time available that it will still be useable.
After the cement on the siding sheets has dried to the touch, use your new blade or Chopper to slice it up into the width that you have chosen. Be very careful to keep each piece separate: I lay them out on more newspaper. When everything has been cut to size, start applying them to the structure. You can pencil on reference lines for each course before applying the glue, or just use the old eyeball method.
Start at a bottom corner, whether on a wall or a roof, and work across one row right to the other side, overlapping each successive piece over the previous one. Then apply the subsequent courses, overlapping the bottom edge over the previous course. Because these overlaps are so small, I find that there's no need to apply (and allow to dry) more contact cement on the top surface of the edge of each sheet that will be overlapped. If you're covering a roof, you'll need to fashion a ridge cap: I usually use a piece of heavy-duty aluminum foil. Cut it to size with your X-acto, make a fold in it to allow it to cover the ridge, then coat both it, and the area on the roof that it will cover, with contact cement. Allow the drying time, then carefully lay it in place. It is important to remember when applying the siding that the bond is instant, so make sure that each piece is where you want it before it touches the structure. And there is no need to press with any more than light finger pressure.
You can leave the siding shiny, for a "brand new" look, Dulcote it, apply grey primer, or any colour of paint, to suit your tastes. If you're making a recently built or well maintained structure, you don't even have to cut it into individual sheets, as the vertical joints in such applications are pretty much invisible. And when weathering, remember that the first areas to rust were the edges, which had no galvanized coating.
Here are a couple of structures that I built using these methods:
The roof of the Lowbanks Stockyard hog pens. The sub-roof is .060" styrene sheet. After application, the roof was sprayed with Floquil Grey Primer, followed by Reefer White, then weathered with a light spray of custom mixed "rust"
The fence around Hoffentoth Bros. Coal. Individual sheets were applied to the fence framework after it had been installed on the layout, then the fence was removed from the layout for application of the lettering (spray painted on using a homemade stencil) and weathering with Floquil paints.
Creechan's Fine Fuels coal dealership. The sheets were applied to a built-up frame of strip styrene: the roof is composed of individual trusses overlayed with strapping, and the walls are Central Valley girders, also with strapping applied. Only some of the roof and walls have individual sheets applied, while some areas were covered with the sheets just as they come out of the package. This gives the impression of individual pieces while saving the modeller a bit of work. The roof is surprisingly strong and is removeable. Paint is a mixture of Floquil colours, with weathering applied.

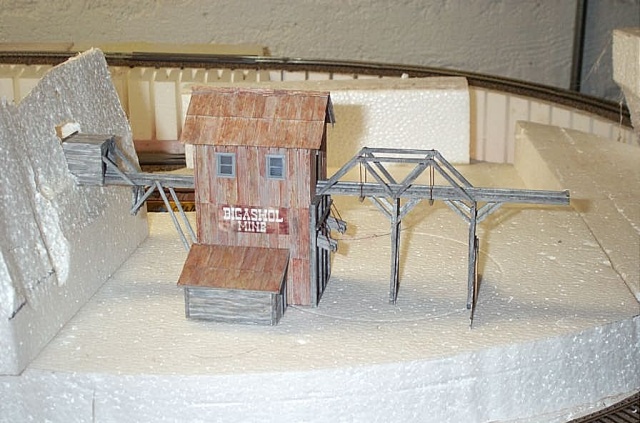
When you have finished your siding or roofing job, you'll have some scraps of material left over: I usually apply some more contact cement to the uncoated side of each piece, except one, then arrange them in a not-too-neat pile, with that one piece with only one side coated, on top. Glue this mini stack to a couple of pieces of weathered lumber, add some rust and weathering to the sheets, and you have a nice scenic element to add to your layout. This is not a very good shot of the scrap piled by the shed, although in all fairness, it wasn't originally intended to be the subject of the photo.
")
I hope this will encourage you to give this method a try.
Wayne