

4x8 figure 8 crossing
- Thread starter YmeBP
- Start date
You are using an out of date browser. It may not display this or other websites correctly.
You should upgrade or use an alternative browser.
You should upgrade or use an alternative browser.
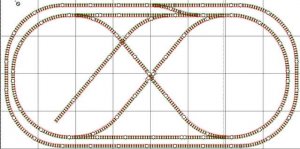
I see 6 probs with the diagram:
1-4: you have to include the 1/3 18" radius pieces when using the switches to complete a circle
5-6: must remove the small straight pieces from the middle of the loops on the figure 8
Eric:thumb:
1-4: you have to include the 1/3 18" radius pieces when using the switches to complete a circle
5-6: must remove the small straight pieces from the middle of the loops on the figure 8
Eric:thumb:
I think there may be a little problem with the track segments you're using. To fit a 90 degree crossing in, you need to get 45 degrees in each of the curves coming in -- where the 4 (or 5) switches are. I'm not sure, but I think the switches are 20 degrees with a spare 10 degree curve to match to the full curve (30 degrees). See if you can do it with a switch, the additional piece and a half (15 degree) curve.
 I think i understand .. i have atlas snap switches, they aren't numbered. So i think you are saying the same thing as thouroughbreed in that i have to use the little stub turns that come w/ the snap switches.
 I think i'm going to bite the bullet and learn xtrakcad becuase i can't get rts 7.0 to do what i want ...
60103 said:I think there may be a little problem with the track segments you're using. To fit a 90 degree crossing in, you need to get 45 degrees in each of the curves coming in -- where the 4 (or 5) switches are. I'm not sure, but I think the switches are 20 degrees with a spare 10 degree curve to match to the full curve (30 degrees). See if you can do it with a switch, the additional piece and a half (15 degree) curve.
60103 said:Does the software have the stub pieces in it? and the half curves?
Yes, i've tried for the last 3 days and i can't seem to get it right ogign to give xtrakcad a shot and repost.
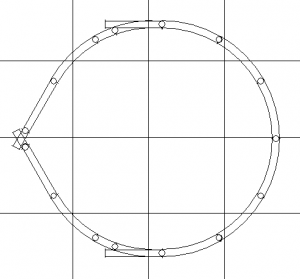
Ok, here is half of the inner figure 8, to be able to put the switches in the right locations,
I used a 60 degree crossing and then 9" straights, the curve pieces are 18" radius. The two small curve pieces are 1/3 18" radius. The switches are snap-switches.
I used a 60 degree crossing and then 9" straights, the curve pieces are 18" radius. The two small curve pieces are 1/3 18" radius. The switches are snap-switches.
Attachments
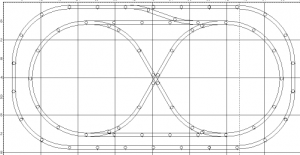
That is a helpIronhead said:Judging from that, the only way he gets the outer loop to fit on the 4x8 is with 60 degree crossings....no way it fits using 90s.....
boy i've gotten as far as to just layout the tracks on the table and play w/ them ahhahaa.Looks liek i didn't scroll down far enough .... THANKS!!!
wow! thanks!!!Thank you soooo much . I'm going to replicate your work in my copy here!!
Yes i've decided to do this project as a way to learn traditional wiring of tracks and accessories, not to mention keep my boys off my rails. They tend to like to see the trains go a little faster than what i like on my layout. Thank you again!!
Beautiful!!! it works i'm going downstairs to try it out!! Thanks again!!!
. I'm going to replicate your work in my copy here!! Yes i've decided to do this project as a way to learn traditional wiring of tracks and accessories, not to mention keep my boys off my rails
. They tend to like to see the trains go a little faster than what i like on my layout. Thank you again!!jesso said:Ok, I did most of the rest. Now remember, those straight lines on the outsides of the figure 8 are reversing tracks so they are going to have to be wired accordingly.
Beautiful!!! it works i'm going downstairs to try it out!! Thanks again!!!
I don't know if you are aware that you can go to the outer circle counterclockwise but have to back up to get back.
If you have a crossover on the lower part of the layout in the opposite direction you would be able to move between both circles freely.
If you have a crossover on the lower part of the layout in the opposite direction you would be able to move between both circles freely.
engineshop said:I don't know if you are aware that you can go to the outer circle counterclockwise but have to back up to get back.
If you have a crossover on the lower part of the layout in the opposite direction you would be able to move between both circles freely.
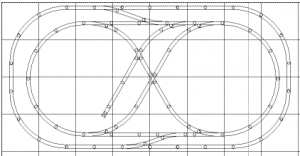
I was thinking about that too as I was drawing it for him. So I have redrawn it and I figured out a way to put the siding in that he wanted. I also put in another connecting line on the other side. You need some different sized sectional track, but it is all readily available.
YmeBP, instant message me if you would like the .ral file
Attachments
Just got finished gluing the track down .... i must say that my apprehension about glueing track is gone... I used nails for my other layout and i think it was a mistake. Using dap adhesive caulk (ran out so i mixed w/ liquid nails) as suggested elsewhere in the forums is MUCH better. I mean .. the track is sooooo solid . I'm very very happy w/ how this is turning out so far, thanks again for the help!.
Some Photo's:

nice smooth and flat:


I've put all the rail joiners in:

Pix of the glued track to come.
. I'm very very happy w/ how this is turning out so far, thanks again for the help!.Some Photo's:
nice smooth and flat:
I've put all the rail joiners in:
Pix of the glued track to come.


The wiring going in:

The top w/o the switch machines in place:

My relay work to control the signals for the turnouts and main line:

The top w/o the switch machines in place:
My relay work to control the signals for the turnouts and main line:
more wiring, i also installed one part of the control panel. This part is for my older son, i haven't figured out how i'm going to do the part for my younger son yet.
Oh i've figured this out too... the stupid little transformers that you get w/ the toy sets suck. I needed two of them in parallel to fire off my switch machines and snap relay.

This is a closeup of my snap-relay wiring:

The panel:

Oh i've figured this out too... the stupid little transformers that you get w/ the toy sets suck. I needed two of them in parallel to fire off my switch machines and snap relay.
This is a closeup of my snap-relay wiring:
The panel:
All done w/ the wiring except the leds .
This is the bottom after i've cleaned up and tacked all the wiring to the wood:

I figured out how to use some vice grips to flatten the wire


All done now i have to wire the control panel

all done w/ the basic wiring

My new bnsf running around the layout.


Now to work on those led;'s and scenery.
. This is the bottom after i've cleaned up and tacked all the wiring to the wood:
I figured out how to use some vice grips to flatten the wire
All done
now i have to wire the control panel
all done w/ the basic wiring
My new bnsf running around the layout.
Now to work on those led;'s
and scenery.O.k. now that i have this thing built and powered i have a question about it's operation!!
I've been trying to get it right and i can't ;( my engines stall when going from the main line to the inner leg of the reversing section of the figrue 8. I have the "x" in the middle blocked and connected to an atlas selector. I have 2 cabs connected to the selector. I have common rail wiring (but both my rails are gapped just in case). Do i need to buy an atlas controller to make the reversing section in the middle of the 8 work seamlessly? Or do i need a primer in reversing loop operation hehehe i'm thinking it's a combination of the 2.
I've been trying to get it right and i can't ;( my engines stall when going from the main line to the inner leg of the reversing section of the figrue 8. I have the "x" in the middle blocked and connected to an atlas selector. I have 2 cabs connected to the selector. I have common rail wiring (but both my rails are gapped just in case). Do i need to buy an atlas controller to make the reversing section in the middle of the 8 work seamlessly? Or do i need a primer in reversing loop operation hehehe
i'm thinking it's a combination of the 2.