

hello everyone, i just today recieved my copy of 3rd planit track design software. i have followed the first tutorial and created a simple oval of track to learn. i have followed directions and cant get it to render in 3D. does anyone have any tips or suggestions on how to effectively use this program? from what i read before purchasing this software, i should be able to draw my benchwork accuratley, and be able to take a virtual look around my work when finished, is this correct? any and all help or ideas or suggestions are appreciated. thanks!
3rd planit question.....
- Thread starter trainsteve2435
- Start date
You are using an out of date browser. It may not display this or other websites correctly.
You should upgrade or use an alternative browser.
You should upgrade or use an alternative browser.
3rd PlanIt is COOL!!
Yep, yer gonna' enjoy that there progiegram! I sure do. You might find it has a steep learning curve, but stick with it and soon you will get the hang of it.
To get to the 3D image of your work, The best way is to push that blue cube in the task bar.
There are hot keys that make the whole thing go much faster, and the sooner you learn them, the better off you'll be.
Look in the "Help" and then look at "Help Topics" and paruse that for what ever you want to do. There are also a list of the tutorials in there to help you make the things you want, like walls, wheels, and how to build rolling stock and engines.
I don't bother with all the under the table stuff. I fugure that part is prittymuch straight forward, also my puter is slower and the memory is not so great so I speed things up by keeping the images to what I realy need to figure out.
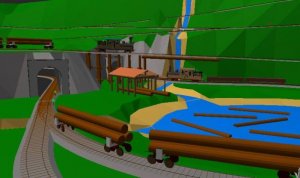
Here is a pic from my logging layout that I built in 3rd PlanIt. I squeezed 105 feet of track into a 7.5' x 5' space (with the hidden staging underneath) I got all the grades, crossovers, and sceanery worked out just how I want it. I even knocked up a Climax engine and log cars to compleat the scean.
Yep, yer gonna' enjoy that there progiegram! I sure do. You might find it has a steep learning curve, but stick with it and soon you will get the hang of it.
To get to the 3D image of your work, The best way is to push that blue cube in the task bar.
There are hot keys that make the whole thing go much faster, and the sooner you learn them, the better off you'll be.
Look in the "Help" and then look at "Help Topics" and paruse that for what ever you want to do. There are also a list of the tutorials in there to help you make the things you want, like walls, wheels, and how to build rolling stock and engines.
I don't bother with all the under the table stuff. I fugure that part is prittymuch straight forward, also my puter is slower and the memory is not so great so I speed things up by keeping the images to what I realy need to figure out.
Here is a pic from my logging layout that I built in 3rd PlanIt. I squeezed 105 feet of track into a 7.5' x 5' space (with the hidden staging underneath) I got all the grades, crossovers, and sceanery worked out just how I want it. I even knocked up a Climax engine and log cars to compleat the scean.
Attachments
There are acctually 4 layers in my track plan. A lower level for the hiddon staging yard. A ground level for for the beginning elevations of the layout. An upper level for the top tracks. And one more for the switchbacks.
There are loads of layers in my plan. You can have as many as you want. You can group the objects together as well (something else you should take notice of).
Here is what I was able to do befor I ran out of memory. (that is why there are so few buildings in my plan)
There are loads of layers in my plan. You can have as many as you want. You can group the objects together as well (something else you should take notice of).
Here is what I was able to do befor I ran out of memory. (that is why there are so few buildings in my plan)
Attachments
Yep, just let yer imagination run wild. I got loads of track plans and ideas I have drawn with 3rd PlanIt. FUN FUN FUN!!!!!!!!!!!! :thumb:
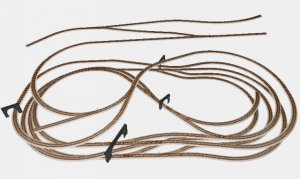
You can do all the benchwork if thats your thing too. Here is a pic from an idea I had when we were descussing switching mechanisoms for 3 way stub switches. Best way to describe my idea was with a drawing. (well, acctually, there was a few)
I hope this has helped you. RailRon is real good at the 3rd Planit thing. Much better than I am. Just check out his web site.
http://www.geocities.com/baumgaron/
Have fun with yer progiegrammy and don't be shy about askin' anythin'")
TrainClown
You can do all the benchwork if thats your thing too. Here is a pic from an idea I had when we were descussing switching mechanisoms for 3 way stub switches. Best way to describe my idea was with a drawing. (well, acctually, there was a few)
I hope this has helped you. RailRon is real good at the 3rd Planit thing. Much better than I am. Just check out his web site.
http://www.geocities.com/baumgaron/
Have fun with yer progiegrammy and don't be shy about askin' anythin'
TrainClown
Attachments
TrainClown,
thank you for the flowers, Chris! You make me blush with your compliments!ops:
From your logging layout I see that you are very active with 3rdPlanit, too - and you are really mastering the program! Also the use of this proggie for your tutorial with the 3-way stub switch linkage was great. Frankly, I'd never thought of that! Ingenious! :thumb:
Steve,
If you have problems, you are always welcome here at the Gauge!
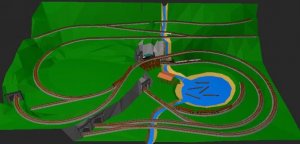
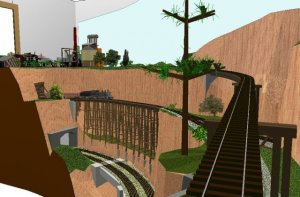
I hope that you are getting along with the 3d rendering now. It is really a fantastic way to visualize what you are going to build. Here is an example from my layout - a look down from the highest bridge of my TC&S RR.
Ron
thank you for the flowers, Chris! You make me blush with your compliments!
ops: From your logging layout I see that you are very active with 3rdPlanit, too - and you are really mastering the program! Also the use of this proggie for your tutorial with the 3-way stub switch linkage was great. Frankly, I'd never thought of that! Ingenious! :thumb:
Steve,
If you have problems, you are always welcome here at the Gauge!
I hope that you are getting along with the 3d rendering now. It is really a fantastic way to visualize what you are going to build. Here is an example from my layout - a look down from the highest bridge of my TC&S RR.
Ron
Attachments
hey guys, thanks for the help and suggestions. i have tried everything that has been suggested and checked every adjustment i can think of, but no luck. i still cant lay a piece of track out and view it in 3d. my frames per second is working and i know the image is moveing, but i just cant see it. is there a certain placement for the camera and point? is there certain settings for the other aspects of this? i dont know, and im really confused, plus kinda discouraged. thanks for all the help!
I might as well toss another fly into the ointment. I downloaded the trial version to play with before shelling out the bucks. The problem I had and couldn't figure out is how to deal with flex track. I finally got frustrated and gave up, but with some willing users with ready information I might look at it again.
Steve,
do you have a blank, white screen, when you switch to 3d view? Do you see anything at all on the 3d screen?
I had the case of the blank screen, when I installed 3rdPlanIt on a HP laptop. This one had an ATI graphics chip. 2d construction was ok, but in 3d view I couln't see anything at all. I had a high screen resolution of 1024x768 pixel.
Then I reduced the screen resolution of the laptop to VGA 'quality' (640x480 pixel) - and suddenly there was a 3d picture visible. But of course the rendering was very coarse, and also the 2d views were quite ugly (although the 3rdPlanit tools worked alright).
In this case the graphic chip was simply outdated, and most of all the laptop had not enough RAM memory. I'd guess that 64 MB is a minimum - my laptop only had 16 MB!
I fear that your problem could be a hardware problem of your computer. Check the technical data of your machine - perhaps this could be a clue. Perhaps it could help to download the newest graphic driver programs of your graphics card.
Pitchwife,
when laying track I always put down the straight sections of the planned line first. Don't care for elevation, that comes later.
Then connect the straight sections with the 'Connect tool', with or without easements. When your line is like you want to have it, you can set the elevation and grades by making a 'path' (also in the 'Connect tool' menu). With the 'elevation and grades' button in the menu bar (a triangle with a % sign) you can set elevation of start/end point and/or the grade of the track section.
It needs some tinkering and getting used to, but the learning curve is quite steep and it becomes real fun to lay out elegantly swooping curves! Have fun! :thumb:
Ron
Arrrrrrrrrrrr Steve!
I know just what yer going through. Yer problem is that you haven't set up the camera befor you go to 3D.
So.
In 2D, go to "View" and open the menue called "3D origin and camera". From that menue you need to do 2 things.
First- Pick "move 3D origin to center of view"
Second- Pick "center view on 3D origin"
Now hit your blue cube to render your file in 3D and you should see more than open space. The 3rd PlanIt world is quite large so you can build a huge plan if you wanted to and it's easy to get lost in the 3Dworld. You will now be able to use your arrow keys to manover around your track plan. Holding down "shift" and "Ctrl" buttons make the camera move past the 3D origin in different ways. This is why it's important to always know where your 3D origin is as the camera revolves around that. So get renderin'
Pitchwife, after you trudge away with the sectional track, you will feel freedom when you lern how to set out the flex track. So I will try and tell you the secrets of flex track.
Now there is a button on your task bar that looks like three pieces of paper stacked up with a red check-mark over them. Put your cursor over this and it will pop up a lable that reads "enable layers" Push this button and open the main layers window. This is the window where you create new layers and manage them, tuning them on and off as you work on different aspects of your plan. There should only be one layer to start with.
At the top of the window is 4 buttons.
The first one crates a new layer and has a yellow asterist on it, use this if you are going to create a new layer. It opens the new layers parameters window.
The second button has a yellow pencile over the papers and if you put your cursor over it, it will pop up a lable that reads "modify the selected layer" This will open the highlighted layer's parameters window. And this is how you change the parameters of already egsisting layers or check them to see how they are set.
The other 2 buttons are self explanitory and only come in to use when you got tons of layers to deal with.
So open the parameter window for the layer you are working on and make sure the box beside "create new objects as track" is checked. This way any new lines you draw will become track automaticly. And likewise, if you want to draw a building or some other object other than track, this box needs to be clear.
So now you have made sure your drawing track. So now zoom in on your grid so the size of your proposed track plan will fit within your screen. Lets say it will be 4' x 8'. Now go to your "Tool Kit" window and click on the magnifieing glass. This opens the zoom options, and pick the lower right button that sets this view as your favorite. This way when you are working and you zoom in on a certin part, you can always come back to this view by pressing "Alt+F4". This is where the hot keys come in so handy. Anyway.
Choose the "Tool Kit " again and select the "Draw" button. This opens your options for drawing various lines. Choose the straight line.
Put your cursor somewhere on the plan and hold the left mouse button down and drag a straight piece of flex track accross the screen. And there is a straight piece of flex track. Now if you double left click the mouse you will return to the "Pick" tool, and you can now highlight the track and move it where you like. You can also get to the "Pick" tool through the "Tool Kit" window.
Now to make a curve, go "Tool Kit", then "Draw", then choose the circle button from the options. Place the cursor in the middel of where you want the circle and press the left mouse button as you drag open a circle of track. You can guess the size, but if you have a radious in mind then here's what you do. On the right side of your screen is a window that shows you details and options. This is where the buildings librairy is as well as the rolling stock. At the top is the list of paramiters for the current object you have picked. So now you have drawn a circle, you will see the the properties of that circle in this window. At the top of the list is a simble that is a circle with an "R" with an arrow beside it, inside the circle. This means Radious, and beside this simble in a box is a mesurment, and that is the size of your circle of track. To change the radious, simply make sure the circle of track is highlighted, then click on the box with the mesurment in it and it will turn to blue and start flashing. Enter 18 or 22 and then hit enter and your circle of track will be transformed to the correct radious.
Now highlight the circle of track, then double click on it and the track turns into a line with a dot at the side. The dot is actually what is refered to as a handle, and there are acctualy 2 of them on top of each other. So grab a handle with your cursor (left click and drag) and revolve the circle. You will find that you can reduce the amount of line down to half a circle or less, and now you can see the other handle. Once you have the portion of curve you think you need, double click on the background and the line returns to track.
Now drag one end of the curve over the end of the straight track, untill you see the straight track change collor, and drop it there. The curve will line up with the straight track and conect. You can still alter the length of the curved bit of track, by highlighting it and then double clicking on it just like befor. Drag a second straight section to the open end of the curve and it will line up the same way.
YIKES! I'm getting long winded
One more thing you should know about to have the just of things.
The third button in your "Tool Kit" leads you to the "Connect" options. You will want to play with all of these options. The button I use the most is "connect with easements" Can't always use it though. Sometimes it takes some fiddling around. It's easyer to join the tracks together if they are farther apart (that's what I fould). Draw 2 circles. Pick "Connect with easements" and click on the first circle. If the red line (that gives you a clue as to where the track will come off the circle) is coming of the wrong part of the circle, then right click the mouse to reverse the direction. Then move the cursor (don't hold the left mouse button down as to drag it!) over to the second circle until it highlights and click the left mouse button again. and now you joined 2 circles with a straight piece of track and 2 easement sections without acctually drawing the straight bit of track.
For fun, I lay out a bunch of circles on a page and then connect them with the "Connect with easements" tool.
ONE MORE TIP!!!!!!!!!!!!!!
So you made an 18" circle and all your circles will be 18". So copy it. Here's how. In the "Tool Kit" go to the "Pick" options. The pick tool is represented by an arrow. Beside that is another arrow with a "+" beside it. Choose this button and anything that you pick with the cursor (pick, meaning left click on the mouse) you will make a copy of. Just pick something and drag a copy some place else.
YIKES Again! It's 4am now thime for some sleep :sleeping:
See if all this helps you out.
TrainClown :thumb: :sleeping: :sleeping: :sleeping: :sleeping:
and the clown sings to himself as he drifts off:
Rockin' rollin' ridin'
out along the bay
all bound for moring town
many miles away
Judy's at the engine
Jody rings the bell
Semore swings the lantern
to show that all is well
Rockin' rollin' ridin'
out along the bay
all bound for morning town
many miles away........................ :sleeping:
I know just what yer going through. Yer problem is that you haven't set up the camera befor you go to 3D.
So.
In 2D, go to "View" and open the menue called "3D origin and camera". From that menue you need to do 2 things.
First- Pick "move 3D origin to center of view"
Second- Pick "center view on 3D origin"
Now hit your blue cube to render your file in 3D and you should see more than open space. The 3rd PlanIt world is quite large so you can build a huge plan if you wanted to and it's easy to get lost in the 3Dworld. You will now be able to use your arrow keys to manover around your track plan. Holding down "shift" and "Ctrl" buttons make the camera move past the 3D origin in different ways. This is why it's important to always know where your 3D origin is as the camera revolves around that. So get renderin'
Pitchwife, after you trudge away with the sectional track, you will feel freedom when you lern how to set out the flex track. So I will try and tell you the secrets of flex track.
Now there is a button on your task bar that looks like three pieces of paper stacked up with a red check-mark over them. Put your cursor over this and it will pop up a lable that reads "enable layers" Push this button and open the main layers window. This is the window where you create new layers and manage them, tuning them on and off as you work on different aspects of your plan. There should only be one layer to start with.
At the top of the window is 4 buttons.
The first one crates a new layer and has a yellow asterist on it, use this if you are going to create a new layer. It opens the new layers parameters window.
The second button has a yellow pencile over the papers and if you put your cursor over it, it will pop up a lable that reads "modify the selected layer" This will open the highlighted layer's parameters window. And this is how you change the parameters of already egsisting layers or check them to see how they are set.
The other 2 buttons are self explanitory and only come in to use when you got tons of layers to deal with.
So open the parameter window for the layer you are working on and make sure the box beside "create new objects as track" is checked. This way any new lines you draw will become track automaticly. And likewise, if you want to draw a building or some other object other than track, this box needs to be clear.
So now you have made sure your drawing track. So now zoom in on your grid so the size of your proposed track plan will fit within your screen. Lets say it will be 4' x 8'. Now go to your "Tool Kit" window and click on the magnifieing glass. This opens the zoom options, and pick the lower right button that sets this view as your favorite. This way when you are working and you zoom in on a certin part, you can always come back to this view by pressing "Alt+F4". This is where the hot keys come in so handy. Anyway.
Choose the "Tool Kit " again and select the "Draw" button. This opens your options for drawing various lines. Choose the straight line.
Put your cursor somewhere on the plan and hold the left mouse button down and drag a straight piece of flex track accross the screen. And there is a straight piece of flex track. Now if you double left click the mouse you will return to the "Pick" tool, and you can now highlight the track and move it where you like. You can also get to the "Pick" tool through the "Tool Kit" window.
Now to make a curve, go "Tool Kit", then "Draw", then choose the circle button from the options. Place the cursor in the middel of where you want the circle and press the left mouse button as you drag open a circle of track. You can guess the size, but if you have a radious in mind then here's what you do. On the right side of your screen is a window that shows you details and options. This is where the buildings librairy is as well as the rolling stock. At the top is the list of paramiters for the current object you have picked. So now you have drawn a circle, you will see the the properties of that circle in this window. At the top of the list is a simble that is a circle with an "R" with an arrow beside it, inside the circle. This means Radious, and beside this simble in a box is a mesurment, and that is the size of your circle of track. To change the radious, simply make sure the circle of track is highlighted, then click on the box with the mesurment in it and it will turn to blue and start flashing. Enter 18 or 22 and then hit enter and your circle of track will be transformed to the correct radious.
Now highlight the circle of track, then double click on it and the track turns into a line with a dot at the side. The dot is actually what is refered to as a handle, and there are acctualy 2 of them on top of each other. So grab a handle with your cursor (left click and drag) and revolve the circle. You will find that you can reduce the amount of line down to half a circle or less, and now you can see the other handle. Once you have the portion of curve you think you need, double click on the background and the line returns to track.
Now drag one end of the curve over the end of the straight track, untill you see the straight track change collor, and drop it there. The curve will line up with the straight track and conect. You can still alter the length of the curved bit of track, by highlighting it and then double clicking on it just like befor. Drag a second straight section to the open end of the curve and it will line up the same way.
YIKES! I'm getting long winded
One more thing you should know about to have the just of things.
The third button in your "Tool Kit" leads you to the "Connect" options. You will want to play with all of these options. The button I use the most is "connect with easements" Can't always use it though. Sometimes it takes some fiddling around. It's easyer to join the tracks together if they are farther apart (that's what I fould). Draw 2 circles. Pick "Connect with easements" and click on the first circle. If the red line (that gives you a clue as to where the track will come off the circle) is coming of the wrong part of the circle, then right click the mouse to reverse the direction. Then move the cursor (don't hold the left mouse button down as to drag it!) over to the second circle until it highlights and click the left mouse button again. and now you joined 2 circles with a straight piece of track and 2 easement sections without acctually drawing the straight bit of track.
For fun, I lay out a bunch of circles on a page and then connect them with the "Connect with easements" tool.
ONE MORE TIP!!!!!!!!!!!!!!
So you made an 18" circle and all your circles will be 18". So copy it. Here's how. In the "Tool Kit" go to the "Pick" options. The pick tool is represented by an arrow. Beside that is another arrow with a "+" beside it. Choose this button and anything that you pick with the cursor (pick, meaning left click on the mouse) you will make a copy of. Just pick something and drag a copy some place else.
YIKES Again! It's 4am now
thime for some sleep :sleeping: See if all this helps you out.
TrainClown :thumb:
:sleeping: :sleeping: :sleeping: :sleeping: and the clown sings to himself as he drifts off:
Rockin' rollin' ridin'
out along the bay
all bound for moring town
many miles away
Judy's at the engine
Jody rings the bell
Semore swings the lantern
to show that all is well
Rockin' rollin' ridin'
out along the bay
all bound for morning town
many miles away........................ :sleeping:
hey guys, i have tried exactly what you told me to do, but im still getting a white screen. i have tried to zoom out, in to the left and to the right, but i cant see nothing but white. im useing a 128mb G force 4 video card, and i have used 3ds max quite a bit, and with no problems at all. do i need to select all when im viewing in 3d? should my resoulution to a certain size? im really confused, maybe im missing a step or something small, but i dont know. the way im going i'll never get a track plan done. i have spent two days just trying to view in 3d, but no luck! thanks again, i really appreciate the help and suggestions.
PS i downloaded the peoria western layout and tried to view it in 3d also, but i cant. i can hear the signal bells ringing and the loco idleing, but i cant view nothing but white.
PS i downloaded the peoria western layout and tried to view it in 3d also, but i cant. i can hear the signal bells ringing and the loco idleing, but i cant view nothing but white.
Steve,
your hardware should more than suffice for 3d rendering.
Just another idea:
When you press ALT-F3 (in 2d view) you should see all of your drawing. Do you see the symbols for the camera and its target point (a square with a cross)?
If not, hit ALT-O (the letter O, not the number 0) and ALT-F3 again. ALT-O toggles the visibility of the camera on/off.
Now you should see your drawing and the camera symbols.
Now click on the camera and check its z coordinate in the window at right. Perhaps it is much too high or below your tracks. You can click on the number and adjust the camera height - and of course you can drag the camera to the point you want it to be.
Then the same procedure for the camera target point: Move it to the center of your drawing and set the height to the height of your tracks. And this time the 3d view should work...
I hope this helps, if not, call again.
Rin
Ron, you weeren't kidding when you said that this has a steep learning curve. TC, I'll have to print out your instructions and maybe play with them this weekend. Just about got everything ready to start moving stuff out of what will be my "train room", so that will take precedence of course. :thumb: :thumb:
TC, I'll have to print out your instructions and maybe play with them this weekend. Just about got everything ready to start moving stuff out of what will be my "train room", so that will take precedence of course. :thumb: :thumb:hey ron, thanks again for the info, but i tried what you suggested, i set the "Z" position for the camera at 3" and for the point i set it at 0". is this where im going wrong? is there a recomended setting for these two items as far as elevation? i just cant figure out what im doing wrong. i even un installed the program and re installed it, but no difference. i have updated all of my video drivers, and even run a performance test on it to make sure, and its all ok. must be something im missing. do i need to have all the objects selected when viewing in 3d? thanks again!:cry:
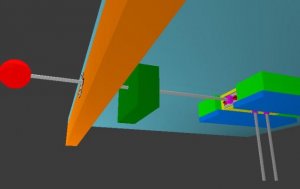
Steve, I played around a bit and I have found onother possibility, why you can't see anything. Do you want to make an experiment with me?
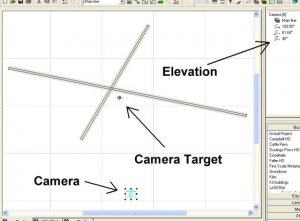
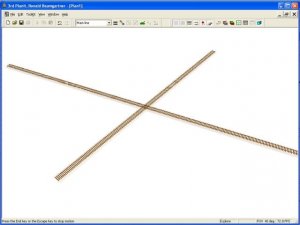
Open a new window, the hit the L key. The 'line drawing cursor' should appear (a plus sign with an short line to the right). Now draw a simple cross in the center of the screen: Two tracks that cross each other.
If you don't see the camera and/or the camera target, hit ALT-O, and they should appear. Perhaps the camera is out of view, then hit ALT-F3. Now you should see the tracks plus camera and target.
Highlight the tracks (click - they turn turqouise), then check elevation in the properties window at right. Should be 0". Do the same for the camera target, set to elevation 0" and drag it near the center of the track crossing.
Now the camera: Drag it to the lower edge of your drawing window and set the camera elevation to about 40".
You should see now something like the left picture. Then hit the tabulator key or click the blue 3d-cube - and now you should see something like the right picture!
Attachments
I hope it worked this time!
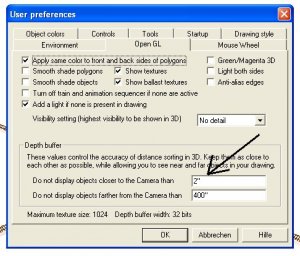
If not, then I found one more thing to check: Hit ALT-P, and you get a pop-up window 'User preferences'. Click on the 'Open GL' tab and check the marked window. It should show a very low value, say 1" or 2".
3rdPlanIt will not show anything which is nearer that this distance. And if this value is larger than the size of your drawing, you have a blank screen, when you try to get a 3d view.
I hope that it works out this time. If not, let me know. Oh well, that's the problem with all these programs: You only have to check the wrong box or radio button, or enter a wrong value somewhere - and the whole thing goes wrong IN A BIG WAY!
As they say: To err is human, but for a complete chaos you need a computer!
Ron
Attachments
hey everyone, just wanted to let everyone know, i got the problem fixed. turns out i had a small virus on my computer that didnt affect anything but my 3d view. it was a .vbs virus. i called jeff from eldorado software and we talked for around an hour or so, he is really a nice guy. so anyways, thanks to all of you for your suggestions and help!
Steve, I'm so glad that you localized the culprit. So there are even viruses who are fighting against model railroading?
Now I hope that you'll enjoy 3rdPlanIt 100%. Show us your work, when you designed your first layout. :thumb:
Ron
Now I hope that you'll enjoy 3rdPlanIt 100%. Show us your work, when you designed your first layout. :thumb:
Ron