1:1 Scale RMS Titanic / Olympic Grand Staircase Clock

Dec 9, 2022
16
36
15
30
Hello! It's been a minute since I last posted on this thread, but I've been thinking about teaming up with some talented creators on this platform to create a 1:1.5 Scale RMS Titanic / Olympic Grand Staircase Clock. I decided to go with this scale because it would sport a very common diameter for the clock insert (152.4 mm or 6 in) that would make it easy to find a clock insert that would suit your needs. I did some exploring and found a wonderful company that produces absolutely stunning 1:6, 1:2, and 1:1 scale reproductions of this beautiful clock. I did some further digging and found a beautiful 3d model reproduction of the clock that was created for a game that was a very faithful reproduction of the ship. I reached out to my buddy Mr. Wong Hidayat as I have commissioned many models with him previously and I know he is a wizard with pepakura, he experimented with the 3D Model and found it to be too difficult for him to reproduce in paper format. I was curious if anyone on this platform has any experience 3d modeling, or is a wizard at unfolding things in pepakura, as I would love to see this model become a thing in the future. This would make for a great conversation starter and serve as a wonderful piece of artwork in anyone's home, so if you would like to help me reproduce this beautiful piece of artwork in paper form, please let me know. Just name a price and I've got you covered. This project will take some research and time to develop so that we can make the most faithful reproduction of the piece in paper, but I guarantee that it will be worth it. Thank you all for your help and support!
-OSN Papermodels
 

Attachments

  • fa38c4_9e9479f883614fb7a6b200c1ddc337e7~mv2.jpg
    fa38c4_9e9479f883614fb7a6b200c1ddc337e7~mv2.jpg
    307.3 KB · Views: 13
Thats a nice piece of art work. This is way out of my papermodeling comfortzone I can't help you with this one.
 
An interesting project - the Titanic had two Grand Staircases, was the same design used for both?
No, This clock design would have been only used in the Forward Grand Staircase of Titanic, Olympic, and Britannic (If she had been given the chance to be converted from hospital ship to ocean liner). Olympics Grand Staircase Clock sill exists to this day, however the original oak color is long gone, it almost looks to be white. This is most likely due to it being painted "Adam Green" in the 1930's. To my knowledge it is still lost to history where Britannic's clock is. With how much time has passed it would not be of surprise to me that it's destroyed, but I am not sure.
 
No, This clock design would have been only used in the Forward Grand Staircase of Titanic, Olympic, and Britannic (If she had been given the chance to be converted from hospital ship to ocean liner). Olympics Grand Staircase Clock sill exists to this day, however the original oak color is long gone, it almost looks to be white. This is most likely due to it being painted "Adam Green" in the 1930's. To my knowledge it is still lost to history where Britannic's clock is. With how much time has passed it would not be of surprise to me that it's destroyed, but I am not sure.
Very informative and great info...some things always have a habit of turning up, which are presumed lost... good luck with this and hope you get this project started - maybe a 3d printed kit would be a better option, as human forms really are hard to replicate in paper methinks?
 
The work involved in making this into a model would be a vast undertaking. More of a project for a 3D printer. I can't see how one could be made out of paper in any way that would be repeatable, or would yield a template. It would be a one off, much like the wood carving, or if it's plastic, the injection mold that probably cost half a million to produce. You have to be a sculptor. :)
 
I'm going to attempt to unfold this massive model. I put the 3D model into pepakura and it turns out it isn't super complex, it's almost a low-poly model, but it still has a ton of parts. The model will have to be broken down into hundreds if not thousands of little squares and triangles and even with the parts as compact as possible I figure that the pdf will be 50-100 pages of parts. I think I will offer it in a plain white color, and I may team up with one of the great graphic designers for paper models to create a wood texture version. If I am going to put in all the effort for this one, I think I'm going to go with a 1:1 scale version. Clock insert will be about 8 inches in diameter. This will make the finished product stand at nearly 40 inches tall, (exact will be 38.5 inches in height, and 29.72 inches in width) Not many people will have the space for this impressive clock but it will be able to be scaled down so it can fit wherever you would like. The 3D Model is impressive even being "low-poly" and features more detail than some of the other clocks you can find on the market to this day. I will begin unfolding as I learn more about how to use pepakura and hopefully in the coming weeks I will have a finished product in a plain white color that I will test build. I will intend to give this model for free, but I may charge for the color version as I need to raise funds for my Australia tour with my local orchestra. We get to play in the Sydney Opera House so I am quite excited for that. Linked is a photo of the 3D Model in pepakura so you can get an idea of the impressive size and get an idea of what the finished product will look like. I begin unfolding today and I will update you all throughout the process even through all the headaches! Thank you all for your support.
 

Attachments

  • TITANICCLOCK.JPG
    TITANICCLOCK.JPG
    80.2 KB · Views: 6
I'm going to attempt to unfold this massive model. I put the 3D model into pepakura and it turns out it isn't super complex, it's almost a low-poly model, but it still has a ton of parts. The model will have to be broken down into hundreds if not thousands of little squares and triangles and even with the parts as compact as possible I figure that the pdf will be 50-100 pages of parts. I think I will offer it in a plain white color, and I may team up with one of the great graphic designers for paper models to create a wood texture version. If I am going to put in all the effort for this one, I think I'm going to go with a 1:1 scale version. Clock insert will be about 8 inches in diameter. This will make the finished product stand at nearly 40 inches tall, (exact will be 38.5 inches in height, and 29.72 inches in width) Not many people will have the space for this impressive clock but it will be able to be scaled down so it can fit wherever you would like. The 3D Model is impressive even being "low-poly" and features more detail than some of the other clocks you can find on the market to this day. I will begin unfolding as I learn more about how to use pepakura and hopefully in the coming weeks I will have a finished product in a plain white color that I will test build. I will intend to give this model for free, but I may charge for the color version as I need to raise funds for my Australia tour with my local orchestra. We get to play in the Sydney Opera House so I am quite excited for that. Linked is a photo of the 3D Model in pepakura so you can get an idea of the impressive size and get an idea of what the finished product will look like. I begin unfolding today and I will update you all throughout the process even through all the headaches! Thank you all for your support.
Just realized the dimensions are wrong on this previous message, the real 1:1 scale dimensions are 48.5 Inches Tall, and 37.25 Inches Wide.
 
  • Like
Reactions: micahrogers
The first part of this BEAST of a clock is being put together. I added a screenshot from pepakura to show what part this is, and for just the clock part, this thing is huge! It measures at nearly 14 inches in diameter. I added in a photo of myself with this piece to give you a sense of scale. I will be adding on the decorative elements to this part tomorrow and I will add another update when that is finished. Then I will move on to the 2 female figures named "Honor" and "Glory" after that. Thank you all for the support.
 

Attachments

  • Screenshot (854).png
    Screenshot (854).png
    112.5 KB · Views: 5
  • 0802232257_HDR (1).jpg
    0802232257_HDR (1).jpg
    415.5 KB · Views: 4
  • 0802232258_HDR (1).jpg
    0802232258_HDR (1).jpg
    546.5 KB · Views: 5
  • 0802232258.jpg
    0802232258.jpg
    525.9 KB · Views: 5
Holy cow!!! I agree with @zathros , this is a huge undertaking but I also think at this size it's doable. However, you have to make sure that the pattern was cleaned up first. There must not be any intersections (overlapping parts). These cannot be edited out in Pepakura, only a 3D modeling program can do that. It's good to see that you are doing a test build. This will show you the requirements and tricky areas of the model. Smart move to make a white model first. :) Please note that you can't texture a model in Pepakura if it doesn't have assigned UV coordinates or got a texture before unfolding. So if the model is completely white you will have to unfold it again after texturing. I'll have to see if Pep is able to import UV coordinates after unfolding though, there is a function to update an unfolded model I'll tell you more when I am back from work. :)
 
Alright, you are lucky. :)

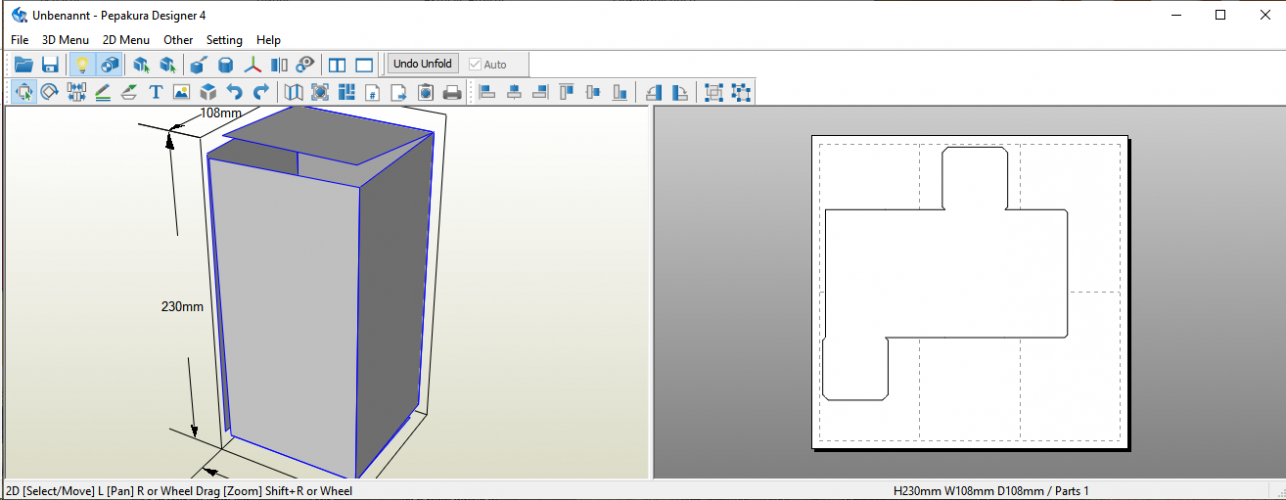
I have rigged up a dummy file (a simple block without texture), unfolded it in Pepakura and saved it as PDO.

1.png

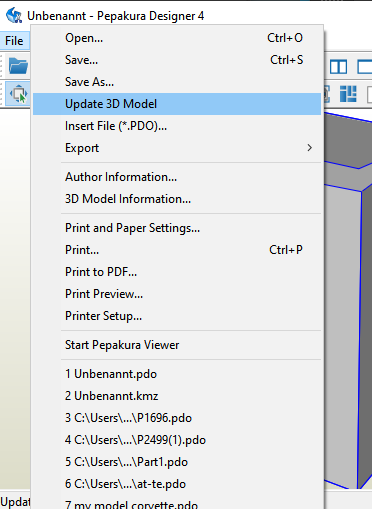
Then I edited the original 3D file and added a texture. Then I opened the dummy file PDO in Pepakura and went to File > Update 3D model and chose the newer file with the texture.

2.png

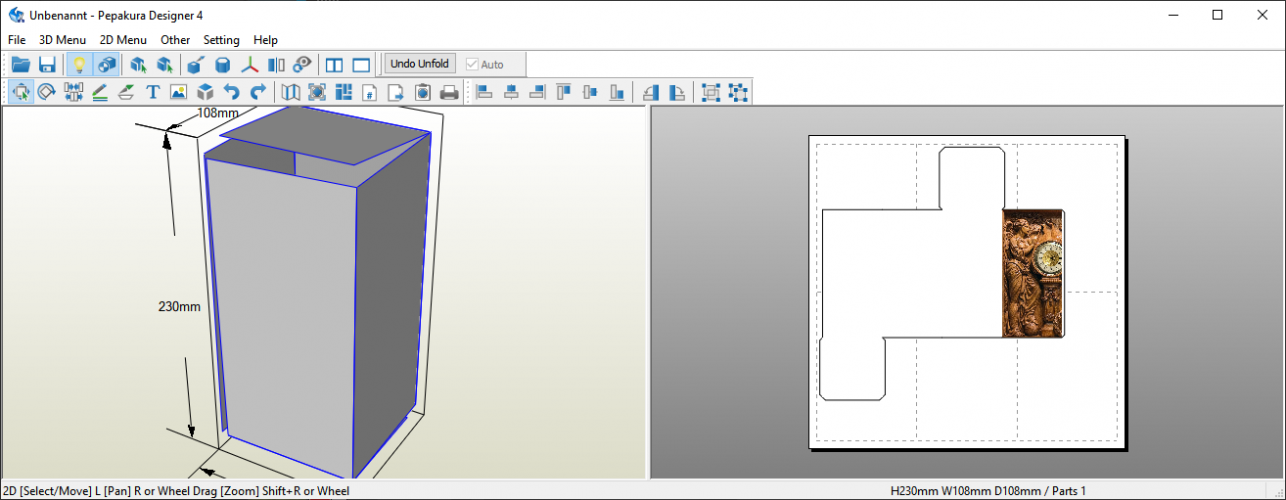
Pepakura opened the file without problems and imported the texture! :)

3.png

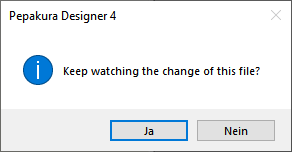
You can even tell Pepakura to watch the 3D file:

4.png

This makes Pepakura check the original 3D file when opening the respective PDO and apply all changes made to the original file to the unfold. So if you change the geometry or the texture the change is immediately ported over to the PDO. :)
 
I suggest to work in sections. Save often so that your development does not get lost if the program crashes.

The clock looks a bit "edgy". I would replace the clock with a shape which has more faces to make it look smoother. On a big model simplifications and blocky pieces show up easier. Of course it would be best to use a real clock of the same diameter. ;)

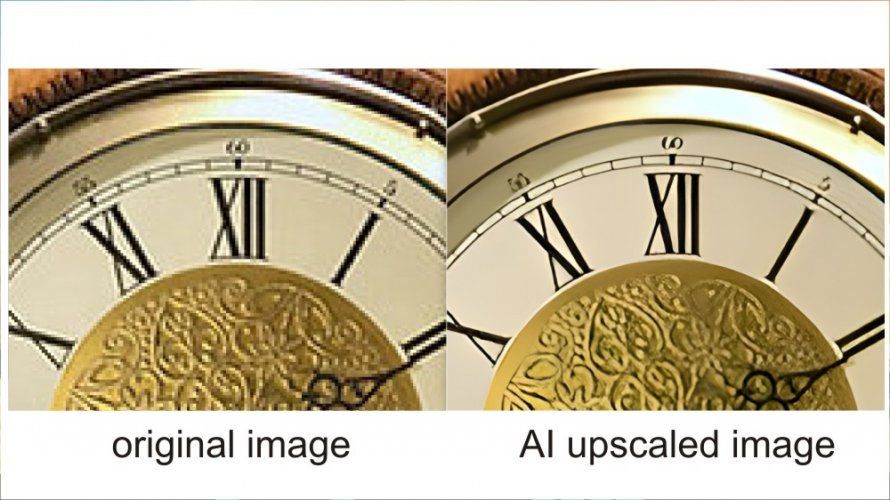
The picture of the real clock in the first post of the thread looks very good and could be used as a texture, however, the resolution should be enhanced. Right now it is 766 x 994 pix big which will still look good on a 5" x 6.6" canvas. If you go bigger you should make a completely new texture based on the image (which is best since you don't have to deal with unwanted shadows on the finished model) or enlarge the picture. There are several services which upscale bitmap graphics using AI for free. The results are not perfect but promising. I have attached two rescaled images, one at 1532 x 1988 pix and the other at 6128 x 7952 pix. You may give it a try, just place it before the 3D model and project the picture on it.

Grafik1.JPG

:)
 

Attachments

  • fa38c4_9e9479f883614fb7a6b200c1ddc337e7~mv2(1).zip
    17.2 MB · Views: 1
  • fa38c4_9e9479f883614fb7a6b200c1ddc337e7~mv2.zip
    1.2 MB · Views: 0
Last edited:
The early versions of Pepakura were unable to handle hi-res textures. The limit was 1024 x 1024 pix. The result were parts with blurry textures. Fortunately there is a hi-res version of Pepakura which allows textures up to 50,000 x 50,000 (!) pix and IIRC the regular newer Pepakura versions allow higher-res textures, too (I guess up to 4,000 x 4,000 pix). You may bypass these imitations and increase the max texture size indefinitely by cutting the texture image into squares of the max possible size and apply each texture square separately to the model. This however requires some very careful alignment but it can be done. Any visible flaws can be edited out using a graphics program on the unfolded template later.
 
The early versions of Pepakura were unable to handle hi-res textures. The limit was 1024 x 1024 pix. The result were parts with blurry textures. Fortunately there is a hi-res version of Pepakura which allows textures up to 50,000 x 50,000 (!) pix and IIRC the regular newer Pepakura versions allow higher-res textures, too (I guess up to 4,000 x 4,000 pix). You may bypass these imitations and increase the max texture size indefinitely by cutting the texture image into squares of the max possible size and apply each texture square separately to the model. This however requires some very careful alignment but it can be done. Any visible flaws can be edited out using a graphics program on the unfolded template later.
WOW! Thank you so much for all that info. Unfortunately I am not sure how much of that uses the licensed version of pepakura, but I am only working off the free version as of now. Until I purchase the licensed version I will be building the model as I have been for the last few days. Yeah, the model is a bit "edgy" but if I were to work off of a smooth version the amount of parts and tabs would triple and it's already going to be difficult to have the patience to finish this one. I am currently working on the decorative elements for the clock and even though those are edgy as well, they really add a lot to the model. It's taken me all day just to finish 1/4th of the decorations that go around the clock due to the complexity of it. More updates coming later tonight hopefully.
 
WOW! Thank you so much for all that info. Unfortunately I am not sure how much of that uses the licensed version of pepakura, but I am only working off the free version as of now.
You are welcome! :)

Unfortunately the biggest advantage of the licensed version is the ability to save the development. I created my first BSG models from the ship pack using the free version. I unfolded them and printed the development as PDF. Then I opened it in Gimp and continued editing there. The results were saved as PNG and then turned back into a PDF again.

If you can't save the development you will have to unfold the model again if you want to texture it with a picture. Of course you can texture the unfolded parts directly on the canvas but that might be very challenging because of the sheer number of parts. If you don't see how they are assembled the texture might not be added seamlessly.

Do you have a link to the 3D model?
 
The amount of facets that have to be arranged and put together, at least you are working with a large scale, of course, that introduces accrued intolerance, but you will find out about that soon enough. If you did manage to put a Pepakura model of this together, it would not be smooth, not at all. One option would be is to use the model you make as a plug, and build a mold up around it. Then make a casting out of the mold, and hand smooth it from there. Good luck, I know what you will be doing for the next months to come.

With Revelle-Fan's help, it could be shorter, but then the model will be as much his as it is yours. He has vast knowledge, and you don't have the software, or expertise, judging from what you have posted. I just state that as I have seen people get a lot of help, and not credit the people who have helped them, to the point where they could not have made it without the help they received. I have converted many models from Pepakura and found them to have so many duplicate lines, it's taken many hours to clean up. When I finally get to something I can work with, there usually isn't enough there to make something that would be worth my while. This models has so many parts, I have my doubts it will be completed, but if you do suceed, you will have really made something special. Possibly a "one off". :)
 
Hello everyone! I am here with the second update to the 1:1 Scale Titanic Clock Construction. I have completed the decorative design that is on the inside of the clock surround. This was EXTREMELLY complicated, I expected it to take one day, but ended up taking two due to the complexity of this part of the clock. Even though it's still very geometrical, it adds so much to the model with the uneven design to it, it adds a lot to the appearance of this otherwise plain cylinder. The final interior diameter (the diameter the clock insert will be) is about 11.5 Inches. Now that the "center" of the clock is finished, I can begin building out. I will be starting with the "honor" figure, (the woman to the right). After that I will move onto "glory" (the woman on the left). Then I will do the clock "pedestal", then the final decorative elements, and lastly the frame which will be constructed out of foam board to ensure the rigidity and longevity of this artwork. I look forward to the next update as things are about to get seriously complicated with the construction of the figures. Thank you all for your continuous support.
 

Attachments

  • 0804232136~2.jpg
    0804232136~2.jpg
    396.4 KB · Views: 6