What do you think?

trainwhiz20

Member
Aug 9, 2004
198
0
16
34
Tampa, FL
Thanks everyone for your much needed advice.

I got the track painted this morning. These are the steps I took:

-Carried track downstairs and outside to the driveway. (The train area isn't well ventilated.. not a good thing for spray painting...)

-Reassembled track into track plan on the driveway, with a layer of newspapers underneath.

-I masked the points on the switches.

-Once everything looked as it should, I took the aerosol can of flat brown spray and went up and down the track in two-three foot sections and stopped. Then I took a paper towel and wiped off the top of the rails. This was a great step because buffing the rails with the track block was much easier without all the paint there. This was just one of your helpful suggestions!

-After the paint had been on a few minutes, I went up and down the rails with the track block.

-Next I removed the masking tape from the switches and painted them by hand, making sure each one functioned as it should.

-Made any final touchups using a small paintbrush.

-Let it dry. (Which it's doing as of now--12:44 p.m.)


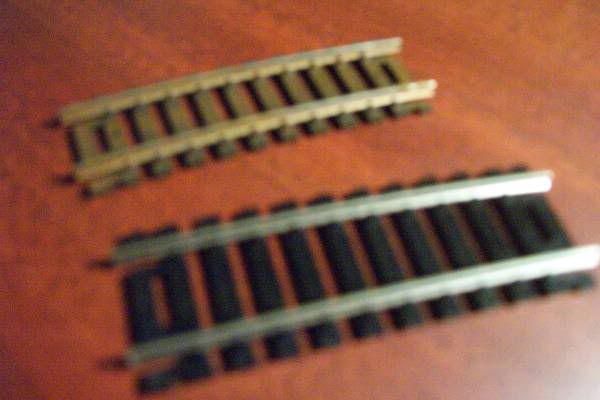
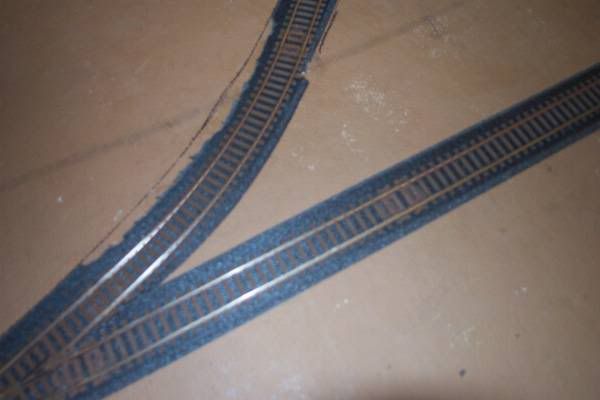
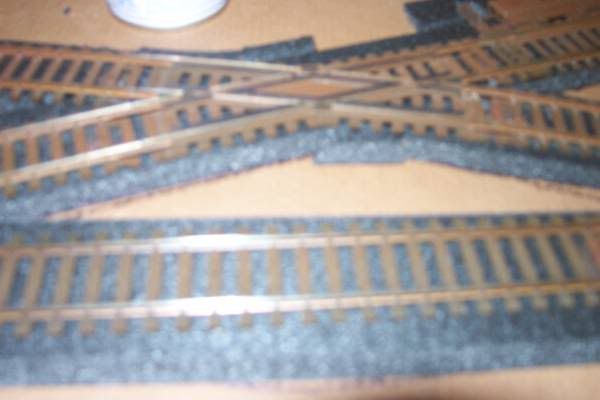
I think it looks good. Much more realistic than the black ties there were before. (No matter what hobby guy says... :rolleyes: ) Not to mention the plastic look is gone from the track. For me, it was a great learning process, rather than just nailing the track down as it was. Much more realistic...

Pictures should come soon. Thanks to all who have responded to my inquires. It means so much to me to know if I'm not totally sure, I can always ask it here.

With the roadbed already glued as of last night, when the track dries I'm going to put it back upstairs and rearrange it back to the track plan. Then I'm just going to nail it down. Hopefully I can get the ballast on after I do some basic ground cover, but I don't have an eyedropper handy to apply the glue. Any ideas?

Thanks again guys. I know I haven't posted pictures in a while, but I'll get back to it. At least it's the weekend!:thumb:
 

shaygetz

Active Member
May 2, 2003
3,612
0
36
64
www.freewebs.com
trainwhiz20 said:
Hopefully I can get the ballast on after I do some basic ground cover, but I don't have an eyedropper handy to apply the glue. Any ideas?

I'm too poor to 'ford an eye dropper ;) , I just use a small emptied Elmer's Glue bottle.
 

eightyeightfan1

Now I'm AMP'd
Jun 18, 2002
2,772
0
36
62
Torrington, Ct.
Suggestion:
I don't nail my track down. When ballasting the track, with the glue and ballast this will hold the track in place. The plus side of this method is that if you want to make a change in the track plan, just soak the area with water and the track piece can be used again. I've found that with nailing, making a change usually damages the track and ties trying to get the nail out. Maybe its just me.....and my big hammer.
 

trainwhiz20

Member
Aug 9, 2004
198
0
16
34
Tampa, FL
Thanks guys.

An emptied Elmer's glue bottle. Now why didn't I think of that? :rolleyes:

Shaygetz- Your online help and advice has been a blessing throughout this project. You certainly know what your talking about, and I bow to you for willing to post and share your knowledge with this young model railroader. Thank you.

Eightyeight- I had no trouble nailing the track down. I used a small hammer to nail them in. If I made a mistake, and I did make them, I used a flathead screwdriver to pry it up. In order to aviod damaging the track and ties, I used a piece of foam (extra roadbed!) as a fulcrum when lifting the nail out. No trouble whatsoever. And man, is that track sturdy. No way is that baby moving. :p I figured the ballasting process would keep the track in place, but it's comforting to know that it's already secured in case something happens when I'm ballasting.

Now for some pics. These might be the last for a while, as my camera battery charger just died. I'm working on getting a replacement, but it won't be easy after spending $200 on this layout! Hehehe. A labor of love.

Train040.jpg


The layout as it appears now. The roadbed (WS foam roadbed) is glued in place. The track is painted and nailed too. A dark brown-ish color, but for some reason it appears light in the photographs. The aerosol-applied paint blended well with the existing black plastic of the original ties, giving a nice contrast. One bummer was that I had to go around painting every nail since the track had been sprayed outside. It was fun though.

Train063.jpg


Very blurry and sorta mis-colored, but it's the best my camera can take. A simple before-and-after shot of the track. Obviously, the original is on the bottom. I really liked the way the track turned out. I'm proud of myself for actually taking the extra step, it was well worth it.

Train057.jpg


Here's a shot of the track itself, nailed in place. No ballast yet, but that's the next step. You can see in some areas I miscalculated, so I had to go up and shift the roadbed to the other side of the track to make it more even. Doesn't look pretty, but it doesn't matter either. The ballast will cover it all.

Train048.jpg


A closer shot of the track and crossing. As I said before, it appears like a light brown, but I can assure you, it's much darker in real life! :)


Tomorrow I'm hoping to get some basic ground scenery applied, that way once the ballast is added it will naturally blend with the adjacent scenery. Thank goodness for WS. Maybe ballast the track if I have that time.

I had a lot of trouble getting the switches back to full operating order. They work fine now, but I had some trouble with the throws not working. So I had to cut a path for them in the foam. I'm afraid to apply ballast to the switches, for fear that something might happen. I'm trying to see if I have some oil laying around... might not....

Ballasting is also going to be a pain because most of my track is near the edge of the table. I think I've found a solution--I'm going to clamp pieces of cardboard vertical to the edge to keep the ballast from falling off the table, kinda like with using water. Should go well, I hope.

Well... as the thread says, what do you guys think? :thumb:
 

shaygetz

Active Member
May 2, 2003
3,612
0
36
64
www.freewebs.com
You're welcome (blush)...Murphey's Law makes it an imperative that you get some kind of drop cloth before you scenic. When you do ballast your track, do several small sections at a time at opposite points on the layout. Homasote is a paper product prone to swelling when wet, ultimately affecting track alignment.

You have a great variation of the late John Allens "Timesaver" switching puzzle that will give you hours of problem solving situations. :thumb:
 
F

Fred_M

You guys are doing great. :thumb: :thumb: :thumb: Proud of ya. Fred
 

trainwhiz20

Member
Aug 9, 2004
198
0
16
34
Tampa, FL
Thanks guys. I know I sound repetitious, but I can't help it! :rolleyes:

Now, for a good couple of questions:

-What's a convienent, easy way to make trees? (i.e. cheap!) I know gathering sticks and sticking polyfiber on them will work, but my LHS doesn't carry WS polyfiber...

-How to ballast switches without messing anything up? Before I ballast the track, I'm going to practice, but I don't want to mess up on my layout switches. All the books I have say to place the glue, but don't touch the switches! (Then how are they supposed to get ballasted?!?!)

-I have some WS plaster cloth. If I make some hills using cardboard strips, and lay it on top, wet it, let it dry, then paint it, am I good to go? Or should I use a plaster to cover the cloth? Sculptamold?

-What about road and road crossings? Posterboard? Or plaster? What about this WS roadbuilding kit I've seen in my Model Trains Step by Step DVD?

-Structures? Should I use paint to dilute the plastic-y effect? What do you guys think about Walther's new City Station and platforms for that back corner of the layout? Just do some Merchant Row kits for the town of Black River with some few industries in the front of the layout?

-Water? Would it be a good idea to cut through the homasote and place the water below the trackline directly on the plywood? E-Z Water? (I think the homasote's only 1/2" however... not much room...)

Whew. Lot of questions. Remember, I need to keep the cost down! (Don't we all?) Luckily I already have some E-Z Water, couple of bags of ground foam, foliage, scenic cement, plaster cloth, and ballast. It may be awhile before I have the $ to get some structures though...

Thanks.

Well, whatduya think? :thumb:
 
trainwhiz20 said:
Thanks guys. I know I sound repetitious, but I can't help it! :rolleyes:

Now, for a good couple of questions:

-What's a convienent, easy way to make trees? (i.e. cheap!) I know gathering sticks and sticking polyfiber on them will work, but my LHS doesn't carry WS polyfiber...
I've never seen WS polyfiber but I suspect it is probably identical to the polyfiber that I've been "recycling" from an old pillow with good results. If an old pillow can be spared, go to a dollar store or a crafts store and for a couple of dollars you will have enough to make acres of trees.

Wayne
 

daboonk

New Member
Dec 12, 2004
69
0
6
34
New Brunswick, Canada
there is a type of garland, i cant remember the name of it but it looks like a binch of small trees stuck together, if you cut it and put a bit of paint on it they make good trees, the name is chenille, i just remembered, its works great, about a penny a tree
 

petey

Member
May 17, 2004
106
0
16
Shaygetz,
I don't know if anyone has mentioned this to you, but I think your looks have taken a decided downturn.
By the way, I built a 3 X 6' layout that contained an oval, four track yard(both pass & freight), and two industrial sidings.
 

shaygetz

Active Member
May 2, 2003
3,612
0
36
64
www.freewebs.com
daboonk said:
there is a type of garland, i cant remember the name of it but it looks like a binch of small trees stuck together, if you cut it and put a bit of paint on it they make good trees, the name is chenille, i just remembered, its works great, about a penny a tree

"Bumpy" chenille is what you're thinking of, and you're right. It makes perfect small and background pines in HO. Now's the time of year to look for discarded artificial Christmas trees. With a bit of clipping and shaping, you'll have oodles of pine trees.

You're right, Petey, I think the Oil of Olay just can't keep up anymore. :p ;)
 

trainwhiz20

Member
Aug 9, 2004
198
0
16
34
Tampa, FL
Thanks guys.

In fact, I found some pillow fiber laying around, and my mother gave me permission to use it. I just need to get some spraypaint from my LHS.

Layout looks good. I made a small hill using WS plaster cloth, painted it dark brown, and covered it in ground foam and lichen. Then I ballasted the track in the area. It didn't turn out very well. The ballast was clumped together, and all over the tops of the ties. It looks like a mess, but no one will know the difference. My fault. Just goes to show I should have tested it on a spare piece of track.:eek:ops: It's okay though. It doesn't really bother me, but I'm definately watching myself from now on.

Thanks for all the advice. I'm debating what to use for paved roads... maybe posterboard?

I'm almost afraid to enter the structure part of the hobby... as I have no clue what to do! Do I dilute the plastic color? Or leave it? Any help is appreciated... Although, I don't have any structures yet. Maybe this week.

:thumb: