What do you think?

trainwhiz20

Member
Aug 9, 2004
198
0
16
34
Tampa, FL
Xavier, I will have no trouble finding homasote. I have two 4'x8' sheets in the garage left over from my Lionel endeavors a few years ago. I'll just have to cut one of them down.

I know Home Depot doesn't stock it. At least, none of the ones I've been to. I found the sheets I bought at a lumber yard in the middle of nowhere in MA. It took a few weeks to track down. It's a darn rare material, I'll tell ya. (Or maybe my luck is just bad? :p )


:thumb:
 

jetrock

Member
Dec 18, 2003
894
0
16
55
Visit site
1x4 frame: A framework that goes under the layout surface (plywood, etcetera) made of 1"x4" lumber. You'll need two pieces that match the long side of the layout (for a 4x6 layout, 6 feet long) and enough pieces about 1.5" shorter than the short side of the layout to support it every 2 feet (again for a 4x6, 4 pieces 3'10-1/2" long.) Using drywall screws, attach the pieces together to form a box like the one below. You can then attach the plywood to this box, providing a firm and stable base for the layout--if you set the plywood on sawhorses, it will warp.
 

Attachments

  • rect.jpg
    rect.jpg
    3.1 KB · Views: 241

shaygetz

Active Member
May 2, 2003
3,612
0
36
64
www.freewebs.com
Thanks for the graphic, Jet :thumb: Trainwhiz, you'll want to rest the platform on the sawhorses using the framework, not the plywood/homasote. This will keep the 'horses from bulging your landscaping up from underneath. Don't attempt a layout without the framing, you'll never be able to control sagging.

Xavier, homasote is hard to find. It is a paper based soundproofing product that few builders use anymore.
 

trainwhiz20

Member
Aug 9, 2004
198
0
16
34
Tampa, FL
Okay. Thanks guys. I got it.

Speaking of that, I got the two plastic sawhorses today. They are 30" in height. I'll post a picture tomorrow. I doubt if I can get my father to help me with the framework, it may take some time. But I got the sawhorses, which was a major step.

Once again, I really appreciate all the help! Thanks Rio, but I got my software reinstalled and can now resize pictures.

:thumb:
 

trainwhiz20

Member
Aug 9, 2004
198
0
16
34
Tampa, FL
Yay!

I finally brought my father into the light, and he claims this will be a great "father-son" project. Truth is, once I get the table built, I can handle the rest.

BTW, the sawhorses are two feet long, and 30" high. We'll build a frame that fits around the sawhorses snugly, and attach that to the table frame which will sit on top. This way, it's secure, but the sawhorses can be removed from the table.

Well, my dad saw the space in the photos and told me I'd have no room to maneuver and said I couldn't build my train table there. We found some other spots in the house--but my mother forbid any trains in viewable areas. So, we came up with a solution.

My father and I are going to reposition the bed longways in the room, which will give a nice square space of about 7x6 in the forward part of the room. Because of accesibility needed for the layout, and movement of the doors in the room, the layout will be 6'x4' along the back wall, with room for an extension, but that's not in the near future. Tomorrow, after getting some chores done around the house for mother, my dad and I will rearrange the funiture in my room and see where we stand. If all goes well, a trip to Home Depot on Sunday may be in order for the lumber for the frame and for the plywood. I'm crossing my fingers.

And mom likes it cause if you close the door to my room--POOF, no trains! :p

4x6 is tiny, but hey, it's a layout. I seriously need to get up and get active and put armchair modeling behind me. And you know what, I think I've taken the first step. :D
 
That's great that you have your space designated and an interested helper Get your dad hooked and real estate will follow! Definitely plan for an extension while designing the initial layout. A simple siding running off to the edge can be a branch line in the future.

You might even build a small staging area on a removeable piece that gets stored under the layout when not in use. This can be a very simple affair on a light weight section, perhaps on a foam base in a light wood frame. Support could be nothing more than hooking it to your layout and propping the other end on the back of a chair. This gives trains a way to leave and enter your layout while operating without taking up valuable space when not being used.

Good luck!

Wayne
 

trainwhiz20

Member
Aug 9, 2004
198
0
16
34
Tampa, FL
Thanks Muddy for the encouraging response.

All I can say is: Houston, we have liftoff!

Today, the land was secured in our upstairs bonus room, a jolly 4'x7' plot of floor space with room to move. Not only did the Black River Branch secure land, but the foundation is 90% completed!

Here are some shots to explain:

Train031.jpg


Here is the actual table. All done today, my father and I via a trip to Home Depot. It's 4'x7' exactly, with a frame, and smaller inside braces. It is complete, along with the 1/2" plywood top. There is a center brace and two outside braces (double secured with two beams), and the sawhorses fit snugly into the box-like area in-between the two outside braces. It works nicely. The table can then be lifted off if need be, but it probably won't have to be. I think it looks good, and when on the sawhorses, it is very, very secure. The thing won't move! Not to mention it looks pretty sharp too.


Train034.jpg


This is a shot of our messy garage. :p (We will carry the table upstairs, mount it on the sawhorses, and screw down the homasote tomorrow.) Actually, it's a shot of the table with frame, and the 8'x4' homasote which needs to be cut, and the sawhorses on which it rests. These are the base of the layout! Heck, you can even see the line on the homasote where we have to cut! (Made by yours truly!) :rolleyes:

I must say, I'm very proud. I think it looks good. What do you guys think?

It's the first step, and I can't wait till we get rolling... no pun intended! :D
 

trainwhiz20

Member
Aug 9, 2004
198
0
16
34
Tampa, FL
Okay. Anyone else out there? I can always use suggestions!

Anyway, today the table made its way upstairs. After a fun stop at the hobby shop, I blew $100 on Atlas sectional track. :eek: It was fun, running around buying stuff. Unfortunately, I have to save some money for a while now.

So, I'm speechless. I've been working all day:

Train039.jpg


Here's the table! A little messy. I just randomly placed the controller to get some trains running. I'm going to add a curtain around the layout, and clean up that E-Z track and those cars.

Train036.jpg


A closer shot of the track layout on the brown-ish homasote. I have a 24-ft. roll of Woodland Scenics track foam that is being added to the mainline as we speak, or just being pinned in place. Also very little ground cover. No glue yet. 18" radius curves. When I have more money, more ballast and foam will be added to the sidings. You can see the ballast/foliage bags on the table too. :rolleyes:

I like the layout because there is-

1.) A passing track... (need one of those!)
2.) Continous run
3.) Not a perfect oval
4.) Long tracks in back for my passenger train/eventual station platform.

Well, I'm done. What does everyone think?

Please let me know! I'm dying to hear from some people! :D
 

sweet_sean

New Member
Dec 9, 2004
11
0
1
34
it looks nice so far i can't wait to see the scenery.
do you have any ideas dor the scenery yet?

keep us updated
Sean
 

shaygetz

Active Member
May 2, 2003
3,612
0
36
64
www.freewebs.com
Looks like a nice layout with plenty of switching possibilities. My suggestion would be to bring the track in from the edges about an 1 1/2". Murphy's Law and the laws of Physics will ensure that the only time all your couplers work perfectly will be the time your longest string of cars, behind your best locomotive, descend with swan-like grace over the side and onto yon carpet.
 
shaygetz said:
Looks like a nice layout with plenty of switching possibilities. My suggestion would be to bring the track in from the edges about an 1 1/2". Murphy's Law and the laws of Physics will ensure that the only time all your couplers work perfectly will be the time your longest string of cars, behind your best locomotive, descend with swan-like grace over the side and onto yon carpet.

i concur...:mad:...been there, done that, made full use of my well-established vocabulary of profanity...:curse:
 

60103

Pooh Bah
Mar 25, 2002
4,754
0
36
Brampton, Ontario, Canada
Visit site
My wife allows the railway in the finished area of the house as long as it looks perfectly neat and well finished. She's always been supportive and has helped with lots of scenery and offered other ideas. Your mother may come round if your finished layout looks nice. But then you may want to have a room with some privacy.
 

jetrock

Member
Dec 18, 2003
894
0
16
55
Visit site
trainwhiz20 said:
1.) A passing track... (need one of those!)
2.) Continous run
3.) Not a perfect oval
4.) Long tracks in back for my passenger train/eventual station platform.

Please let me know! I'm dying to hear from some people! :D

One thing I notice: on the passing track near that crossing, you might try to reverse those switches. As they are, they make what is called an "S-curve" which will result in uncoupling and derailment problems. By switching the left-hand turnout for the one on the right and vice-versa, you'll end up with neater track and fewer operating problems.

The switch on the other side, the one all by itself, looks like a prime candidate for "S-curve" problems too. Have you tried running trains on this with more than a few cars? I'll bet that those spots have some problems with derailments.

I also notice a very long track in the background that starts at one end, follows the curve and goes all the way down the other side: what is it for? You mentioned a passenger depot but there really isn't anyplace for the depot to go.

Also--except for large terminals, railroad stations tend to not use single-ended sidings--either there is a "passing track" to allow trains in from either direction (and avoiding having to do back-up maneuvers) or they simply stop on the mainline.
 

trainwhiz20

Member
Aug 9, 2004
198
0
16
34
Tampa, FL
Thanks for the comments.

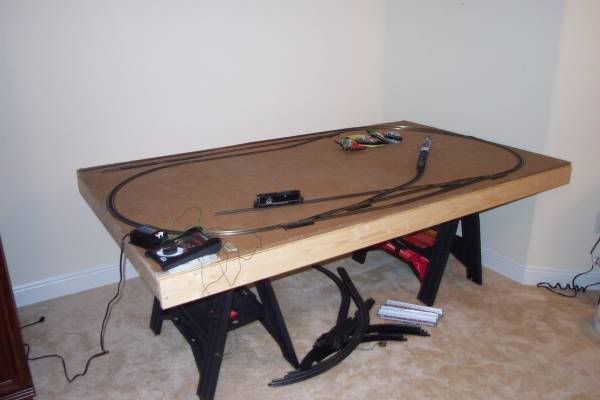
Aye, yes, sometimes the couplers will only work when falling off the table, hence I got around to taking some small pieces out and bringing the track slightly more into the table to aviod the edges.

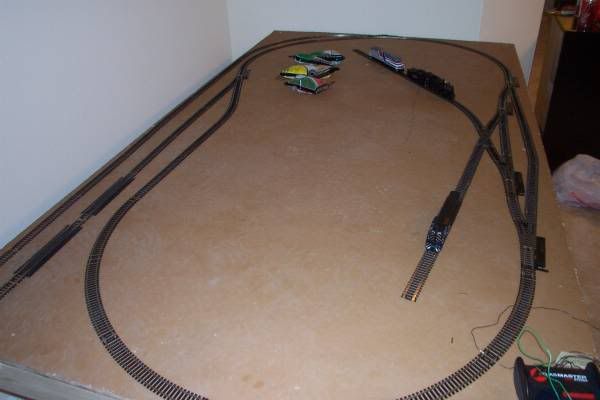
Jetrock, THANK YOU! I never noticed that. I'm glad you did. In fact, my locos ran over the 'S' well, but when the GP7 was pushing a few cars, they derailed horribly. I fixed the layout of the track in that area, just as you said. I can' believe I made that mistake, and I never would have noticed it either. The switches are now reversed, and I tweaked a bit to get the crossing and all to fit. Looks nicer, and the operations are smoother than ever.

This is exactly what I need you guys for! :D

Jetrock-- The switch in the back by itself doesn't cause any problems. There are some straights thrown in there and everything, even long trains, run just fine. I'm not making speed records here trying to derail the trains, but they ran over that area in back pretty well and kept all wheels on the track. ;) Good idea to check that though. The track connected to it will most likely double as an interchange/second depot track, I'm not sure.

The track in the back is sorta a thing for me, whether it be prototypical or not. It was built to house my longer passenger trains--like my American Orient Express--if I ever needed to sidetrack it and run a local frieght. This would spare me having to pull it off the layout, back on again, and so forth. It may be dressed up as a passenger depot track and just dead end. I mean, I'm not building this railroad to someone else's expectations, am I? :p Essentially, the track provides an escape for my longer passenger trains when they aren't running, but I can still show them off, even if it's sitting at the "depot".

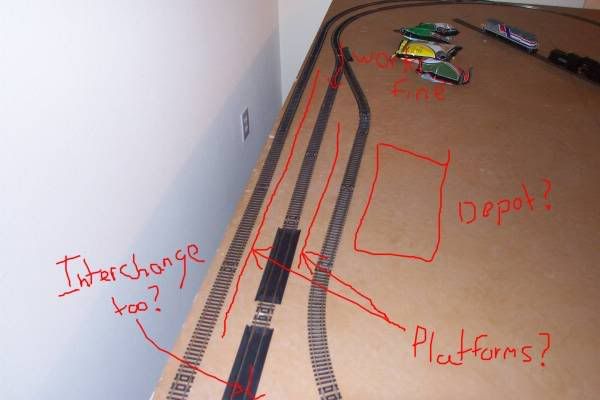
Here's maybe an example:

Train038edit.jpg


Please excuse my computer handwriting! This was done in 2 seconds in Photoshop.:rolleyes:

You have to understand, I'm very big into passenger operations, so my "Black River Branch" basically serves a large town passenger station/interchange in the back and small industries in the front, without the need for a scenic backdrop. I'll blend it in. It may not be utterly realistic, but in this small space, I want to accomodate what works best for my rolling stock of choice.

As time and money permit, I'll add some buildings, and maybe another switch here and there for a few more industries. This is why I've decided just to nail the track down instead of glue it.

As for the depot, I'm thinking of that new not-yet-released Walther's one coming out and the platforms which go with it. What do you guys think?

Comments? Criticisms? Questions? Please tell me. As seen here, Shaygetz's and Jetrock's comments made all the difference! :thumb:
 

trainwhiz20

Member
Aug 9, 2004
198
0
16
34
Tampa, FL
Okay... I'm bringing this thread back to life... :p

I got a whole bunch of stuff, and this weekend is work, work, work.

One question:

I bought 2 aerosol cans of Tamiya Color Paint, color Red Brown.

The dude at the hobby shop told me I can't paint the track without masking the rails, but everything else I've read in hobby books and the web contradicts that! He said once painted, the rails will no longer conduct electricity.

I shouldn't have asked him for help. He made me give a 5-minute explaintion on WHY I'm painting the track. His quote was, "Why the heck paint it? Ties are near dam* black anyway..."... Just thought that was interesting.

So, can I just paint the track (rails included) like it is using the aerosol can?

I would've gotten Floquil, but they didn't have aerosol cans, and I don't have an airbrush nor know how to use one.

I could really use an answer ASAP. Not trying to be rude, but the sooner this is answered, the sooner I can get working! (I don't wanna not wait for an answer, think it will work, and screw up my whole layout!):rolleyes:

Thanks guys. As always, any help is much appreciated...

:thumb:
 
I'd like to see Hobby Shop Dude masking the tops of the rails before painting. Cutting endless wafer-thin strips of tape and trying to get it on evenly isn't the answer. It's obvious he's never done this.

Try this on a piece of scrap track:

Try putting some light oil on a rag or Q-tip and applying it along the top and a little on the inside edge of the rail. Just enough oil to leave a thin film, not an oily mess. Then give it a shot of spray paint. When the paint is completely dry on the ties, wipe the tops with a clean rag, maybe give it a swipe with a Bright-Boy. A little soapy water will help clean up any leftover oil if necessary, though it likely won't be.

You gotta watch them hobby shop dudes all the time.

Wayne
 

shaygetz

Active Member
May 2, 2003
3,612
0
36
64
www.freewebs.com
Mask between the points on your turnouts then spray. In a few minutes, before the paint hardens, remove the tape and go over the tops of the rails with a hardwood stick. Let the paint dry then buff the rails with a Bright Boy track cleaner, a pen eraser will fill the bill in a pinch. We've weathered over a thousand feet of track at the club this way with no problems whatsoever. You hobby guy needs to go back to the Crafts Dept. :p
 

grlakeslogger

Member
Sep 2, 2003
128
0
16
WI, USA
Visit site
On a small layout, I handpaint Rail Brown with a small brush. A drop of oil at the switch points helps. After it has set an hour or so, I go at it with a Bright Boy--DO NOT wait until the next day for this cleaning! The advantage to hand painting (I work in HO) is that it gets the rusted rail color onto the tie plates and spikes if done carefully. I do not paint the side of the rails that is toward the walls of my walk-in layout unless that side can be seen from a viewing angle people actually can get to. Nobody has caught that omission on three layouts so far. Whichever method you use, you might test on a couple feet of easily replaceable straight track to check your technique. Every one of us had to learn. And any modeler who has not occasionally tried a technique that has not worked has not tried many. The skills come with time!
Best of luck--I've enjoyed this thread a great deal so far.
--Stu--