USS Tarawa LHA1 1/200

barry

Active Member
Jan 28, 2004
1,557
1
36
86
Brighton Uk
Hi All

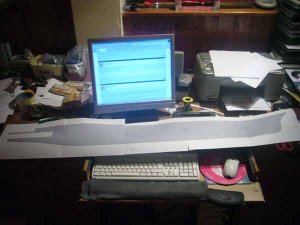
I think everyone should have a piece of lunacy and this is mine for 2007 should be fun even if it gets set fire to cos it did not work. It will be about 49" long by 6.5" beam. Progress will be dead slow but that's half the fun of card modelling.

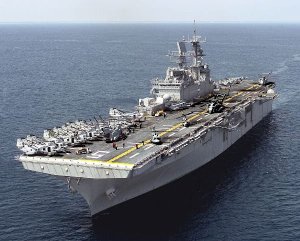
The idea is to build it as underwater hull, waterline to hanger deck then flight deck.

I think the main interest will be the variety of choppers, landing craft and AV8 s


This how I hope it will look in the end pictures are out of pepakura 2

I am still racking my brains for a method of filling the gaps betweenn the frames without resorting to plastic spray filler. Anyone got any ideas.
 

barry

Active Member
Jan 28, 2004
1,557
1
36
86
Brighton Uk
Hi Darwin

Funnily enough I was sitting here playing with a piece of it when your email came in my first thoughts were this stuff soaks up water like there is no tomorrow. What would you suggest to seal it ? I've also got a piece of the foam gap filler that has been drying for about a week sets like rock and is easy to sand, I can see why the Poles took to it in a big way, very tempting. Somehow it seems a bit of a cheat still.

I thought about Papier Mache (?) made with pva glue and of course cross banded strips or just a hell of a lot of half formers along the keel which can be made just slicing thru the metaseq using the knife tool.

Oh what fun
 

Bowdenja

Active Member
Sep 26, 2005
485
0
36
67
Madison, MS
Alright barry!..............

My dad severed on the previous Tarawa (CV-40), and my uncle survived the Bataan Death March so I've got some interest in this one. Maybe I can do a USS Bataan after you finished.

On the filler thing............. again I'm not a ship builder, but could you skin the hull, let it sink in, use a putty(plaster) to fill the places that sank, sand and shape it, then re-skin over top with the final layer. Kinda like body work done to fix a wrecked car.

Seems like a lot of work, but sanding the shape should be pretty easy because you have most of the hull as a pattern. And the parts that didn't sink in should support the second hull layer.

john
 

Attachments

  • USS_Bataan_%28LHD-5%29%3B10080504.jpg
    USS_Bataan_%28LHD-5%29%3B10080504.jpg
    77.4 KB · Views: 1,457

rjm

New Member
Aug 11, 2005
11
0
6
Marion, Iowa
Darwin,

I've tried the florists green foam blocks in a ships hull.

It's easy to shape with almost any tool, but the stuff
I used left little grains of the stuff everywhere, all
over everything and it sticks like the plastic DVD
wrapping with static. It seems to take a damp rag
to remove and water is usually not a good idea around
paper models.
Anyone else tried it and had better luck?

rjm
 
Nov 28, 2005
80
0
16
Fareham UK
Free Filler?

Could you use the polystyrene foam blocks that comes in packaging of electrical goods? The foam could be cut with a hot wire and you could get the hull shape using card formers for the guide.

It would be good to recycle the stuff.
 

Sumato

Member
Sep 2, 2005
31
0
16
48
I've done what rjm suggests, using green florist's foam. There are a couple of problems with the material. One is that the polymer it is made from is similar to ABS plastic, and cannot be melted easily. A hotwite cutter will only 'burn' it's way through it. Another is that it is not very strong structurally once its cut & sanded. I've used it on aircraft noses, and occasionally to model aircraft tires. What I do is saturate it and cover it with shellac, giving it some strength, and covering the tiny pores. You can even use spray shellac on the material, which makes it pretty easy.
 

rwguess

New Member
Nov 21, 2005
11
0
6
sealer for foam blox

just my 2 cents
i make candles as well as models and it struck me that you could melt some candle wax in a pot then dipp the blocks in the wax to coat them and water proof them veryvery well...

give it a try and see how you like it

use a small block first to test it

i have used the wax to seal stuff like this before with excellent results

-the hermit...
 
Instead of florists foam try either the pink or blue rigid foam insulation sold at lumber yards and home centers. Available in different thicknesses. Works easily and is very rigid over small spans. If you sand too much off you can always fill the hollow spots. Lightwieight spackle works well. See the USS Metcalf thread in the Large Ship Competition as Built forum. But then again the links to the pictures might of been from the old site and so unavailable. Alas the Metcalf now resides in Davy Jones Locker
 

Sumato

Member
Sep 2, 2005
31
0
16
48
Another foam that you can use is the foam backing from meat products from your local grocer. It is expanded polystyrene, but not the bead type. It will sand perfectly smooth and is quite dense. I use it for aircraft bulkheads. I take the paper part and glue it to the foam, then use a hotwire cutter to cut the final part. It is about 3/16 of an inch thick, which is perfect for overlapping butt-joints on fuses and hulls. You won't even need mating strips using this method.

I love Pwguess's idea using candle wax. I see a lot of unexplored potential there.
 

Jim Krauzlis

Active Member
Sep 26, 2005
1,490
0
36
68
Copiague, Long Island, New York
Wotcher, bazzer...the insanity continues, what?:grin:

She's a beautiful looking ship, mate, sure looking forward to seeing you use your magic to make her come to life.

As to the "filling the gap" problems, have you considered using 0.5 mm laminate for the hull plates? Peter Crow is doing that on his beautiful model of the Nina, and it seems to work very well in providing a stiff alternative to the usual card plates. As long as you don't use them too much where you need a lot of curves, it seems to work very well for the straight runs. In the bow and stern, I think your best bet is to insert a few extra formers to bridge the gaps so there is no more than 1/2" between the formers in the area where the curves are sharp. If you do that, then using narrower plates, running vertically, and also laminated with 0.5, might work in giving you a fairly sturdy curved surface. This could work well especially if you are designing a break at the waterline; the plates could be split along that waterline, and easier to work into place. I also believe in this scale you want to use an underlayer of heavier card in any event as a sturdier base for the printed exterior plating; that way you can sand out any rough spots, smooth out the curves and all, in the first heavier and uncolored plating before you glue on the outer printed layer of hull planking.

Just some random thoughts, as an alternative to the foam inserts.

I hope you are still working on Spruance...can't wait to see her finished mate (this from the fellow that has put Constitution on sabatical for quite some time...but I have started on her again; sort of a New Years Resolution sort of thing.:grin: ).

Cheers!
Jim
 

barry

Active Member
Jan 28, 2004
1,557
1
36
86
Brighton Uk
Fillers

Hi All

Thanks for all the replys my problem is I find sanding paper is not one of my great strengths judging by Spruance (still working on it Jim) I suppose it really means take more time over it in future.

It made an interesting thread anyway never realised there was so much stuff out there for filling. I think I started this cos I am too idle to cut even more ribs for the keel. Keeping something taut over 6" wide is going to be a problem though.

Jim glad to hear you've started on Connie again it's been sadly missed
 
P

paulhbell

Hi barry, what about using the expanding foam that comes in a spray can. This can be bought from diy stores, although this also would mean sanding again and your bulkheads would need to be very strong. Good luck on this build, I have watched your other boat build's and I am looking forward to watching this build.
 
The link has the thread at Kartonbau that I started when doing the Metcalf (aka Arsenal Ship). It has some pics that show the framing and just how the hull looks when filled with foam and sanded. One note, when sanding the foam it is really easy to wind up with hollow spots between the frames. I designed the hull structure with frames on 1" centers to make the egg crate as solid as I could. The keel plate also had squares of the same material as the frames (chipboard laminated on both sides with Wausau Exact White 65# Bristol) that the framing elements were located by. A test build 4.25" square with frames on the same centering distance plus the key plates and no foam would support over 500#

http://www.kartonbau.de/wbb2/thread.php?threadid=863&hilight=metcalf
 

barry

Active Member
Jan 28, 2004
1,557
1
36
86
Brighton Uk
Tarawa spine

Looking at this I think I may well be right about biting off more than I can chew. It's ok writing down figures like 49" but this is reality. I am hoping the experiments I did with the Gearing will work scaled up.

Like I said before don't hold your breath

Frankly I think I am off my trolley this time. Next it will have to be 1/700 I have run out of room.
 

Attachments

  • P1010582.JPG
    P1010582.JPG
    38.2 KB · Views: 367
P

paulhbell

Good luck

GOOD LUCK WITH THIS ONE.

This is going to be a long build, don't worry though, if it's as good as your other ships it will turn out excellent.

You should think about starting a museum for your builds.
 

eibwarrior

Member
Dec 17, 2005
568
0
16
54
Knoxville, TN
Don't be intimidated Barry! Remember, bigger is better. :twisted:

Seriously, I'm glad to see you're getting into this one deeper. This is a great subject, with no apparent commercial model to fit the bill. Yours will be a very interesting build.

I can't wait to see more.
 

Jim Krauzlis

Active Member
Sep 26, 2005
1,490
0
36
68
Copiague, Long Island, New York
wotcher, bazzer!:)

Don't be dismayed, mate. This will be a very unique and interesting build, to be sure. Very much worth the potential headaches and effort needed to get it done, I think; unlike me, you have a very good talent for desiging and building so I have no doubt whatsoever you will apply your skills to this and end up with another winner. Yeah, this one is probably a longer project than the others, but maybe not...I've seen you push ahead at a good clip.

Personally, size is the reason I like to stick to about 1/600 scale for ships, but that's just my quirkiness. You build it and I'm sure you'll find a good place for it.:grin:

Cheers!
Jim
 

barry

Active Member
Jan 28, 2004
1,557
1
36
86
Brighton Uk
Hull sides

Hi All

I have come back to the comparative safety of building ships instead of commenting on anything else and getting lectures on my idiocy and general lack of knowledge of the state of the world (can't find a smilie sticking it's tongue out)

It does not seem quite such a daunting task when I put Spruance next to the printout it's only 2 sheets longer. I decide to split the sides where the bow flair starts from the slab sided bit.

One thing I think will be necessary is to put some weathering on the blank grey wall that will be produced and there is a great picture to try and copy on the net except that it now seems to have disappeared.

Found it http://navysite.de/ships/lha1_10.jpg

Anyway it's a bit of fun.


For the purists amongst I promise I will put the beer in the fridge before drinking it.

Thanks for the encouragement lads.