

Z
U-Boat Molch "Salamander" by GPM 1/25 Scale
- Thread starter treadhead1952
- Start date
You are using an out of date browser. It may not display this or other websites correctly.
You should upgrade or use an alternative browser.
You should upgrade or use an alternative browser.
Hi Zathros,
That's a good thing since it is the one that I just finished and reflects using water colors to edge with.")
Seriously though, I am working my way around different ways to try to get the best look for this and the other three little mini U Boats in this Card Model Publishers fleet. Experimenting with techniques to build these little boats transfers to larger projects and saves materials as they are limited to fewer pages of card to deal with. Seeing what other more experienced card modelers have accomplished sort of spurred me into doing this since they don't cover all the little things that they do to produce a better finish on their projects.
That's a good thing since it is the one that I just finished and reflects using water colors to edge with.
Seriously though, I am working my way around different ways to try to get the best look for this and the other three little mini U Boats in this Card Model Publishers fleet. Experimenting with techniques to build these little boats transfers to larger projects and saves materials as they are limited to fewer pages of card to deal with. Seeing what other more experienced card modelers have accomplished sort of spurred me into doing this since they don't cover all the little things that they do to produce a better finish on their projects.
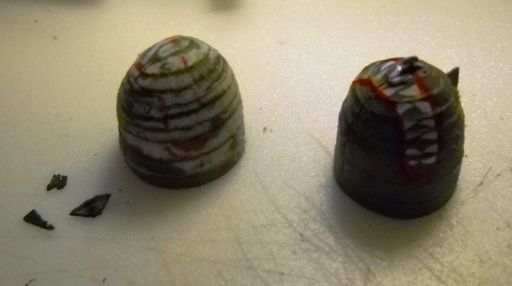
One technique for making the nose that I do, is to make a cylinder the diameter size of the model. I then carve off the excess material and with a variable speed drill. I round it off to the size needed. Once this is made, you have the choice of painting it to the color of the model "OR" take the original part, cut off the tabs and then wrap it around and on the carved nose.
Hi Silver Oxide,
One of the guys on the German Forum site used "simple" mathematics to figure out the length and size of paper needed to make a form to do just what you suggest. The length over all of his strip turned out to be 1.8 meters long but once he rolled it up it was a perfect sized and shaped domed cylinder. He then formed the parts of the nose around it. He also made up dome shapes to cover the torpedo noses, entry hatch dome as well as this part.
I like your suggestion of making the cylinder then shaping it with a drill sander much better. While my old Geometry teacher is probably spinning in his grave at my lack of mathematical prowess, just making up a shape to fit this need would be much easier for me to just whittle it out as you suggest.
Looking at the two other builds of this little mini U Boat that I have found on the internet as well as builds of the other U Boats in the series, they all share this same constuction method to form the noses so coming up with a way to make it look as good as one can is a good idea. As Zathros pointed out other than making up a shape, sanding it down to smooth it out and then sealing and painting it to match the rest of the parts, this is about as good as it gets.
I am thinking about taking the second nose that I made and sanding it down smooth and sealing it then painting it to see if I can possibly come up with a better one than what I have managed so far. But I will be starting on making up the other parts to carry on with the build even as I work on that. I will post my results in either case as I move along on this build.
When I sand the cones round, I use a secondary pole to wrap the strips around it. If it is small like in missiles or bombs i usually use a paper stick (ears swab, Q-Tip) And I place the extended end all the way inside the drill mandrel. If you leave it too far out, the wrapped cylinder is slightly off sided and will rip the cylinder apart. For larger pieces or cones, I use a thick dowels to withstand the centrifugal force. The bigger the cone, the larger the dowel until it gets too big to insert into the mandrel. The hardest part of rolling the strips around a dowel, is that sometimes it is not wrapped tight and there is spacing in the wrapping. When you get to that air gap, it tends to rip the cylinder. Wrapping it tight is the secret to sanding or shaping the paper.
Thanks for the tips Silver Oxide. They will come in handy when forming things up on the fly to add some detailing to models.
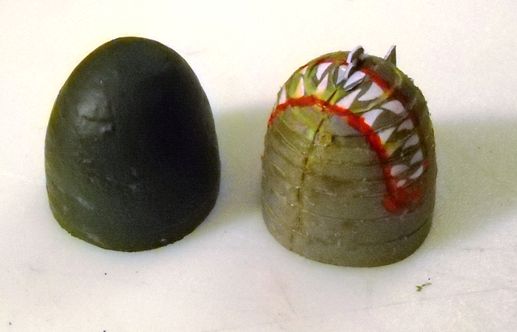
I went ahead and sanded down the exterior of the second nose that I built. With the internal strips that were used in building these up and the amount of Aleene's Tacky Glue I used, the parts are sturdy enough to withstand sanding on them with sand paper without going to pieces.
After sanding it down I used a paint brush to apply a coat of Aleene's Tacky Glue and let it dry. Next came a coat of Acrylic Enamel which also was allowed to dry and then a coat of regular Enamel which is drying now. I am putting all these coats on there as I am going to do some more sanding on the part to smooth it out even more. Once that is done I will put a top coat of enamel on there and then see how well I can paint the face on there and then replace the parts and use it for my U Boat.
Ok Newbie thinking here maybe outside the box.... how about wetting the cardstock and forming the shape then drying the card> you would still have to paint it, but it should make a smoother surface.
Hi Micah,
That would probably work as well. Lots of good suggestions of how to go about these things.
I sanded it down after the paint and glue had dried hard and then added another coat of Aleene's Tacky Glue which smoothed it out even more and let it dry. Grubbing around in the paint locker I came up with a fresh unopened bottle of Model Master Olive Drab and painted it over the last coat. I think this is about as far as I will carry this.
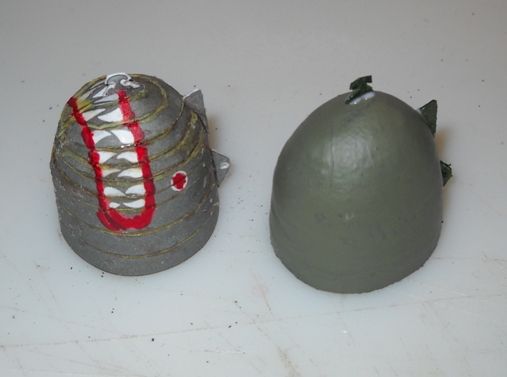
It no longer has the look of strips formed around to make a dome shape and with the three parts added to the dome it looks pretty close to the pictures of the real ones that are remaining in museums around in Europe. I have noticed that there are a pair of triangular reinforcements added to the "T" shaped device on the tip of the nose looking at the photos and video of the remaining real ones. There is also a service circular plate on the side that I am thinking about adding to this to further make it look like the real ones.
That would probably work as well. Lots of good suggestions of how to go about these things.
I sanded it down after the paint and glue had dried hard and then added another coat of Aleene's Tacky Glue which smoothed it out even more and let it dry. Grubbing around in the paint locker I came up with a fresh unopened bottle of Model Master Olive Drab and painted it over the last coat. I think this is about as far as I will carry this.
It no longer has the look of strips formed around to make a dome shape and with the three parts added to the dome it looks pretty close to the pictures of the real ones that are remaining in museums around in Europe. I have noticed that there are a pair of triangular reinforcements added to the "T" shaped device on the tip of the nose looking at the photos and video of the remaining real ones. There is also a service circular plate on the side that I am thinking about adding to this to further make it look like the real ones.
Thanks Micah,
I have been working on the rest of the parts aft of that nose piece, getting them rolled up and glued together. With this little project that is mostly what it is, rolling and gluing. I also have a number of the parts that are doubled in thickness flat parts. I have been studying the photos that I have dug up to see where I might be able to add some more dimension to the overall look of things.
Looking at the improvement in the nose piece that I was able to accomplish I am casting a weather eye at those torpedos now. Apart from those nose pieces that are formed in the time honored card model method of a "flower petal", the rest of the torpedo looks pretty good. I am considering what I might do with them to make a bit of an improvement as well.