U-Boat Molch "Salamander" by GPM 1/25 Scale

treadhead1952

Member
Mar 22, 2009
181
1
16
Las Vegas, NV USA
Hi All,

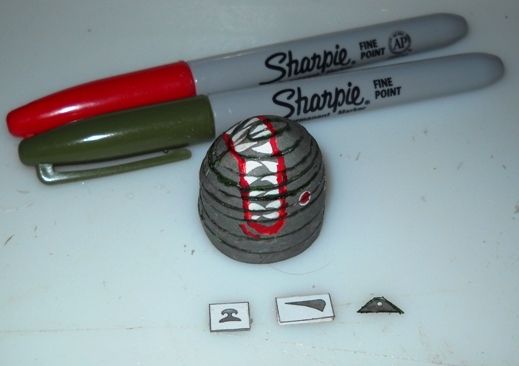
I decided that I just had to start this one even though I have a couple of other irons in the fire. The only mention of one of these that I have been able to locate on the site here is where one of the members mentioned one that he had built and taking it to an IPMS meeting. This is GPM's Kit #263 Series "B". It consists of four pages printed on card and one small 2" X 2" paper sheet of parts, that is probably where the Series "B" designation comes in, the extra parts included which are a series of circle forms to help stiffen the structures internally. There are four pages of pictograph style instructions as part of the booklet. As you can see by the cover artwork, this one was published in 2006, but it is still available and there are even a set of laser cut frames available from GPM for it as well.

EMailCoverArtwork_zps9cdaa8aa.jpg


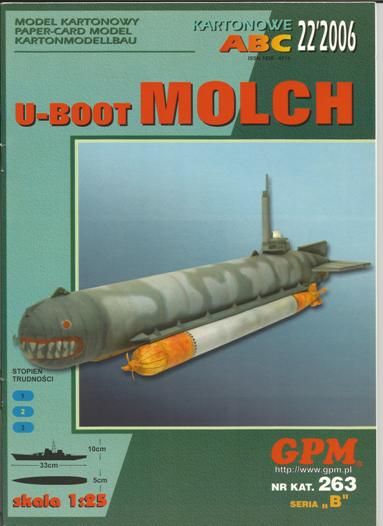
The Molch or "Salamander" was Germanys' first sucessful Mini U Boat. It was 11 tons, travelled completely underwater, carried two G7e Torpedos slung along it's bottom sides and went anywhere from 3 to 5 knots on it's missions with about a 50 mile range. It used electric torpedo technology to power it's motor by a bank of chemical batteries. It was a bit difficult to keep trimmed up in operation and had a very low sucess rate sinking roughly 10 to 12 ships and damaging a few more. As other more sucessful designs were developed they were relagated to training roles.

I have found a couple of other build threads to assist me in my build, uh, yeah, I will check out as much helpful information as I can dig up in building these things. I have found a number of reference photos from all over the world from real ones, there seem to be a number of them in museum collections in Europe, to other models, resin, styrene and card in various scales.
 

treadhead1952

Member
Mar 22, 2009
181
1
16
Las Vegas, NV USA
Hi All,

I got started on this last night clipping out most of the parts and seeing how the build threads that I found online seemed to make it up. Not too many curves it would seem in a fairly straightforward build. When I started to think about building the stand up so I would have a place to house the model under construction I did notice a little bit of improvement that would be easy to do by the addition of a little balsa wood.

It started with the two little upright supports that come up off the main base. They supply two outside panels, a single inner panel and a strip to go around each upright. by no stretch of the imagination would the strip fit the three layers of card without looking like it was made in a sort of "I" Beam looking way. To fill the panels out so that the strip would fit to fill the two cut out areas in the base would take several layers of card be laminated to gain the required .110" width. That was when I started thinking balsa wood. A piece of 1/16" scrap supplied enough to glue one upright panel on one side, trim it out and then glue the other panel to the other side. Gluing a strip around the edge had a pair of them that would work perfectly.

The main base part is an upper shell and a bottom panel piece. Since I was in balsa mode, I just cut out a section large enough to fill the angled section of the main base part and then added another 1/16" sheet to the bottom of that, glued them up, clamped them together with some bulldog clamps and let the whole thing sit overnight. This morning I used the card base piece to mark a pair of troughs to hold the uprights. I also used two more small pieces of 1/16" sheet to back up the two nameplate pieces that get glued in between the uprights to give them a bit more mass and strength. I used a brown Sharpie Marker Pen to color the balsa a bit darker color.

So here is what it was looking like before assembly.

EMailUBoatMolch0001.jpg


A little Aleene's Tacky Glue later and I had an assembled base that would easily handle the future chore of supporting my Molch during assembly and beyond. Once the glue dries it will be clear and not so noticable, especially with the model in place.

EMailUBoatMolch0002.jpg
 
Z

Zathros

I really have a "thing" for subs. I look forward to seeing this come together! :)
 

treadhead1952

Member
Mar 22, 2009
181
1
16
Las Vegas, NV USA
Rollin', Rollin', Rollin'!

Hi All,

That is what happens when you live too close to New London... ;)

I have been having entirely too much fun with the G7e Torpedos that come in the kit. I came to realize early on that this kit is mostly rolled up. To demonstrate what I mean when I tell ya'll that I rolled something over a mouse pad, this is my old "Head Nurse" mouse pad that I used to use long ago and far away when I used to use an old fashioned mouse instead of a track ball. On it are the two main body sections of the torpedos along with three of the four sizes of extra long drill bits that I use to do rolling chores on larger pieces like this. Ordinary drill bits work for smaller sized pieces as well as magic marker bodies, Pin Vises, nails, anything round that will compress the foam rubber insides of the mouse pad as you roll something in between the mouse pad and the cylinder you are rolling with. This imparts a curve to the item making it much easier to glue together in that shape. It works for paper and card both, it even works on brass and fine sheet metal as well.

EMailUBoatMolch0003.jpg


Graduating down in size of the drill bits rolls the card tighter and tighter until finally it is the diameter it needs to be. It will hold this shape for a while, long enough for me to glue up one of the strips that hold the cylinder shapes together. Right now these are just rolled, nice and round.

EMailUBoatMolch0004.jpg


Once I do get ready to glue them up, work on one side at a time to get them to fit as closely as possible. It helps if you pre roll the strip itself just like the part. Once you have the ends glued together and touching you can take your larger drill bit and roll it inside the tube to further shape it nice and round, just be careful not to get too exuberent or you might move the edges apart.

EMailUBoatMolch0005.jpg


So far this evening I have managed to get these parts rolled up and joined together. I still have 6 more cylinder shapes that need to be rolled per torpedo. Once they are all rolled up and glued together I have to apply the end disks that close up each of them. The little strips that go inside to hold the cylinders together are a little shorter than the parts so that if you do it carefully and correctly you will have clearance for the disks to fit inside so you can glue the parts together, disk to disk.

EMailUBoatMolch0006.jpg
 
Z

Zathros

Nice looking tubes.. Getting that uniform is a pain in the butt. I have one of those soft mouse pads I keep just for that reason. My wife hates it. I think it is a first generation mus pad with a very added picture of Winnie, the pooh, and it looks like pooh too. :)
 

treadhead1952

Member
Mar 22, 2009
181
1
16
Las Vegas, NV USA
Hi Zathros,

I heartily agree with the pain in the tender area as to the amount of care that you have to put out to get things this uniform. Unfortunately, with a model that requires mostly rolled up pieces of card to happen, it is the nature of the beast. I have the Bieber and the Hecht waiting in the stash once I get this one done and I am looking around trying to find any of the other mini submarine types that were used during the war to add to that collection.
 

treadhead1952

Member
Mar 22, 2009
181
1
16
Las Vegas, NV USA
Hi All,

Working on all the little parts that go to make up the torpedos, one entire page is devoted to just them. I got them all sorted out. Forming the head and firing tip was aided using a fat Sharpie marker for the head piece, wetting the inside of the part with some Elmers White Glue for the extra moisture content that it has over Aleene's Tacky Glue so I could further round the parts over and join them a little at a time.

EMailUBoatMolch0007.jpg


Gluing the disks into each end of the round pieces gives you a solid joining area to assemble the long tubes.

EMailUBoatMolch0008.jpg


Now I can assemble all these to make the tube shape without a lot of worries about alignment issues. I did make sure to get all the join lines on each section lined up on what will be the bottom of the model.

EMailUBoatMolch0009.jpg


Next up comes the rear control fins, propeller blades and the spinner blades that go on the firing control tip at the head. These make up some nice G7e torpedos, looking at the other mini submarine models in this series, they all share the same basic design. I did notice that the tiny propeller blade cones have holes in the disks that join those parts to the tail end of the torpedo. If you were so inclined you could actually build them to rotate. With a little micro electronic work you could add motors, batteries and a switch so that they would spin for that matter, the way this is constructed. But fortunately for my sanity, ain't gonna happen this time around. sign1
 

treadhead1952

Member
Mar 22, 2009
181
1
16
Las Vegas, NV USA
Hi All,

Just a quick update, I got the rear control fins built up and added to these. As I am back at work now, updates may get a little sporadic, but they will come as I have something to report on my progess with these two builds.

EMailUBoatMolch0010.jpg
 

treadhead1952

Member
Mar 22, 2009
181
1
16
Las Vegas, NV USA
Hi All,

I have just about completed my first two G7e Torpedos. I do have the final tiny cone shaped end piece to assemble and glue in place on the very rear of the last propeller mounting and edge color the firing spinner blades on the nose. GPM has done a fine job on these and Piotyr Motyka, the author designed a very trouble free method of assembly. Just to make up the two Torpedo assemblies required 124 parts total.

The only part that was a bit difficult was the nose pieces with their "petal" tips that have to be curved in to form the rounded ends of these two parts. One of the guys on the German forum site actually sat down and did the math to produce a strip that he rolled up to form a mandrel to insert in the inside of the larger nose pieces to help form them. Believe it or not, the strip required was 1.8 M long! Wetting the inside of the individual petal tips after using the end of the large Sharpie Marker Pen body to start the bends in the card and then wetting them with Elmers' Glue All on the inside a second time and carefully forming them after the glue had a chance to soften the card a bit worked pretty well for me.

EMailUBoatMolch0011.jpg


Now I get to start work on the pieces that make up the Submarine itself.:thumb:
 

treadhead1952

Member
Mar 22, 2009
181
1
16
Las Vegas, NV USA
Hi All,

Getting the two G7e torpedos done finally, I have moved on to start the actual construction of the Submarine itself. These are the parts that go into making up the nose of the boat, four interior reinforcement pieces and 10 exterior pieces with the grinning face painted on. There are also a couple of other parts that go on the exterior, handling grab points and tie downs added after the assembly. This is more rolling on the mouse pad material as is most of this vessels construction.

EMailUBoatMolch0012.jpg
 
Z

Zathros

That sure is a lot of cutting and it looks like you did a very precise job! :)
 

treadhead1952

Member
Mar 22, 2009
181
1
16
Las Vegas, NV USA
Thanks Zathros,

Getting into the zen of cutting out parts for me is one of those things that is best done without a lot of distractions. When they all have either curves or a bunch of little zig zag lines, it makes that even more important, at least for me.sign1

Seriously though, once you get all of these cut out from the sheet, rolling them into the curves that they should have or at least be close too is the next step. The old mouse pad and steel pin, round pencil, drill bit or what ever you may have available to do the deed works quickly and easily. Once I get the outside parts glued into rings I can start stacking them into a unit and then use the Zig Zag trimmed pieces to help lock them together. The smallest of the Zig Zag trimmed pieces actually accepts the outside nose piece and the two rings next to it. The next size does the third ring up and the next two and so on so you can easily join them.

EMailUBoatMolch0013.jpg
 
Z

Zathros

I think this is a step many people leave out. Mot doing this is evident when you see models where the seams aren't lining up and you just imagine the person struggling with the part unwinding because they did not roll it first. These kind of pictures are the best kind. It shows what works, and how to do it. :)
 

treadhead1952

Member
Mar 22, 2009
181
1
16
Las Vegas, NV USA
Hi All,

Glad to know that ya'll are picking up a little tip here and there in my meanderings through card modeling while I have all the fun of building.;)

I got started with my nose piece assembly not really knowing quite how to go about it. The other articles that I had access to didn't really specify as to the order of assembly of this part so I first tried putting the parts together starting with the nose and working back. This made it necessary to push each ring over each freshly glued ring in front of it which led to some misalignment and I wasn't too happy with the end result. That being the case I printed out another copy of the parts having scanned the model pages first before blade ever touched card or paper.

The second time around I worked from the back stacking the parts one atop the other adding the inner support rings as I went to help in joining the pieces together. This worked much better. The fourth ring installed, the one with the back of the eyes on it was glued down to the third one without any support ring as I had discovered that there was a slight gap between the two rear support rings that did not allow that one ring to touch the first support ring. This is what the two parts that I had assembled looked like, the first try being in the rear, the more sucessful second one in front.

EMailUBoatMolch0017.jpg


The little support rings that went on the inside were added as I built it up and after getting the outer rings attached to them I added a second layer of glue to the entire assembly inside to act as a supporting web. Once the piece was complete and this extra layer of glue dried the part was quite solid and not at all flimsy. Looking from the inside you can see how the support rings fit helping to hold the whole thing together.

EMailUBoatMolch0016.jpg


Once the part was assembled I took a Red Sharpie Marker Pen and went back over the Eyes and Lips of the face, this sort of covered over the edge marking that I did to keep any white from showing through the individual rings. With the nose piece drying and the small parts yet to be added I can continue on moving to the hull main body now. Here is how the second pass on this part came out so far.

EMailUBoatMolch0015.jpg


EMailUBoatMolch0018.jpg
 
Z

Zathros

The only alternative is vacu-forming or carving one out of balsa, or whatever. I think you did really good with the nose piece. I can't see how any better could be done. The only other thing would be filing and sanding, but even then color matching becomes an issue, then you have to paint the whole thing, and you know all about that! :)
 

treadhead1952

Member
Mar 22, 2009
181
1
16
Las Vegas, NV USA
Hi Zathros,

The only difficult part of any card model is when you have to represent a rounded or domed surface. There are two ways of dealing with it and in this particular model they use both of them. Diminishing rings joined together as this nosepiece is or the "Flower Petal" method as was used to form the noses of the torpedos. Either case is a trade off and as you have pointed out the alternatives dictate that you turn to another material entirely such as wood or plastic, form the shape in the size required and paint it to match the surrounding paper or card.

That they show the parts on the cover of the kit prominently right off the bat lets you know that you are going to have to deal with it.

EMailCoverArtwork_zps9cdaa8aa.jpg


There is also the small dome on top of the hatch of the crew compartment that is coming up. On one of the other threads that I have found to help me in this project the author used a clear plastic dome that he cut from a "Wobbling Eye" used in craft stores for dolls which is one way, the other found a part of a thermo formed packaging of clear plastic that was the right size. At the moment I am in search mode for a similar answer to that particular little problem.

And I am not entirely satisfied with the way this part concluded, so there may yet be another entry into this one before the dust finally settles. I will admit to being influenced by entries into builds of other mini U Boat projects on the German forum, those guys are just too creative when it comes to these things.:thumb:
 
Z

Zathros

This is where some people just want to finish the model and be done with it. I can understand that. I guess it depends on the overall size of the models. The German and Polish forums are quite incredible, as are the Russian ones, in dealing with these issues. Seeing the other work you do, I know I could not offer you any suggestions you wouldn't already know or know of. :)
 

treadhead1952

Member
Mar 22, 2009
181
1
16
Las Vegas, NV USA
Shoot, I am not all knowing in anything by any stretch of the imagination, believe me. If you have an idea or a suggestion, feel free to toss it out there. Any thread that I start is not closed to any sort of ideas, free and open discussion is the best way that I know of for folks to come up with ideas.

As to just finishing something, well that is nice, but I like to explore things for fun and seeing if I can come up with a better solution is also a part of that for me. ;)
 

treadhead1952

Member
Mar 22, 2009
181
1
16
Las Vegas, NV USA
Hi All,

I have been looking through my supply of art stuff and came across some watercolors. I did think about trying acrylic paint as well but the water colors got the nod first. Mostly because they are transparent to a certain degree unless you layer on a thick application. I had to mix up a couple of the colors that I had on hand to come closest to what the base color of the parts were and it is still a little on the lighter side, but it does accomplish what I wanted to do, hide the white color of the underlying card that it is printed on without overpowering the ink jet color from the printer. I have to touch up the three added parts to blend them in yet but it does show how much better the nose looks this way.

EmailUBoatMolch0019.jpg


I will try to touch up the teeth a bit so they don't have the green washed look and I did go over the red with a red Sharpie Marker as I did with the second try at this. Green kills the color red in a big way so that was the only way to get the lips back to what they should look like as well as the center part of the eyes. So I am much happier with my water color edge coloring than I am with the Sharpie Marker Pen treatment. On a darker color than the green hue that this is the Sharpie might have been a better choice. But with the light green the water color seems to work out better.

EMailUBoatMolch0020.jpg