Tsunami Decoder in P2K Heritage 0-6-0

Fluesheet

Member
Jan 22, 2006
339
0
16
Central Ohio
Good day folks.

A couple months back, I posted my initial impressions of the P2K loco, along with some information about my initial efforts to install a Soundtraxx Tsunami decoder and speaker. I took a bunch of pictures with the intent of posting them later, but only now am getting around to it!

The initial post is here: http://www.the-gauge.com/showthread.php?t=21472&highlight=0-6-0

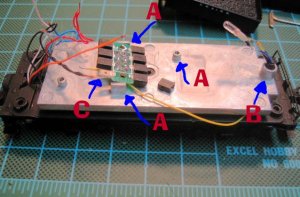
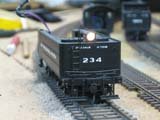
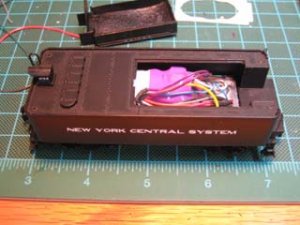
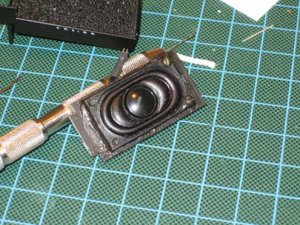
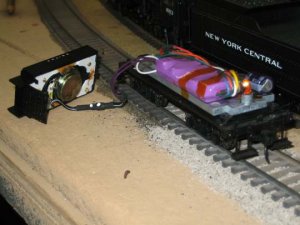
My 0-6-0 started as a DC model. The guts of the tender included a small circuit board, along with an NMRA-type "DCC ready" plug. After getting the Tsunami, it became apparent that there was no way I was going to be able to fit the decoder and speaker and still use the factory provided plug. The first photo shows the unmodified chassis. All parts of the casting that rose above the floor were eventually removed (a couple are marked A in the photo - excepting the light mounting tube. I did this for two reasons - to give myself as much flexibility as possible in the location of the decoder and to give the decoder alot of surface contact with the chassis weight so it could be used as a heat sink.

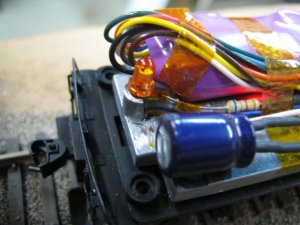
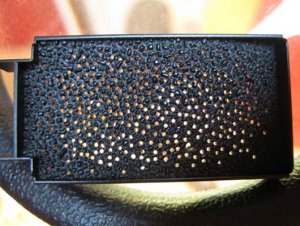
I also ended up modifying the light mount to accomdate an LED - it had to both be shortend and "opened" on one side to give me access to the cathode and annode. More in next post.
 

Attachments

  • IMG_2552denoted copy.jpg
    IMG_2552denoted copy.jpg
    63.2 KB · Views: 155

Fluesheet

Member
Jan 22, 2006
339
0
16
Central Ohio
This photo shows the final location of the decoder and configuration of the wiring and lighting.

After some test fittings with the speaker, I found that the decoder had to be placed as far back and to the fireman's side as possible to avoid contact with the speaker magnet. This took some trial and error fittings. I chose to face the decoder "backwards" (wires to the rear) to give myself more loose wire to work without having to deal with a rats nest of wiring in the front half of the tender. Once everything was in place, it was anchored with kapton tape. Lastly, all unused leads had a bit of liquid tape dabbed on the ends and the speaker leads were soldered to a two-pin miniatronics plug to allow the shell (and speaker) to be separated from the chassis.

Stock, the wiring from the drawbar squeezes through some very narrow spaces between the weight and the shell. It was becoming a pain to tuck all the wires in and get the shell remounted without any getting pinched, so I drilled a hole through the front of the weight about a quarter inch from the edge to route the wiring through. This helped immensely, organization and ease-of-maintenance wise.

For lighting, I used a 3mm Golden White LED for both front and rear lights. I had to switch to a different bulb anyway, and decided to try LED's because of longevity and to keep the heat down. Both headlight and tailight shine through a light tube and I didn't want to worry about heat affecting the tubes or about excess heat build up in the tank, what with a large, busy processor sharing the same very small space.

The original backup light (incandescent) was nested in the metal tube at the rear of the tender weight. An LED wouldn't fit into the tube, so I mounted the LED on top of the tube. The tube had to be modified in two ways. First, I opened up one side of the tube to allow access to the LED leads. Second, the tube had to be filed slightly lower to keep the LED from contacting the tailight tube and preventing the the shell from seating properly. I soldered a resistor in line on the negative (yellow) wire and made sure everything was insulated. Last, I spliced the forward and rearward common (blue) wire onto the decoder common function lead.

This is my first experience with LEDs, by the way, and I am very impressed with the amount of light they through. They would actually be useful to a scale engineer at night!

I'd like to get small lights in and under the cab at some point. But first, I have to figure out how to get it (the cab) off!
 

Attachments

  • IMG_2763-resize.jpg
    IMG_2763-resize.jpg
    60.9 KB · Views: 142
  • IMG_2708-resize.jpg
    IMG_2708-resize.jpg
    57.2 KB · Views: 134
  • IMG_2700-resize.jpg
    IMG_2700-resize.jpg
    24.2 KB · Views: 153
  • IMG_2699-resize.jpg
    IMG_2699-resize.jpg
    23.5 KB · Views: 146
  • IMG_2760-resize.jpg
    IMG_2760-resize.jpg
    25.8 KB · Views: 149

Fluesheet

Member
Jan 22, 2006
339
0
16
Central Ohio
Last, the speaker. I chose the 34.7 x 20 mm (1.37" x 0.79"), 7.9 mm (0.30") H. medium oval speaker (from Tony's - http://www.tonystrains.com/technews/dreamspeakers/detail-medoval.htm) to mount in the coal load, facing up. This was as big as I could realistically fit with clearance for the decoder, etc. But how, do you ask, would the sound escape through that solid plastic "coal"?

Soundtraxx recommends drilling holes with a #55 drill. I drilled one of these and was immediately unhappy with the results - I didn't want the coal load to look like a salt shaker(you can see this single oversized hole in one of the pictures below)! I experimented with smaller bits and finally settled on a #72. The beauty of this size is that if drilled between chunks of coal, they were virtually invisible - and in fact enhanced the look of the load by giving it depth. The downside is the size of the hole. I'm not an engineer, but I figured it would take an awful lot of holes to allow air to be moved (sound to be good).

So over the course of a week or so, any time I had some spare time, I sat down with that coal load, my optivisor, a bright light and a pin vise. In the photos below, there are about 300 holes in the load. I drilled another 100 or more after that - the load is now practically a mesh! Note that in the photo of the painted speaker, the holes are not visible. I'm very pleased with the result - sound and looks wise.

To wrap up, I created a speaker mounting plate from .040" styrene that fit snugly in the coal bunker and mounted the speaker to it. Prior to final assembly, I painted the side facing up so it wouldn't be visible. The plate/speaker combination was fastened into the underside of the coal load and all cracks were sealed with silicone to isolate the speaker cone from the interior of the tender, which thereby served as an enclosure.

I've attached photos relative to the above and some additional photos to give a better idea how it all fit together. The image of the decoder in the tender is for interest only - the decoder was later located further back and to the side than indicated.

Fluesheet.
 

Attachments

  • IMG_2652-resize.jpg
    IMG_2652-resize.jpg
    34.5 KB · Views: 153
  • IMG_2744-resize.jpg
    IMG_2744-resize.jpg
    66.9 KB · Views: 136
  • IMG_2741-resize.jpg
    IMG_2741-resize.jpg
    67.9 KB · Views: 156
  • IMG_2734-resize.jpg
    IMG_2734-resize.jpg
    46.5 KB · Views: 135

Fluesheet

Member
Jan 22, 2006
339
0
16
Central Ohio
Jim Krause said:
I'm having a problem (probably self induced) trying to locate the speaker. Did I miss something?
Nope - I was just slow in posting it! I didn't want to modify the floor of the tender because of the electrical pickups below it. This started as no-sound model, so there was no accomodation for speaker(s) facing down.

I guess I should put a picture of the finished product out as well, but I don't have any!
 

MasonJar

It's not rocket surgery
Oct 31, 2002
5,362
0
36
Ottawa, Canada
Visit site
Nice work! I know what you mean about the holes... Took me a long time to drill out mine too... :rolleyes:

I used the Soundtraxx DSD-LL080 (intended for the P2K 0-8-0), and it worked well. I am not overly happy with the sound as there seems to be a lot of static in the recording itself. It also makes a hack of a hum at switching speeds - the engine was silent running on DC only...

How do you like the sound and control of the Tsunami? Is it "new and improved" in your opinion?


Andrew
 

Fluesheet

Member
Jan 22, 2006
339
0
16
Central Ohio
Mason Jar - I'm very pleased with the sound of the Tsunami. It is MUCH improved, soundwise over my only other Soundtraxx decoder (a sound only DSX). Sounds in general and the exhaust in particular have wonderful adjustibility. I have a Trix Mikado whose sound I was perfectly happy with until I installed this!

The exhaust has quite a bit of range in volume settings, as well as the sound "character". It can be adjusted (for example) from a "chi-chi-chi" all the way to a reasonably bassy "woof-woof-woof". The exhaust can be set up to be very (or not very) sensitive to throttle changes, as well as load, so you get louder exhaust while accelerating ( or under load) and quieter while drifting. The former works quite well, the latter works, but not as well as I'd hoped. I experimented with it for awhile, but finally opted against it, for several reasons. That variation of how loud or soft to make the exhaust in these conditions can also be modified.

The only problem I have with the exhaust is the same complaint modelers have had for years regarding DCC steam sound - syncronizing the exhaust. In this locomotive's case, an axle cam is virtually out of the question, and I've heard the Soundtraxx disks are finicky. Right now I'm using the "auto exhaust" which I've gotten it to a satisfactory setting. I'm waiting for a sound decoder that gets it's cam input from the bemf signal. The relationship between that signal and driver rotation is fixed, so it would seem to be a logical function to add. Zimo (who make great motor decoders) has such a function, but on the surface it doesn't appear to be compatible with Soundtraxx - still researching that.

Apart from the exhaust, sounds such as the air compressor, injector, blower, bell, fireman sounds, etc., can all have volume adjusted individually and can be mapped to functions, disabled, or set up to fire at random intervals. You set the "likelihood" of the sound firing - it's not a fixed interval.

The Tsunami also comes with a nice selection of whistles (actually two of each - a short and a long), several of which I think sound VERY nice.

I've tried out several other users configurations and it is interesting to hear how different we all think a steam locomotive should sound.

Overall, I'm very pleased except in one area - low speed motor control. With the bemf on full blast, it runs very smoothly, but starts and stops rather suddenly compared to a Zimo, which drift down to almost imperceptible motion before halting - much more lifelike. However, I will admit I'm being picky here - My father has found no issues with it. I've found I can get the Tsunami to run very slowy, but it's smoothness suffers.

Well, this post got longer than I expected.

Fluesheet
 

Fluesheet

Member
Jan 22, 2006
339
0
16
Central Ohio
msowsun said:
Will this sound decoder operate on straight DC as well?

Hi msowsun. Yes, this decoder can be set to recognize a DC signal as well. I believe some of the sounds are accessible via DC as well, though I don't know how well that works.
 

Fluesheet

Member
Jan 22, 2006
339
0
16
Central Ohio
MasonJar said:
Thanks for that great review. Lots of useful info there...

Andrew

No problem. As a word of caution, all of the variations on all the sound, light and motor settings can get quite complex and at times frustrating. I started using Decoder Pro to program and store decoder settings because of this decoder - it would be very tedious to do this all from the cab, especially if you like to experiment. The side benefit is that you can store several variations of your settings and do mass CV updates so you can compare one sound "profile" to another. The application also makes it possible to share settings with other users via CV file import and export functions.

Fluesheet
 

MasonJar

It's not rocket surgery
Oct 31, 2002
5,362
0
36
Ottawa, Canada
Visit site
I am currently looking at an iMac G3 that will run OS9, and getting the various jmri programs to allow me to use the computer for programming and storing all my decoder settings.

I have also found track planning shareware that will run on OS8 through OSX so I may be set there too...

Now it's just a question of giving up space on my workbench for a computer.

Andrew