The Wicked Wench!

jleslie48

Member
Feb 7, 2004
96
0
16
Aimont, NY
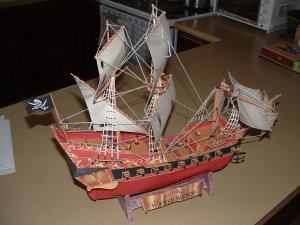
ok, here's the bottom hull half finished, quite literally. ;)

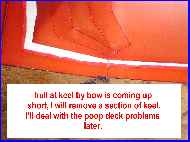
I ran into a fit problem on the hull to the keel:

th_ww0109312.jpg


(click on link below for enlarged pics)

I see from the build pics here that I ran into the same issue as you did,
the hull is coming up short based on the keel. I chose to shorten the keel,
and this will most likely force me to shorten up the poop deck or main deck later,
but I thought it was the best solution.

here's the build so far:

http://jleslie48.com/ww01/cs.html
 

Kevin G

Member
Nov 27, 2003
106
0
16
Muskegon, Michigan
jleslie48, lookin good. I only had that problem at the aft end on the starboard side as can be seen in the pics. The Port side came out a little too big for me, what can ya do :roll: . I found the top to be very forgiving when adding the deck so you may not have a problem, just print a section of the hull color and fill in the blanks!

Update time! Got some time in on the Wench yesterday! Now where did I leave off... oh yes the masts. Mast cross members are rolled as two seperate parts and then joined with glue to make a single piece. I found this to be difficult for me so I did it a different way. I rolled both parts then cut off the tabs, rolled a piece of card to fit inside of the parts and joined them. This has the benefit of strengthening the part and made glueing to the mast easier I think.
site1071.jpg


site1072.jpg


Now this is the part of the build you have to make your own pics with your imagination (can't believe I forgot to take any pics).
Adding the sails is extremly straight forward. The instructions are excelent with many diagrams and easy explanations on the masts and rigging. Rigging on my build are accomplished with some crochet thread "borrowed" from the never ending supply of craft junk that my wife seems to collect :twisted: (I'll pay dearly for that comment if she ever sees this post)
Lots of details are added at this stage such as lanterns and anchors. I added the optional table with a map in a different place than shown in the pics at trader Sam's site. The rope ladders are added to the masts and are stuck thru some flat parts sticking out from the sides of the ship. These flat parts were not easy for me to glue in place since they are straight when cut out but the hull sides are curved. A bit of minor trimming seems to fix them right up and it is most probably just my build that made the fit problems. :-D
The Model is Finished! Finished build pics in next post.
 

Kevin G

Member
Nov 27, 2003
106
0
16
Muskegon, Michigan
site1069.JPG
Finished Build Pics.
Starboard Side
site1068.JPG


Port Side
site1074.jpg


Head on shot
site1075.jpg


Above shots all had the mast in the unbroken posistion. Following Pics will be of broken mast.

Pic of this girls beautiful rear :twisted:
site1076.jpg
 

Kevin G

Member
Nov 27, 2003
106
0
16
Muskegon, Michigan
A few more Pics.

Broken Mast
site1069.JPG


Anchor detail
site1070.JPG


Birds-eye View
site1077.jpg


Well, She is finished! I would like to thank Trader Sam for an excelent model that has provided me with many hours of fun, and some learning too! Questions, Comments, and suggestions are welcome as always. No the edges are not colored. No the edges will not be colored. Maybe the next model will get edge colored but I doubt it.
If there is anything anyone would like a better pic of let me know and I'll get one posted up for you.
Thanks for looking guys and gals!
 

eibwarrior

Member
Dec 17, 2005
568
0
16
54
Knoxville, TN
Kevin,

Good lookin' model for a freebie. You've done it brilliantly... I've always been fond of the steel ships, but this inspires me to do one of the crafts of sail...

Well done!
 

Kevin G

Member
Nov 27, 2003
106
0
16
Muskegon, Michigan
Thanks for the kind words guys!

eibwarrior said:
Kevin,

Good lookin' model for a freebie. You've done it brilliantly... I've always been fond of the steel ships, but this inspires me to do one of the crafts of sail...

Well done!
Well, I never expected my build to "inspire" anyone.:grin:
Do give a ship with sails a try sometime, It is a whole new adventure in modeling!
This was my first experiance with rigging, and it was a blast. Really love the old tall ships with lots of sails and lines everywhere. This was also my first sucessful full hull build (mainly because there is no way to make it a waterline hull) and the things I have learned from this build will be so helpfull later on on other builds.
Still can't thank Trader Sam enough for making this available to all of us!
 

Moonliner

New Member
Jul 20, 2006
2
0
1
Nice work KG! I notice you also blackened the inside of the cannons. I solved my mast problem by cutting off the tabs on one side and cutting the other side about twice as long (long thin triangles). This made it easier to glue together. Your idea seams structuraly stronger. I doff my tri-corn to ye, matey!
 

Kevin G

Member
Nov 27, 2003
106
0
16
Muskegon, Michigan
Moonliner said:
I notice you also blackened the inside of the cannons.
Caught that did ya? :-D
Yes i am comming around to the whole edge coloring thing and it just seemed wrong not to have the insides of the cannon black. I will try to edge color my next build completly, who knows it may help hide some of my messy building!
Thanks for the kind words guys.
 

Trader Sam

New Member
Jun 6, 2006
14
0
6
46
www.disneyexperience.com
I do love this ship; I may place mine in a display case.

I'm also surprised how awesome everybody's model always turns out. Every time I see a photo of the Wicked Wench, I do a double-take; I always think it's my personal model in the photos. Weird.
 
P

Padre

This is my build of the Wicked Wench. If you do build it be sure to add bracing to the hull to keep it smooth , and reinforce the deck.
 

Attachments

  • DSCF0004.JPG
    DSCF0004.JPG
    457.7 KB · Views: 167