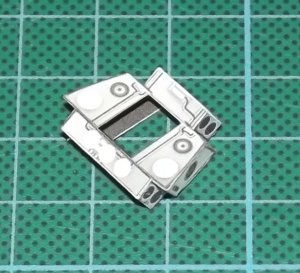
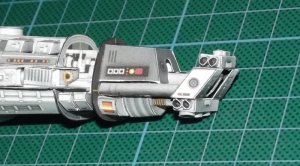
Curiously I found another part which had some excess: The rear end of part 92 was slightly too long which caused some fitting problems. I cut the part shorter and continued assembly.
The UHU02 Colonial Viper appreciation thread
- Thread starter Revell-Fan
- Start date
You are using an out of date browser. It may not display this or other websites correctly.
You should upgrade or use an alternative browser.
You should upgrade or use an alternative browser.
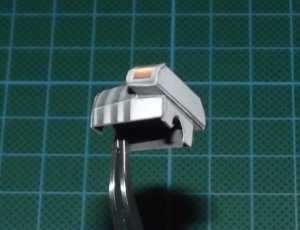
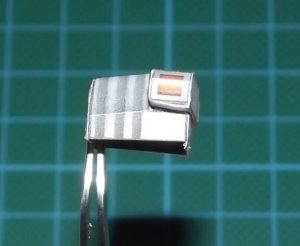
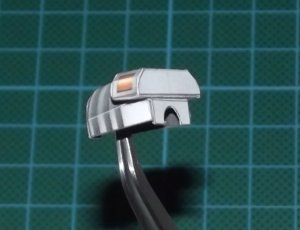

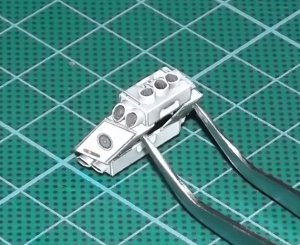
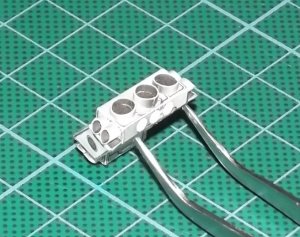
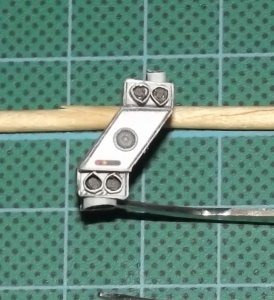
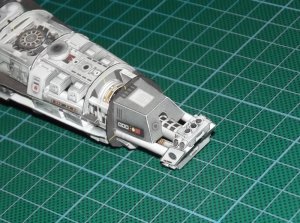
Some close-ups of the tiny open tubes on the nose front part. These things ARE TINY, and I am working with enlarged versions (my sympathies, RB & Dan  !). When you are assembling them make sure that you don't sneeze.
I used a pair of tweezers to attach them. However, this procedure is very delicate even with them. When I was about to attach the second tube it jumped off the tweezers and "became one" with my carpet. I spent 15 minutes crawling on the floor to find it!
!). When you are assembling them make sure that you don't sneeze. I used a pair of tweezers to attach them. However, this procedure is very delicate even with them. When I was about to attach the second tube it jumped off the tweezers and "became one" with my carpet. I spent 15 minutes crawling on the floor to find it!
Attachments

Thank you! I would love to see you accompanying the group build. With your ship we would have three different scales. It would be very interesting to see.Funny that you should post this . . . I just printed it out today at approx 1:72 scale, and will be starting on it tonight.
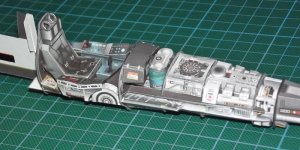
The cockpit shots look great guys!
vbsargent
viper
Thanks for all the build photos guys. I am working on my next project but I am also tweaking UHU's build as well. Here are some photos of some of the process. The cockpit will have more relief and the instruments will have a back panel and the seats have been modified as well with the harness as a separate item. there will be more items that will be built up using Uhu's plan. Oh by the way, My build will be a bit larger, about the same scale as the Star Wars mini figures.. About 1/24 scale.:thumb:
Thanks for all the build photos guys. I am working on my next project but I am also tweaking UHU's build as well. Here are some photos of some of the process. The cockpit will have more relief and the instruments will have a back panel and the seats have been modified as well with the harness as a separate item. there will be more items that will be built up using Uhu's plan. Oh by the way, My build will be a bit larger, about the same scale as the Star Wars mini figures.. About 1/24 scale.:thumb:
Attachments
@Dan: I am glad to see that you have started your build. I like the idea of using a light table like that.
Good luck with your build!!!
@Revell-fan: Your build is coming together very well. :thumb::thumb:
KEEP UP THE GREAT WORK!!!
@Silveroxide: I am glad to see that you have joined in on this mass project.
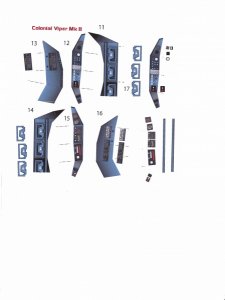
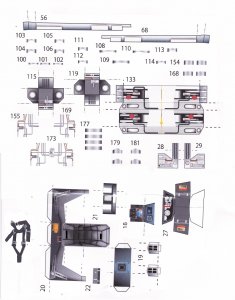
I like the look of your parts pages that you have shown so far.
At 1:24 scale, it will be easier to add all of the detail that you want. It will be interesting and (I am quite certain) very informative to watch. I am very curious to see how your build will turn out.,
I am (eventually) planning to rebuild this model in 1:32 scale and add as much detail as I can. I think that I will be using your build as a guide for such.
Good luck with your build!!!
@Revell-fan: Your build is coming together very well. :thumb::thumb:
KEEP UP THE GREAT WORK!!!
@Silveroxide: I am glad to see that you have joined in on this mass project.
I like the look of your parts pages that you have shown so far.
At 1:24 scale, it will be easier to add all of the detail that you want. It will be interesting and (I am quite certain) very informative to watch. I am very curious to see how your build will turn out.,
I am (eventually) planning to rebuild this model in 1:32 scale and add as much detail as I can. I think that I will be using your build as a guide for such.
Damn...all this looks great..
I have to hold me back and keep in mind that i allready have 3 models in progress.
The Viper is pn my list of all time favorite space ships...
And now with this detailed version i would love to have one.......maybe one day.
I have to hold me back and keep in mind that i allready have 3 models in progress.
The Viper is pn my list of all time favorite space ships...
And now with this detailed version i would love to have one.......maybe one day.
Yeah, man! :thumb: This is gonna be GREAT!!! Welcome aboard!Thanks for all the build photos guys. I am working on my next project but I am also tweaking UHU's build as well. Here are some photos of some of the process. The cockpit will have more relief and the instruments will have a back panel and the seats have been modified as well with the harness as a separate item. there will be more items that will be built up using Uhu's plan. Oh by the way, My build will be a bit larger, about the same scale as the Star Wars mini figures.. About 1/24 scale.:thumb:

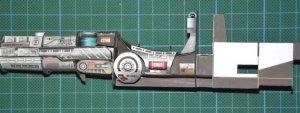
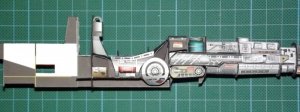
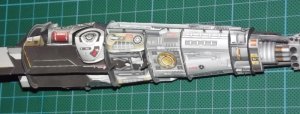
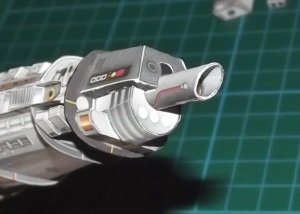
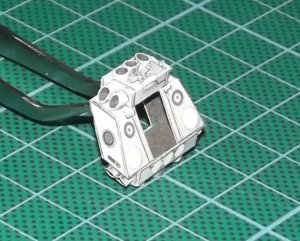
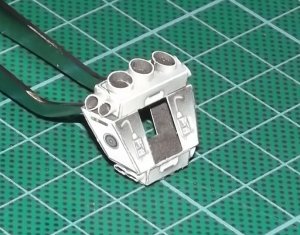
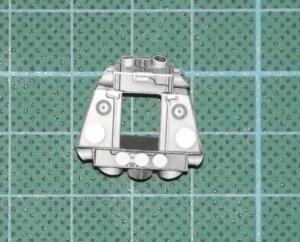
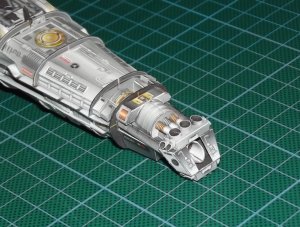
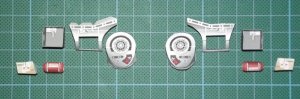
Here is further progress of the front end components.
So far, I have not had any fitting issues (knock on wood hamrhamrhamr)


So far, I have not had any fitting issues (knock on wood hamrhamrhamr)


Now that the front end is finished. It is time to move back to the midsection again and install the life support system and start working my way back to the engines.
Sheesh.... I have got a lot to catch up on.
Looking great so far R-F & R-B !! :thumb::thumb:
And, welcome aboard Ag2O!:mrgreen:
Looking great so far R-F & R-B !! :thumb::thumb:
And, welcome aboard Ag2O!:mrgreen:
I also found this model, but I don´t think that I will be able to create it.
Maybe make copies in A3 paper format to have bigger parts;-))
Maybe make copies in A3 paper format to have bigger parts;-))

Ok, after having printed out the parts sheets on 160gsm (and 200gsm for page 1,) and studying the parts on the sheets, I deemed it a good idea to print out the whole model again on 80gsm paper.
I am going to use the lighter grade paper for the tiny parts. I think that this will produce a cleaner and sharper looking part when folded and glued.
But, until I actually get my finger out of my a$$ and start some actual building, all this is speculation on my part.....
As we have all mentioned, (and taken as par for the course,) we are all doing our builds in our own unique way. That is what makes this thread real FUN!!!!
Whatever we achieve and however different each build is to any other, the end results will be the same:
- The completion of a perfectly designed and engineered model template,
- The satisfaction of achieving this completion..
- (and as with every model,) learning something new...
- And most importantly: SHOWING OUR RESPECT, DEEPEST GRATITUDE, and an ETERNAL (or as long as paper will last) MONUMENT to THE MASTER OF PAPER MODEL DESIGNERS: UHU02. :inw:
I have a very busy weekend ahead, but I hope to get at least the main structural framing cut and assembled by Sunday.
Have a good weekend all!!
See you soon
Whatever we achieve and however different each build is to any other, the end results will be the same:
- The completion of a perfectly designed and engineered model template,
- The satisfaction of achieving this completion..
- (and as with every model,) learning something new...
- And most importantly: SHOWING OUR RESPECT, DEEPEST GRATITUDE, and an ETERNAL (or as long as paper will last) MONUMENT to THE MASTER OF PAPER MODEL DESIGNERS: UHU02.

SO SAY WE ALL, DAN!
:thumb::thumb::thumb: :thumb::thumb::thumb: :thumb::thumb::thumb: :thumb::thumb::thumb: :thumb::thumb::thumb:
Attention!
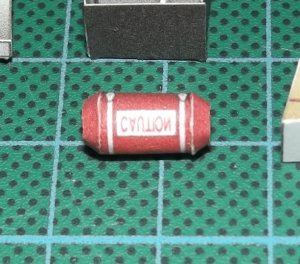
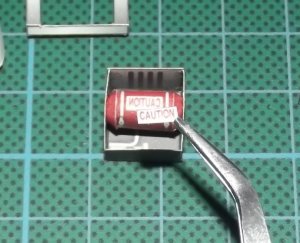
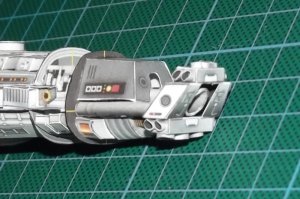
Then I was struck by an error. An unexpected error. The text on part 121 is mirrored!
I isolated the correct line from part 117, printed it on regular paper and glued it over the flawed text. Phew, that was close!
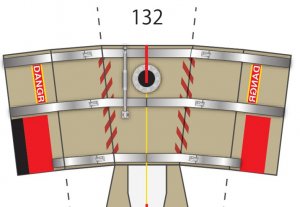
Alarmed by this incident I checked the texts on the other parts - and found the same mistake on part 132! I fixed it like the first one.
Well, this proves that the master is indeed human!ops:
Then I was struck by an error. An unexpected error. The text on part 121 is mirrored!
I isolated the correct line from part 117, printed it on regular paper and glued it over the flawed text. Phew, that was close!
Alarmed by this incident I checked the texts on the other parts - and found the same mistake on part 132!
I fixed it like the first one. Well, this proves that the master is indeed human!
ops: