The On30 conspiracy
- Thread starter sumpter250
- Start date
You are using an out of date browser. It may not display this or other websites correctly.
You should upgrade or use an alternative browser.
You should upgrade or use an alternative browser.
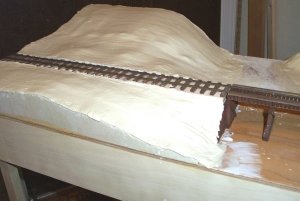
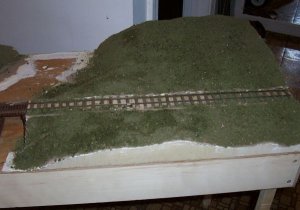
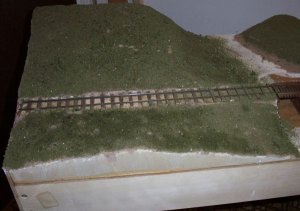
The areas behind the retaining walls, at each end of the bridge, were filled in with styrene foam, carved to shape with a hot wire, from Woodland Scenics. The most recent addition is the ground cover. This is done by painting the dry plaster with a brown latex paint, and adding a mixture of dirt, saw dust, and various colors of Woodland Scenics turf, while the paint is still wet.
Attachments
C
Catt
Pete,the diorama looks great.I've putting all my spare time into the NTRAK modules so the On30 is on a siding for a while.
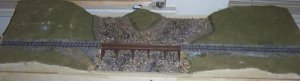
The ballast is in, and the first stage of river bottom is done. At this point I have to go and study the photos I have taken of various rivers, and streams to determine what direction to go.
I've also started a thread in "scratchin and bashin" to document the building of an O scale tree.
I've also started a thread in "scratchin and bashin" to document the building of an O scale tree.
Attachments
OCMODS
Sumpter,
With just a few slieght modifications to add power and a clamping serface, you've got yourself a nice OCMOD!
OCMODS (On30 Conspiracy Module Standards)
OCMODS Yahoo Group
Sumpter,
With just a few slieght modifications to add power and a clamping serface, you've got yourself a nice OCMOD!
OCMODS (On30 Conspiracy Module Standards)
OCMODS Yahoo Group
Ron,
Happy New Year!, Haven't seen you around much, good to hear from you again. I suppose I could use the diorama for a module, I'd just have to find a group, locally, that's doin' On30.
Pete
Happy New Year!, Haven't seen you around much, good to hear from you again. I suppose I could use the diorama for a module, I'd just have to find a group, locally, that's doin' On30.
Pete
Been Busy...
Hi,
Yes, I've been very busy with the On30modules yahoo group. Now OCMODS.
I think my last post on The Guage was back in September.
There's close to 100 members on OCMODS and we were running close to 25 messages per day...
Most from me.
Out of 100 people, you might find one or two in your neck of the woods.
Come on over and take a look.

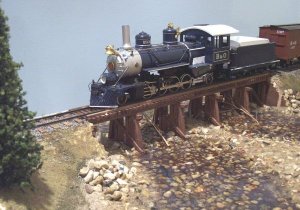
Pete that water looks great! Is that the new stuff WS just came out with? How is it to work with, how many more pours do you think you will need and what will the depth be at that point?
Tyson,
It is the "new stuff from WS". I will wait and see how this pour finishes, and then decide if another is required. I may paint in some "water plants", and add a final layer.
The "water" needs 24 hours to cure, according to the directions.
It doesn't set up hard, so it is not easy to be sure when to pour another layer. On this second one, I used a small brush, and water, to blend the edges into the banks.(it is water soluable) I will have to check out these areas before going further. I also tipped the diorama to get the "water" to flow into all the areas more quickly.
When all the "water" is done, I'll experiment with the "water effects"product, to create water flow around rocks,and other obstructions.
When I first saw the products, WS people indicated that 1/8" was the maximum depth. The directions indicate 1/8" at a time, with no indicated maximum.
I think I might add fish before the last pour...it is O scale.
Pete
Wow.
Beautiful, Pete. I just love those shallow streams with the visible streambeds. You've done a fantastic job.
Please...keep posting!
Beautiful, Pete. I just love those shallow streams with the visible streambeds. You've done a fantastic job.
Please...keep posting!
C
Catt
Pete n'Steve, you guys are making me jealous.Also chompin' at the bit to do some serious On30 modeling. Onliest thing is I made a promise to me to get the N scale layout up and running first.
Onliest thing is I made a promise to me to get the N scale layout up and running first.