P
You are using an out of date browser. It may not display this or other websites correctly.
You should upgrade or use an alternative browser.
You should upgrade or use an alternative browser.
P
philip
Philip , I'm wondering did you use a mold to create all these walls and if you did is it one that you made? I'm working on a viaduct made out of stone and need something like this myself. It looks terrific!!! Pat
P
philip
molds
Pat, Yes this is my work. It is not copied. Its actually two different masters. The reason for using two pieces is because if you attach the wall and the pilaster together you end up with deep undercuts and lots of air bubbles in the pour. Especially on the pilaster corners. Glad you like the walls")
Pat, Yes this is my work. It is not copied. Its actually two different masters. The reason for using two pieces is because if you attach the wall and the pilaster together you end up with deep undercuts and lots of air bubbles in the pour. Especially on the pilaster corners. Glad you like the walls
Attachments
P
philip
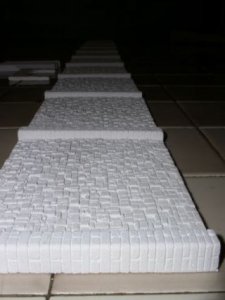
the most important trick
The most important trick or secret in making the rubber impression right is to seal the bottom of the object your reproducing. The mold box shown is an original that I made some time ago. The rubber is poured in the box and picks up all the details on the orginal. The big mistake people make including me is not taking the time to seal the bottom of you master to the wood on the bottom of the box. The rubber will seep underneath the original and make the rubber difficult to release. I have worked on some molds 40 hours and end up breaking them because the rubber completely encompasses the original. Some time I use an exacto knife to cut the rubber around the bottom and that generally works but then you end up with a lot of flash on the open side of the mold. All those tutorials you see on line will never tell this secret. So the cats out of the bag. I got started/motivated in this mold making stuff by CC Crow who sells hydrocal buildings for a living. He also runs Builders in Scale. Check his website for more info. I believe it is C.C.Crow.com.
The most important trick or secret in making the rubber impression right is to seal the bottom of the object your reproducing. The mold box shown is an original that I made some time ago. The rubber is poured in the box and picks up all the details on the orginal. The big mistake people make including me is not taking the time to seal the bottom of you master to the wood on the bottom of the box. The rubber will seep underneath the original and make the rubber difficult to release. I have worked on some molds 40 hours and end up breaking them because the rubber completely encompasses the original. Some time I use an exacto knife to cut the rubber around the bottom and that generally works but then you end up with a lot of flash on the open side of the mold. All those tutorials you see on line will never tell this secret. So the cats out of the bag. I got started/motivated in this mold making stuff by CC Crow who sells hydrocal buildings for a living. He also runs Builders in Scale. Check his website for more info. I believe it is C.C.Crow.com.
Attachments
Philip I appreciate the info but you stopped short of actually telling us how to seal things to the bottom. I posted this exact question a couple of weeks ago and did not get an answer to it. I've checked out the CC Crow site several times and am glad I found it a while back and was very surprised by the fact that noone here mentoined it? There is some great info on that site and I got some other PM help as well now I just have to get this final piece to the puzzle. Thanks Pat
Philip,
They're beautiful walls. I can't believe they're N scale. How did you make them? Are they hand carved?
George
They're beautiful walls. I can't believe they're N scale. How did you make them? Are they hand carved?
George
P
philip
seal
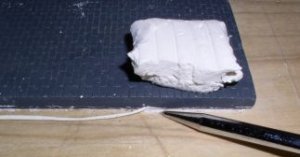
Belg: The bottom of the original is sealed with sculpy clay. This keeps the rubber material where it needs to be. I just roll out a piece like a baker in tuck the clay under the entire perimeter of the original. Time consuming but effective. Sorry I left you in the dark.
Belg: The bottom of the original is sealed with sculpy clay. This keeps the rubber material where it needs to be. I just roll out a piece like a baker in tuck the clay under the entire perimeter of the original. Time consuming but effective. Sorry I left you in the dark.
Attachments
P
philip
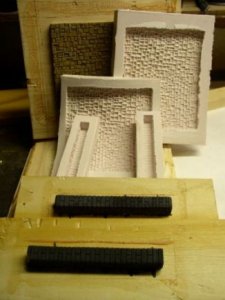
more tips
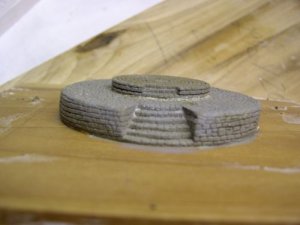
The grey part of the picture is the original. Notice how the brick work/ detail is missing. This is what happens when you fail to seal the bottom of the mold box. Or you fail to use a mold release. I use canola oil or wd40. This attempt resulted in the original ended up sticking to the rubber. Mold ruined. So far no real problems using either product. I spray the stuff on and brush the stuff into the cracks. This pic shows what happens when you miss a spot. I use foam material called jiffy foam. Dick Blick carries this product and its inexpensive. Now to the air bubble problem. Notice how the air was trapped and couldn't escape. Deep undercuts will cause this problem. You know on construction jobs where rebar is used, the workers will use a vibrator to get the concrete into nooks and crannies. Same deal here but on a mini level. Tapping the mold with a rubber hammer works Ok but the fine areas need more attention. I use a toothpick...stirring around to release those pesky bubbles. Using the foam as a master requires painting. A couple coats of model paint works well and kind of creates a barrier between the original and the rubber.
The grey part of the picture is the original. Notice how the brick work/ detail is missing. This is what happens when you fail to seal the bottom of the mold box. Or you fail to use a mold release. I use canola oil or wd40. This attempt resulted in the original ended up sticking to the rubber. Mold ruined. So far no real problems using either product. I spray the stuff on and brush the stuff into the cracks. This pic shows what happens when you miss a spot. I use foam material called jiffy foam. Dick Blick carries this product and its inexpensive. Now to the air bubble problem. Notice how the air was trapped and couldn't escape. Deep undercuts will cause this problem. You know on construction jobs where rebar is used, the workers will use a vibrator to get the concrete into nooks and crannies. Same deal here but on a mini level. Tapping the mold with a rubber hammer works Ok but the fine areas need more attention. I use a toothpick...stirring around to release those pesky bubbles. Using the foam as a master requires painting. A couple coats of model paint works well and kind of creates a barrier between the original and the rubber.
Attachments
Phillip, this thread is very interesting. Thanks for the tips and photos.
Since you're using Sculpey to seal the bottom, are you also using it to carve the master wall sections?
Since you're using Sculpey to seal the bottom, are you also using it to carve the master wall sections?
P
philip
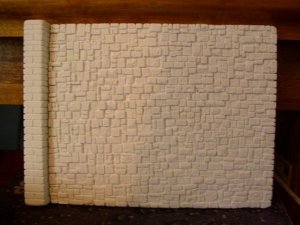
Ray and George
Thanks! Glad you like them. George, Yes to your question. Hand carved and your scale question. Is it N-scale? The largest stones being the pilaster measures 7ft long 4ft wide and 2&1/2ft tall in n-scale. You tell me. The actual wall section is 74ft long & 59ft tall in N-scale. Quite a large stone for one of those n-scale people "LPB's. Maybe with some mechanical assistance.
philip
P
philip
sculpy
Casey, No, I only use foam. The actual original pattern is screwed on from the back of the mounting board. I use the clay only to seal the original to the mold box. The drywall screws are countersunk so the mold remains level. I tried once using the clay only to hold the original in place and my......the original came loose from the base and was floating around in the box
thanks, philip
F
Fred_M
Thanks for the tip on sculpty mold to seal down the master. I had been spending hours sanding them flat on a piece of glass to get them flat and then CA them to a piece of acrylic to avoid the flash or is it called the creeps? DASH
Philip now you have me more confused ,inyour last post you said you used only clay and it floated into center, but in your response to me you said that was how you attached it to the bottom??????
P
philip
attaching the master
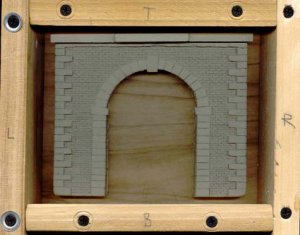
Belg: The master is the piece that you want to reproduce. Attach the master to a piece of wood by screwing or gluing it down to the board. I recommend screwing the master down so it can be removed later. The clay is used only for sealing the master to the piece of wood. hope this helps. This is the piece I want to reproduce.
Belg: The master is the piece that you want to reproduce. Attach the master to a piece of wood by screwing or gluing it down to the board. I recommend screwing the master down so it can be removed later. The clay is used only for sealing the master to the piece of wood. hope this helps. This is the piece I want to reproduce.
Attachments
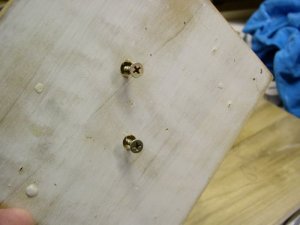
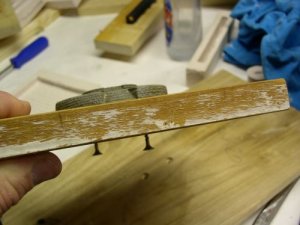
P
philip
cross view
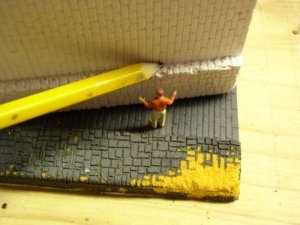
OK. This is a cross section of the master and the wood. Attach the master with screws from underneath the wood. Note the two drywall screws used. Make sure the screws are the correct length so they don't run thru the master. The screws hold the master in place.
OK. This is a cross section of the master and the wood. Attach the master with screws from underneath the wood. Note the two drywall screws used. Make sure the screws are the correct length so they don't run thru the master. The screws hold the master in place.
Attachments
P