

I bet filling the whole thing with hot glue will make the entire model flicker . you are doing such a great job, keep it up, this will be a famous diorama!!!
Star Trek: TNG:- Wolf 359 Diorama - micro build log
- Thread starter linweseregon
- Start date
You are using an out of date browser. It may not display this or other websites correctly.
You should upgrade or use an alternative browser.
You should upgrade or use an alternative browser.
What you are doing with these little ships, is SIMPLY MIND BLOWING!!!
I am really looking forward to seeing how this whole diorama will turn out!!!
I am really looking forward to seeing how this whole diorama will turn out!!!
@spaceagent-9 I'll take yer word for it - lol - hot glue is yet another thing I know nothing about  .
.
@Rhaven Blaack Thank-you. It shouldn't be too long before it's finished now - another year or two should see it done . Realistically, with six more ships to build, a fortnight should definitely see it finished. (Famous last words... lol)
With the upper hull complete I cut the parts for the lower hull and neck:-
 I had to discard the dark support pieces for the neck to make way for wiring. With both halves and the neck formed I pushed a darning needle through the lower hull for the LED prongs to slide through. I also marked the cut lines for damaged sections:-
 Before connecting the hull pieces I had to work on the nacelle:-
 The central areas of the blue piece had to be removed as the nacelle will be housing another LED:-
 I forgot to take photos at this stage because there was a lot of wrestling going on. The structure on the top of the nacelle had to have a central slice removed and then was thread onto the extension wiring of LED 1. I had to build the rest of this structure around the wires and then connect LED 2 in series with LED 1.. After that I built the nacelle around the wires and bulb - or tried to... It is bulging a bit in one area because I stripped too much wire from the battery connecting extension, but fortunately it's also in an area of extensive damage so it might work out alright in the end. I thread the battery leads through the largest damage holes after ruthlessly stripping out as much of the innards as I could. I also had to add a bit more card to insulate bare wire. This is the stage I'm at so far:-
 I'm going to leave the neck hole open and blacken some of what is showing - it's much better looking damage than sticking on a picture. I'll fill the rear holes with pinpricked damage printout, but leave the front starboard hole, as the combination of ragged card and bare wiring should be quite effective when some of it is blackened. I'm also going to attach the starboard hull chunk with wire so that it looks like it's falling away. A few filaments of wire wool and some shredded offcuts should prove useful as well. Did I say I'd be finished in a fortnight? Hmm....
.@Rhaven Blaack Thank-you
. It shouldn't be too long before it's finished now - another year or two should see it done . Realistically, with six more ships to build, a fortnight should definitely see it finished. (Famous last words... lol)With the upper hull complete I cut the parts for the lower hull and neck:-
Granted, I am wanting to see how this turns out, but please do not rush it. Take your time. If it takes longer than a fortnight, then so be it. No big deal!
I am GREATLY ENJOYING just watching the build thread as a whole (and seeing what all you are making and how you are doing it).
KEEP UP THE GREAT WORK!!!
I am GREATLY ENJOYING just watching the build thread as a whole (and seeing what all you are making and how you are doing it).
KEEP UP THE GREAT WORK!!!
All the extras have been added to the USS Firebrand:-
 The buckling on the nacelle adds to the sense of impending doom. And now the poor thing is on fire:-
 The rest of my day has been spent wiring bulbs and tying up fibre optics and sanding other fibre optics. Here's a wee taster with a very rough filament straightener:-
 The obvious wire on the Borg phaser will be replaced with something less invasive once the PVA sets properly. The yellow LED did have to be replaced. I have the new one wired up ready for attaching Federation phasers; I'll have two coming from the Yamaguchi (the blur on the left of the pic) and one from the Saratoga (which was also mounted today). The Kyushu was also mounted and attached to a Borg phaser, leaving one more for the Buran (still to be built).
yay! that is so completely wicked!!!!
try a 470 ohm resistor on your leds to stop them from burning.
try a 470 ohm resistor on your leds to stop them from burning.
@spaceagent-9 Cheers Jim . Fortunately I found an electronics company from Lothian (near Edinburgh) which supplies the resistors with their value already calculated for their bulbs in conjunction with a 12V supply - phew!
I'm going to attempt the USS Buran next. The Challenger class will be a challenge for me, if you'll excuse the pun. It's a kitbash of Galaxy class saucer and nacelles joined with a submarine turret. There aren't any designs for it that I can find so I'll have to wing it on this one. I think the easiest way for me to do this would be to find some orthographics, cut and paste and tidy up 'new' sections, and then shrink them to scale with the Galaxy sections. While I'm thinking about it I'm going to finish off the second damage chunk on the Borg cube.
. Fortunately I found an electronics company from Lothian (near Edinburgh) which supplies the resistors with their value already calculated for their bulbs in conjunction with a 12V supply - phew!I'm going to attempt the USS Buran next. The Challenger class will be a challenge for me, if you'll excuse the pun
. It's a kitbash of Galaxy class saucer and nacelles joined with a submarine turret. There aren't any designs for it that I can find so I'll have to wing it on this one. I think the easiest way for me to do this would be to find some orthographics, cut and paste and tidy up 'new' sections, and then shrink them to scale with the Galaxy sections. While I'm thinking about it I'm going to finish off the second damage chunk on the Borg cube.

I also noticed a 1701-a type in the wreckage that could be bashed into something cool, and of course the I drew one up from the 70's proposal of star trek, a kind of triangular looking beast I would be glad to post here for you to ravage like it deserves to be lol
@linweseregon I have to say that I like what you did with the USS Firebrand. You did a GREAT JOB on it and I especially like the saucer section and how it was cut in half like that.
Your work is SIMPLY AMAZING!!!
Your work is SIMPLY AMAZING!!!
- Apr 5, 2013
- 13,499
- 9,551
- 228
All the extras have been added to the USS Firebrand:-
The buckling on the nacelle adds to the sense of impending doom. And now the poor thing is on fire:-
The rest of my day has been spent wiring bulbs and tying up fibre optics and sanding other fibre optics. Here's a wee taster with a very rough filament straightener:-
The obvious wire on the Borg phaser will be replaced with something less invasive once the PVA sets properly. The yellow LED did have to be replaced. I have the new one wired up ready for attaching Federation phasers; I'll have two coming from the Yamaguchi (the blur on the left of the pic) and one from the Saratoga (which was also mounted today). The Kyushu was also mounted and attached to a Borg phaser, leaving one more for the Buran (still to be built).
Bloody Brilliant and quite right! This is really building momentum. You are setting the bar quite high, and making a new standard!
@spaceagent-9 Thanks again Jim - I found a few other others showing the intact structure, but your angled ones will be ideal for showing how the bits go together. You've piqued my curiosity with the triangular looking beastie - what's that about? Is it that monstrosity in "The Search For Spock"?
@Rhaven Blaack @zathros @ennder Many, many thanks guys - this kind of high praise keeps me going on days like today when I'm tearing my hair out in frustration with fibre optics that have developed their own twisted artificial intelligence and refuse point blank to go where I want them to go- lol.
I've put off the Buran today and (as just mentioned) had a wrestling match with fibre optic filaments. It always kinda annoyed me that some ships had massive chunks missing, but no visible traces of where the chunks went, so I liked the idea of having a large section joined to the main hulk with blackened wire. Taking a dried up marker to minced offcuts and sticking them on strands of wire wool - it's fiddly as @*&%, but well worth it. One of my dad's hobbies is floral art and he's got loads of handy stuff kicking about the place. One of these handy items is multi-coloured metal flakes, which can also be stuck onto wire wool; red and gold on the Federation ships, and green (of course!) on the cube. Most of the support wire I use is also from his gear. I'm using 1mm steel rods to keep the fibre optics straight. In the case of the Federation phasers I've tied them together with gold thread and applied a glob of PVA which I'm hoping will hold everything in place and allow me to cut off the unsightly knots. The yellow light still isn't working as can be seen in this close-up off the USS Saratoga:-
 I used the same method for this damaged section as I did for the larger one minus the red and yellow paint - shredded wire wool, minced off cuts, green metal shavings and three micro fibre optic filaments (which don't show because of the flash). I'll try the red LED tomorrow then mibbe the phaser will light up.
. So, we have the USS Princeton (wreck, top left), the USS Bonestell (small blob, middle left), the USS Yamaguchi (top middle left with phasers hitting damage hole), the USS Kyushu (crippled target of Borg phaser, bottom middle), the USS Firebrand (being torn to pieces by Borg phaser, top middle right) and the hated USS Melbourne (target of Borg tractor and cutting beams, bottom right) as well as the USS Saratoga firing on the cube in the previous pic. I'm getting there .
btw Linwë Séregon is my name translated into Tolkien's Quindar Elvish - although I'm guessing any 'unusual' name will come up the same. I liked the sound of it so I claimed it as a user name and e-mail handle. Kirsty
- I found a few other others showing the intact structure, but your angled ones will be ideal for showing how the bits go together. You've piqued my curiosity with the triangular looking beastie - what's that about? Is it that monstrosity in "The Search For Spock"?@Rhaven Blaack @zathros @ennder Many, many thanks guys - this kind of high praise keeps me going on days like today when I'm tearing my hair out in frustration with fibre optics that have developed their own twisted artificial intelligence and refuse point blank to go where I want them to go- lol.
I've put off the Buran today and (as just mentioned) had a wrestling match with fibre optic filaments. It always kinda annoyed me that some ships had massive chunks missing, but no visible traces of where the chunks went, so I liked the idea of having a large section joined to the main hulk with blackened wire. Taking a dried up marker to minced offcuts and sticking them on strands of wire wool - it's fiddly as @*&%, but well worth it. One of my dad's hobbies is floral art and he's got loads of handy stuff kicking about the place. One of these handy items is multi-coloured metal flakes, which can also be stuck onto wire wool; red and gold on the Federation ships, and green (of course!) on the cube. Most of the support wire I use is also from his gear. I'm using 1mm steel rods to keep the fibre optics straight. In the case of the Federation phasers I've tied them together with gold thread and applied a glob of PVA which I'm hoping will hold everything in place and allow me to cut off the unsightly knots. The yellow light still isn't working as can be seen in this close-up off the USS Saratoga:-
"We have engaged the Borg"

These are the other ships that are mounted so far. There does seem to be a slight yellow tinge on the USS Yamaguchi's phasers... Raiding my dad's kit again produced some natty green thread stuff that gives a kind of pearled effect to the Borg phasers that are hitting the USS Firebrand and the USS Kyushu. Both the green and the blue LEDs are working perfectly . So, we have the USS Princeton (wreck, top left), the USS Bonestell (small blob, middle left), the USS Yamaguchi (top middle left with phasers hitting damage hole), the USS Kyushu (crippled target of Borg phaser, bottom middle), the USS Firebrand (being torn to pieces by Borg phaser, top middle right) and the hated USS Melbourne (target of Borg tractor and cutting beams, bottom right) as well as the USS Saratoga firing on the cube in the previous pic. I'm getting there .btw Linwë Séregon is my name translated into Tolkien's Quindar Elvish - although I'm guessing any 'unusual' name will come up the same. I liked the sound of it so I claimed it as a user name and e-mail handle. Kirsty
- Apr 5, 2013
- 13,499
- 9,551
- 228
Linweseregon, go to a welding shop and buy some "Tig" welding rod. It is very thing and very strong, it comes in different thicknesses. It will almost disappear in your diorama. You can you harden the metal rods (they are very thin) by firmly attaching one end to a post, then attaching the other end too a wooden handle, pull slowly but very hard, the wire will stretch and it will harden and become very very stiff. This is what we did when I worked making Instruments for aircraft. When an instrument fails, a little flag comes down to tell you that the instrument no longer works. The shaft of the flag is made using this method. You are in effect hardening the wire. I have become a fan of you and your work !!
action packed midway island battle scene !
YEAH BABY! great work.
I am actually tickled inside just looking at it !!
here is the pos I made from the pilot attempt. I think it was in the graveyard that Riker went to when he was ambushed by a chrome Romulan Maurader.

YEAH BABY! great work.
I am actually tickled inside just looking at it !!
here is the pos I made from the pilot attempt. I think it was in the graveyard that Riker went to when he was ambushed by a chrome Romulan Maurader.
@spaceagent-9 It is the one I was thinking of! I'm going to stick with the list I have just now, and mibbe if there's enough space I'll add some flotsam and jetsam like a Connie hull eg. I've saved your design though, and I'll have a go at a 2" version at some point .
Today was 'bite the bullet' day and I've started on the USS Buran. All my sources agree that the saucer is made from two upper halves of Galaxy class parts. I've opted for the Hudson Valley Gift Shop version:-
 My sources also agree that Galaxy class nacelles were used, but just to be awkward they are at a different scale. I had to print them at approximately twice the size of the saucer scale (whatever that was...):-
 There seems to be some agreement that the nacelles are slightly longer than the saucer. This is where there is some divergence - some sources think that the engineering deck is thin and straight-edged, others think it's a modified Galaxy secondary hull. I've opted for the latter. To make things awkward again, this is in yet another scale; somewhere between the saucer and the nacelles:-
 The photo shows the pieces I'll be using for the engineering deck (as well as the finished nacelles. The bottom three pieces are currently a rough guide for the shape of the underside. More modification will be needed since the Buran doesn't have those markings. The real fun begins tomorrow when I try to recreate the submarine tower for the upper nacelle support. Apparently it was taken from a Russian Typhoon kit. I might also reprint some of D-Whale's nacelles as the ones here are a bit 'blocky' for my liking.
.Today was 'bite the bullet' day and I've started on the USS Buran. All my sources agree that the saucer is made from two upper halves of Galaxy class parts. I've opted for the Hudson Valley Gift Shop version:-
The pieces I used yesterday for the engineering deck didn't work - it ended up looking like a grey banana and it was too big. I reprinted the pieces and trimmed curves into the joining edges. I also found a design by rocketman on Deviant Art for the Red October, which is a Typhoon class Russian sub. Reworking the conning tower gave the parts necessary for the nacelle supports.
 The tower piece still on card needed to be shortened and reduced in depth and angled for the lower support. I used parts of the Galaxy class nacelle support to construct a way of attaching the engineering deck to the saucer.
 With these sections connected I drew on my damage guide.
 The only reference photos I could find were these:-

 This made a guessing game of where the damage should be and because of this I've left the lower nacelle intact. I used my usual wire wool and shredded offcuts to simulate parts being blown off the saucer and upper nacelle.


 The wires are for another flickering yellow LED.
The USS Buran turned out to be less of a challenge than I expected; I doubt very much that I'll be able to say the same of the USS Chekov!
The USS Buran turned out to be less of a challenge than I expected; I doubt very much that I'll be able to say the same of the USS Chekov!
- Apr 5, 2013
- 13,499
- 9,551
- 228
Lin', check out this webste for all of your calculating needs when it comes to LED's of any type. for either series, parallel, series-parallel, you name it, this site will help you construct bullet proof LED circuits. Current is the most important thing to control with LED's. A Rheostat can be a very god friend. As you can see from the interface page, it is easy top do. Just spend some time with it. Make sure you notice the: "The Guru - Single led - Series leds - Parallel leds " These are links to those interfaces.
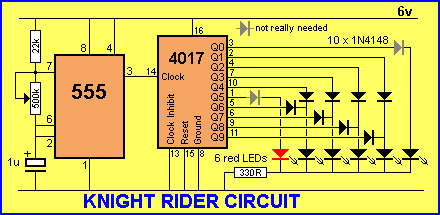
If you are not using a breadboard, I highly recommend that you do. Check continuity with your ohm meter to know which holes connect. The boards don't have to be transparent. These allow you to build really fancy circuits, and get creative, using 555 timers, you can make them flash and do all kinds of neat things. 555 timers are timed with a small capacitor and a resistor. This is the "Knight Rider" light circuit, using a 555 Timer and a 4017 clock chip. These chips cost around a $1.00 (US) dollar a piece. You can find many substitute chips.
Breadboard:

Link= http://ledcalc.com/#calc Below is a sample Picture of the Interface Page

If you are not using a breadboard, I highly recommend that you do. Check continuity with your ohm meter to know which holes connect. The boards don't have to be transparent. These allow you to build really fancy circuits, and get creative, using 555 timers, you can make them flash and do all kinds of neat things. 555 timers are timed with a small capacitor and a resistor. This is the "Knight Rider" light circuit, using a 555 Timer and a 4017 clock chip. These chips cost around a $1.00 (US) dollar a piece. You can find many substitute chips.
Breadboard:
Link= http://ledcalc.com/#calc Below is a sample Picture of the Interface Page
that's really cool!!
looks great and another ship I have never seen!
thanks Zathros for the chart.
jim
looks great and another ship I have never seen!
thanks Zathros for the chart.
jim