Having stalled out on my Polar Light's Enterprise Refit (a bit of advice: you can't use a airbrush in an apartment) and still having the "I gotta build something" bug I grabbed my virtual Boogie Board as started surfing. My criteria was pretty simple; cheap, relatively easy and no painting. It seemed that a card model would satisfy those criteria. My last paper model was a small Cassini probe I made about 7 years ago. The quality wasn't that great, but it was cheap (free). I eventually found Steves Paper Battlestar Galactica Fleet Pack.
I spotted the 3ft Galactica, but I knew I had to build up to that (pun intended) so I downloaded Colonial One, started cutting and promptly got frustrated by the Alien Queen (35) and the Cthulhu (33) parts. So I said, "Frack this", scrapped that plan and dived head first into the deep end by downloading the Galactica pdf files. Actually I downloaded the entire site and got banned until I reset my cable modem.")
ANYWAY, I printed the files, cut out the bow's bulkheads (formers) and started my version of the Scorpion Fleet Shipyards. While waiting for the glue to dry on parts FU 1 and FU 2 I was thinking that there has to be an easier way to keep all these parts from getting warped from the glue. The next day at work I was in the kitchenette pondering this very question while stirring my coffee with a wooden stir stick when a 2 watt bulb burnt out above my head. Hmmm...the stir stick was fairly straight and only had a little bit of flex so I grabbed a few for testing. Well, it seemed like a good idea at the time.
Actually, it was a good idea. The sticks are easy to work with, light weight, sucks up the water in Elmer's Glue almost as fast as #110 card stock and can stir your coffee while you wait for the glue to dry. Staples has Berkley Square Wooden Stirrers for $2.99. These little babies are 13.97cm (5.5 inches) long, 4mm wide, 1mm thick and come 1,000 in a box.
I bought two.
BONUS TIP: refresh that product's page for a couple of days and you'll get a 10% discount. I considered using Starbuck's stir sticks (17.6 cm x 5mm x 1mm, rounded ends), but they appear to be coated. I didn't want to take anymore chances with pieces rattling around inside the model than I had to.
Well, are you ready to see some pics? What? I didn't hear that could you say that louder?
Alright already! geez...
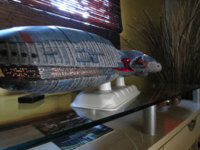
This is actually my second attempt at the upper bow.
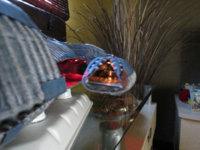
These are the parts that made me use the coffee strips. Not only do the strips give extra strength to a part they also glue you something to glue against (i.e., a bigger target).


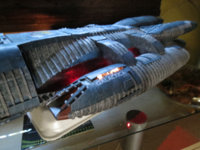
Here's the rest of the bulkheads for the upper bow section. I needed to keep everything centered so I pencilled in centerlines and an outline of the smaller part on the next, larger part.


The space between FU 2 and FU 7 is 22.3cm.

Thinking that the space between bulkheads would be evenly divided I drew lines at approximately 4.46 cm.


WRONG!
The spacing isn't on FU 9 - 11 (lined file) either. Those were on the small side of the angle changes on 1a/b. So I decided to put the bulkheads as close as I could to the angle changes.


Well, I've reached the upload limit for this message. I'll continue this thread later.
djp
aka DataZombies
I spotted the 3ft Galactica, but I knew I had to build up to that (pun intended) so I downloaded Colonial One, started cutting and promptly got frustrated by the Alien Queen (35) and the Cthulhu (33) parts. So I said, "Frack this", scrapped that plan and dived head first into the deep end by downloading the Galactica pdf files. Actually I downloaded the entire site and got banned until I reset my cable modem.
ANYWAY, I printed the files, cut out the bow's bulkheads (formers) and started my version of the Scorpion Fleet Shipyards. While waiting for the glue to dry on parts FU 1 and FU 2 I was thinking that there has to be an easier way to keep all these parts from getting warped from the glue. The next day at work I was in the kitchenette pondering this very question while stirring my coffee with a wooden stir stick when a 2 watt bulb burnt out above my head. Hmmm...the stir stick was fairly straight and only had a little bit of flex so I grabbed a few for testing. Well, it seemed like a good idea at the time.
Actually, it was a good idea. The sticks are easy to work with, light weight, sucks up the water in Elmer's Glue almost as fast as #110 card stock and can stir your coffee while you wait for the glue to dry. Staples has Berkley Square Wooden Stirrers for $2.99. These little babies are 13.97cm (5.5 inches) long, 4mm wide, 1mm thick and come 1,000 in a box.
I bought two.
BONUS TIP: refresh that product's page for a couple of days and you'll get a 10% discount. I considered using Starbuck's stir sticks (17.6 cm x 5mm x 1mm, rounded ends), but they appear to be coated. I didn't want to take anymore chances with pieces rattling around inside the model than I had to.
Well, are you ready to see some pics? What? I didn't hear that could you say that louder?
Alright already! geez...
This is actually my second attempt at the upper bow.
These are the parts that made me use the coffee strips. Not only do the strips give extra strength to a part they also glue you something to glue against (i.e., a bigger target).
Here's the rest of the bulkheads for the upper bow section. I needed to keep everything centered so I pencilled in centerlines and an outline of the smaller part on the next, larger part.
The space between FU 2 and FU 7 is 22.3cm.
Thinking that the space between bulkheads would be evenly divided I drew lines at approximately 4.46 cm.
WRONG!
The spacing isn't on FU 9 - 11 (lined file) either. Those were on the small side of the angle changes on 1a/b. So I decided to put the bulkheads as close as I could to the angle changes.
Well, I've reached the upload limit for this message. I'll continue this thread later.
djp
aka DataZombies