

P
You are using an out of date browser. It may not display this or other websites correctly.
You should upgrade or use an alternative browser.
You should upgrade or use an alternative browser.
P
philip
C
Catt
P
philip
P
philip
P
philip
outside corner bead
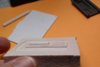
I guess I will use this to join the corners of the combine. Its a Midwest product plastic device. Anyone used this stuff? I'm also out of plastic so :sleeping: :sleeping: again....actually off the the hobby shop tomorrow evening after the real job.
philip
I guess I will use this to join the corners of the combine. Its a Midwest product plastic device. Anyone used this stuff? I'm also out of plastic so :sleeping: :sleeping: again....actually off the the hobby shop tomorrow evening after the real job.
philip
Attachments

P
philip
progress.............................
I have finally installed chair rail on the combine below exterior windows.
Incorporated the doors as built into the bulkhead.....now to the mold box. All I have to do is construct the dam around the bulkhead.
The corner bead is what frames the outside of the door and will also hold the 4 corners together.
philip
Attachments
P
philip

P
philip
P
philip
P
philip
P
philip

P
philip
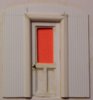
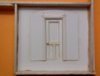
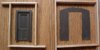
I wanted to show the outside corner bead that is a useful product for joining corner parts together. Refer to post # 66 for a view of the bead that is a simple design. This part would be great on the old art deco gulf gas stations with the round corners.
The first photo shows the part dry fitted to the corner of the combine.
The second photo shows the part askew ( out of line) to show the header board over the window and the chair rail trim below the window. I had to hold those horizontal trim pieces short to fit in the dado so the corner would fit plumb.
Now the wait begins. Hopefully the mold will work.")
The first photo shows the part dry fitted to the corner of the combine.
The second photo shows the part askew ( out of line) to show the header board over the window and the chair rail trim below the window. I had to hold those horizontal trim pieces short to fit in the dado so the corner would fit plumb.
Now the wait begins. Hopefully the mold will work.
Attachments
P
philip
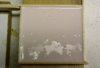
The wait is over and I can only say it didn't work :cry:
back to scratch again
I should have made the car ends two pieces to start with. I really wanted to take the easy road.
The mold is all messed up...the material can't be poured into the door because it is higher than the rest of the mold. See 2nd pic. lesson learned, don't do what I did. I thought it would work....duh
back to scratch again
I should have made the car ends two pieces to start with. I really wanted to take the easy road.
The mold is all messed up...the material can't be poured into the door because it is higher than the rest of the mold. See 2nd pic.
lesson learned, don't do what I did. I thought it would work....duhAttachments

P
philip
P
philip
Well friends, the cat is out of the bag. Paul took ownership of the combine. Another completed mission............Philip 
http://www.all-model-railroading.co.uk/forums/index.php?showtopic=812
http://www.all-model-railroading.co.uk/forums/index.php?showtopic=812