Quinn Ball Bearing

P

philip

weathered

Gary,

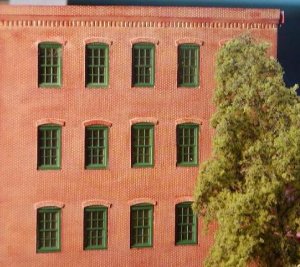
Take some red paint and add a little brown. That should tone the red down. Thin the paint down and apply a water thin wash to the test area. Let dry. now make a mixture of the mortar sand concrete with a shade of a darker color. Apply with a tiny sponge and go back over the area ( with a clean damp sponge) mopping up the sand off the brick surface and leaving the mortar in the recesses. Only a suggestion "no warranties implied" results may vary.

philip
 

sumpter250

multiscale modelbuilder
Jan 19, 2002
3,073
0
36
80
Vernon Hills, Illinois
Visit site
The slight difference in tones I was looking for looked good on a test piece prior to applying mortar, afterwards it wasn't noticable
Gary,
Some colored pencils are water soluable, if that was the case, the spackle would have removed the pencil color. I have used a thin wash of white acryllic with some degree of success. Some fading of the brick red is actually desireable.
Pete
 

Gary Pfeil

Active Member
May 7, 2001
2,510
0
36
Boonton NJ
Visit site
Thanks Philip for that tip. And Pete, you're right, that would be why the pencil marks disappeared. Well, true to my word I've spent most of the last several weeks outdoors only occassionally attempting to make progress with the mortar problem. And Robin has built a completed coal tower in that span! Anyway, here's where I am now, I think I'm ready to do the main walls. A big mistake I made was installing the arches and dentel cornice prior to final coloring and mortar application. Well, live and learn. This small section of wall is sitting on top of one of the end walls in its original color. What I've finally come up with is using chalk in orange and an orange/brown dusted on the red and fixed in place with gloss cote. Then I add mortar with thinned paint with detergent added. When dry I wipe the excess off, use the colored pencils to make some bricks different colors, the dull cote. The gloss cote helps the removal of the mortar, and seals the chalk. Final weathering will be done after assembly.
 

Attachments

  • P1010517jpg.jpg
    P1010517jpg.jpg
    52.7 KB · Views: 218

Gary Pfeil

Active Member
May 7, 2001
2,510
0
36
Boonton NJ
Visit site
Here's a closeup, final weathering should tone down the contrast in the brick colorings. While still not great, it's time to move on. You all must think it's ridiculous to have spent so much time on this. Can't argue that, it seems ridiculous to me. But I'd do it this way again. Heck the bldg ain't done yet!
 

Attachments

  • P1010523jpg.jpg
    P1010523jpg.jpg
    28.3 KB · Views: 216
P

philip

Gary,

It looks great!... So it may take months to complete, we don't mind..once finished your project will be unique with all the add on castings. I really like the soldier add ons! :thumb:


philip
 

Matthyro

Will always be re-membered
Dec 28, 2000
4,550
0
36
86
Georgetown, Ontario,Canada
Keeps getting better as you progress Gary, Just think of how the building will be viewed and the illusion you wish to create, to set the level of reality you wish to achieve.
I don't know if it has been mentioned here already but there is a good article on the subject in the August Model Railroader by Kathleen Renninger. Some of the tools she uses are cosmetic sponges.
 

Gary Pfeil

Active Member
May 7, 2001
2,510
0
36
Boonton NJ
Visit site
Thanks Philip, I appreciate it. Robin, it's funny you mentioned that article now, I just read it a couple hours ago! Interesting idea, I tries something like many years ago. Not really like it, I didn't use the sponges, I painted the mortar first and then applied brick colors using artists markers witha broad tip. It worked farily well and I had forgotten about it.

The bldg. will be foreground and I want it as real as possible. It's frustrating being able to see how you want it to look but not being able to accomplish it. Somethings I decided from the beginning I would have to settle for, the arches for example. They ought to be flush with the wall, not glued to it. But there was no way I would've been able to cut the openings for the arches in the wall without having tons of gaps to fill so I didn't think about attempting it. And I'm ok with that. It took over a month but I think I'm ok with the mortar now too. Let's see, when I finish the main walls I get to paint and then install glass in about 160 double hung windows. Yipee. But it'll look good then so I'll be into it.
 

Gary Pfeil

Active Member
May 7, 2001
2,510
0
36
Boonton NJ
Visit site
Thanks Robin, Jon, the time it took those lazy lpb's to do the job is a sore point with me. Everytime I thought they had finally got the message, I'd go check on them and find them sitting around, listening to music and drinking vodka! They would invite other lpb's over for BBQ, hang around the spa, you'd think maybe they didn't have such a good work ethic. At times I would get upset with their lack of progress, but they just told me to chill.
 

spitfire

Active Member
Jul 28, 2002
3,448
0
36
75
Toronto, Canada
www.parkdaleyard.com
Wow Gary, that fire escape is fantastic!!!!!! Did you actually make it strip by strip? I can only dream about having that kind of patience. Awesome work - this building is going to be a real showpiece!!!! :thumb: :thumb: :thumb:

Val