Public Works Project, Part II

roryglasgow

Active Member
Jun 3, 2001
1,223
0
36
55
Huntsville, TX USA
web.wt.net
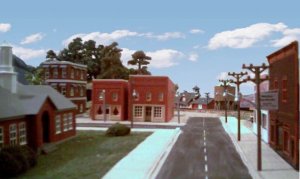
Things are moving slowly, but surely (more slowly than surely) on the renovations to the City of Bryan. Tasks still remaining are: a walkway from the sidewalk to the school, trees and bushes, fences and hedges, building details (and "permanent" placing) and some road signs.

I went to a train show recently and found a bag full of N-scale plastic fence pieces for $4! There's a picket fence and another type of wooden fence. They look pretty nifty.

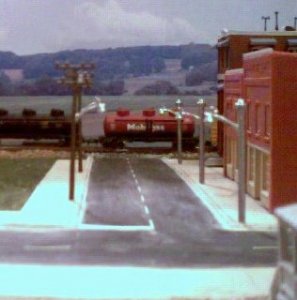
Here's a view through town, looking north. The backdrop is a temporary portable backdrop I created for taking pictures. At present, there is no actual crossing there at the track. I probably won't put anything there because that area is where two turnouts join back-to-back.

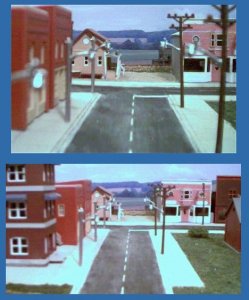
Catt!, the gel pens worked great! I was surprised to see how much the stripes added to the look of the roads!

-Rory
 

Attachments

  • town1.jpg
    town1.jpg
    20.5 KB · Views: 205

roryglasgow

Active Member
Jun 3, 2001
1,223
0
36
55
Huntsville, TX USA
web.wt.net
Here are two views looking down the same street from the other direction. Again, that's the portable backdrop back there... Note how the light pole on the right looks bent. That's a distortion caused by the camera lense.
 

Attachments

  • town2-2.jpg
    town2-2.jpg
    56.6 KB · Views: 147

Drew1125

Active Member
Jan 28, 2001
2,975
0
36
Hey Rory,
The detail work looks great!
I really like the striping on the streets, & all the telephone/light poles!
And the backdrops make so much difference! In addition to adding realism, they really focus the viewer's attention on what's out in front...your wonderful modeling! Did you paint the temporary backdrop? I like it even better than the digital one.
Excellent work, Rory! Thanks for sharing!

P.S. Where you have that street dead-ending at the tracks...perhaps you could put some of that new fencing there to keep inattentive motorists out of harm's way! :)
 

roryglasgow

Active Member
Jun 3, 2001
1,223
0
36
55
Huntsville, TX USA
web.wt.net
Charlie,

Thanks for the compliments. The backdrop is one that I printed from www.backdropwarehouse.com. It isn't the full-sized backdrop that you can buy, but I figured that it would serve for creating limited views. That's why I used the digital backdrop for the last picture--because that view is actually a view of almost the entire length of the layout and my portable backdrop isn't high enough to cover the scene.

I used gel pens for the stripes. That was Catt!'s suggestion. And the light poles came with a Life-Like train set I bought a while back. I clipped off the bottoms, painted them and set them in holes that I drilled into the plaster.

I might stick a dead-end sign at the end of that street, too. Another idea I had was to create HALF of a crossing, since that is supposed to be a road leading out of town. I just can't put much on the track itself. The trackplan doesn't lend easily to roads going in and out of the loop...

-Rory
 

shamus

Registered Member
Dec 17, 2000
3,489
0
36
87
UK
Hi Rory,
Those photo's are excellent and so is the modelling friend. I do like the pavements. That distortion on the telephone pole is I think due to a wide angle lens being too close to the subject such as a 28mm wide angle.
Shamus
 
C

Catt

Rory,the pictures look awesome. They make me wish my layout was ready for scenery.Glad the Gel-pen worked for you.It's the only way I do the lines now.:D
 

kettlestack

Member
Jan 18, 2002
859
0
16
84
Scotland UK
Visit site
Nice work Rory, I can already visualise it when it's superdetailed.
I think you got a very realistic tarmack roadway after all!! Good choice of surface... (at least the way you've done it).
Nice realistic pics too. The backdrop (digital or otherwise) really brings realism to it all...... By the way is that a pub on the right? how about you take us all for a beer (or two or three) :) . There's nothing like success huh? :D
Errol
 

roryglasgow

Active Member
Jun 3, 2001
1,223
0
36
55
Huntsville, TX USA
web.wt.net
Tyson: I got the gel pens from Wal-mart. I've thrown away the card they were on, but they were just regular fine-point pens that came in a 3-pack. There were three colors: creamy white, creamy yellow and creamy green. I guess they had some extra creamy at the factory. Anyway, the gel is sorta like paint, and covers whatever you write on very well. A couple of strokes with the pen, and I had a solid line. Even the white "stop line" at the intersection was done with a gel pen.

Errol: The first building on the right is Emily's Dry Goods. It's a Bachmann Emil's (no "y") Dry Goods. I named it after one of my nieces. The building past it is Kristi's Home Cookin' Restaurant, named for my wife. I'm afraid that they don't have a license to sell alcohol, but I'd be more than happy to treat y'all to a good ol' Texas chicken fried steak and glass of iced tea!

Tonight I started doing the mortar work on the brick buildings. I'm using the technique Charlie told me about--the one with diluted paint. It seems to be working pretty good so far!

-Rory
 

Drew1125

Active Member
Jan 28, 2001
2,975
0
36
Rory,
I was just looking at that picture again...the one looking down the long street...I was noticing how those stripes reall add a perspective depth to the scene...that street looks like it goes for miles! :cool:
You have done such a great job on that layout!
 

roryglasgow

Active Member
Jun 3, 2001
1,223
0
36
55
Huntsville, TX USA
web.wt.net
Charlie,

I never thought of it before, but it does look like it continues on... In reality, it ends in a parking lot that wraps around behind the buildings on the left. That's one of my favorite views of the layout, because of the way it looks out over the yard and station.

-Rory
 

akonpittbull

New Member
Jul 2, 2010
3
0
1
All the situations are good but I can't understand why you use this blue color in that because it is not looking as god as it should be. I think you should change that color from your project so you can make everything like perfect.