Plaster mountains and trees

Tim K

Member
Dec 30, 2005
100
0
16
59
Stoney Creek On. Canada
Reading through a book on scenery I noticed that there was no mention on how they planted the trees on plaster mountains.

Making the mountains with cardboard strips and plaster cloth seems easy enough but how do you stick the trees in such a hard shell:eek:ops: .

I would rather ask a dumb question than remain in the dark.

What is the best way to do this ?

Thanks
Tim K
 

ezdays

Out AZ way
Feb 3, 2003
6,339
0
36
Arizona
bigbluetrains.com
Tim K said:
Reading through a book on scenery I noticed that there was no mention on how they planted the trees on plaster mountains.

Making the mountains with cardboard strips and plaster cloth seems easy enough but how do you stick the trees in such a hard shell:eek:ops: .

I would rather ask a dumb question than remain in the dark.

What is the best way to do this ?

Thanks
Tim K
I use two things, on one I made a handle out of a small block of wood and drilled a hole in one end. I then took a real heavy needle and stuck the blunt end into the hole. Since I'm into N scale, I could use this to punch a hole in the plaster to plant a small tree. For larger trees, I use a carpenter's awl. It's tapered so the further I push it in, the bigger the hole. I've glued some trees into their hole, others I just plant without glue.

Hope this helps.
 

Clerk

Active Member
Nov 6, 2002
1,678
0
36
91
Esparto, California
Visit site
I made my mountains from cardboard strips, paper and plaster. I just used my dremell and drilled a buinch of holes the size of the tree trunks and popped them in.
They have been there for over a year now and no problems.:thumb: :thumb: :thumb: :wave: :wave: :wave:
 

Drew1125

Active Member
Jan 28, 2001
2,975
0
36
Instead of a drill bit, which can get kind of gunked up drilling thriough plaster, I put a finishing nail in my drill chuck...
 

EngineerKyle

Member
Oct 3, 2005
442
0
16
63
Troy MI
Hi Tim,

I use an old drill bit and let it get gunked up... It slips throught the plaster with ease. next I vacuum up the white powder and fill the hole with titebond glue. Then I take a little WS fine "soil" and cover the glue while it is still wet and push the tree trunk in. This "soil", a foam almosty black in color, implies shadows beneath the tree. Finally, as an option, I may stick a little more lichen or other vegetation to the base area.


ado.jpg


That tree on the left kinda shows the result.

Have fun! :D

Kyle
 
L

lester perry

Boy I sure messed up. I didn't even use plaster. I painted the wall behaind it flat black. Stapled screen to wall and layout. Glued deer moss to the screen leaving them about 2 inches from the bottom. Propped up the bottom deer moss with sticks from back yard and now I have a mountain of trees.
cc9684d1.jpg
 

kirkendale

New Member
May 24, 2004
79
0
6
Great job, looks good. I also cannot wait to see how you make out.
The guys at my club also drill holes and use a comgination of white glue or fresh plast, in part this depends on the base of the tree.
 
N

nachoman

Tim - NICE job. you swear that is your first time? :) i also wonder how you made that mountain so neatly. Plaster is a messy business :)

kevin
 

Tim K

Member
Dec 30, 2005
100
0
16
59
Stoney Creek On. Canada
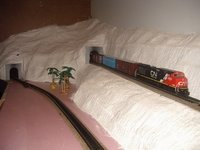
Building the mountain was very easy thanks to Woodland Scenics and a little imagination.

I started by planning how I wanted the track to run along the montain , I then used Woodland Scenics incline kit to get the elevation I wanted.

My next task was to figure out how I wanted the mountain to look so taking a pencil I simply drew light lines on the backdrop until I came up with something I was happy with.

Then I cut up a bunch of cardboard strips ( about an inch wide) and started hot gluing and stapeling them from the backdrop (along the pencil line ) to the incline and from the incline to the base.
What I love about this method is that it is very easy to change something if you don't like it.

After I was satisfied with the shape of the mountain I aplied plaster cloth (Woodlands Scenics of coaurse) over the cardboard . If you cut the cloth to aproximately the size of your hand it makes it very easy to work with.
Lay cloth with the bumpy side up and use a wet brush to spread the plaster out as you move along.

This whole process was very easy and just about fool proof , I did make a small mistake with one part of the mountain so I simply cut it out reshaped it and added a little plaster cloth and the problem was fixed.

Apperently cardboard strips have been used for a long time and I can see why , it's a cheap and easy way to build a realistic mountains , also thanks to Woodland Scenics plaster cloth there was very little mess to clean up .

I am now in the process of casting my rocks for the mountain face and will post more pics after I intall them and then finally some colour , can't wait .:D

So far this has been a lot of fun and very easy.
I hope this helps a little and yes this is my very first layout , but not my last :thumb: .

Tim K