Picture thread of your Logging, Mining, or unique industrial equipment.

Mountain Man

Active Member
Jan 19, 2007
1,607
0
36
80
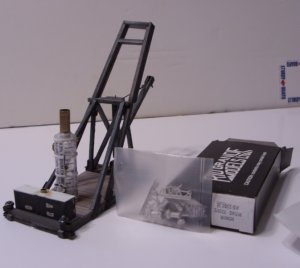
according to the label that boiler began life as a single use 10 ml syringe of normal saline. the smoke stack is a piece of brass tubing, which was held with a pair of mini vise grips, and heated cherry red with a mini blow torch, and then melted into the business end of the syringe tube, which was shortened, by cutting off the bottom of the boiler to get it close to the right height

Other than the shape, the material is not ideal, as most glues don't want anything to do with it.

Bill Nelson

Very nice. Epoxies don't work?
 

Bill Nelson

Well-Known Member
Dec 14, 2008
2,680
467
78
Clarksville Tn
I haven't got to epoxies. I have some weird stuff I got from my model boat scratcbuidings that seems to be working, I'll see if it falls apart after it's painted
 

Bill Nelson

Well-Known Member
Dec 14, 2008
2,680
467
78
Clarksville Tn
sml 2ndSPmchry1.jpg Machinery for the 2n'd S-P

I had told Dr, Tom that the 2nd Surry Parker would come without machinery. Well then I started playing with that Normal saline solutiion syringe, and I had a boiler. In hunting through my stuff I found a Rio grande models 3 drum hoist, so it looks like the machinery is covered.
 
Last edited:

Bill Nelson

Well-Known Member
Dec 14, 2008
2,680
467
78
Clarksville Tn
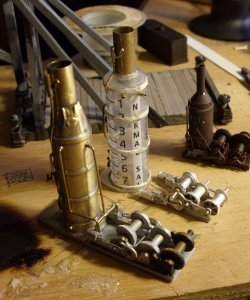
SML1stblrppngdne.jpg SML1stblrppngdne.jpg 1st set of machinery piped and readdy to paint!

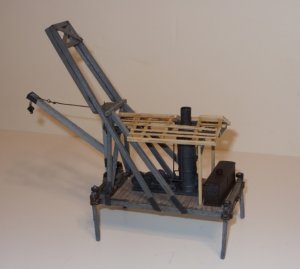
I got the piping done on the 1st boiler/winch set up. the winch is from an evergreen A H & D hill two drum hoist, which has had a drum from a lifelike flatcar load stacked in front. (the other half went to convert a lifelie two drum unit into a three drum unit). the second winch, a Rio Grande models three drum winch, which I believe is also a A H & D design. I'd open up my unbuilt Rio Grande models A H & D log loader kit to see if it has the same winch, but If I open that box I might be building it, the donkey shops are about full, and I have other projects I'm wanting to work on.

In the background is the little Bachman hoist. I'd have used it, except the boiler was way too small, and the piping detail would have been lost If the boiler and hoist were seperated was .

So the first set of machinery is ready to paint!

Bill Nelson
 
Last edited:

Bill Nelson

Well-Known Member
Dec 14, 2008
2,680
467
78
Clarksville Tn
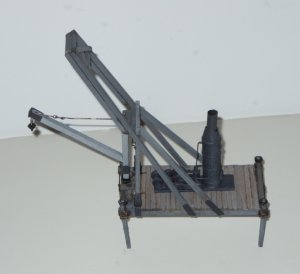
SML#1S-Pwpntedblr.jpg SML#1S-Pwpntedblr.jpg #1 boiler painted

The #1 boiler is painted , the warped upper wrapper doesn't show much now that it's black. Next I have to start planning a roof. placement of the machinery & upper pullies will need studying to minimise the cable to frame contact. I'll have to get that figured out so I can make the hole in the roof for the smokestack.


Bill Nelson
 
Last edited:

Bill Nelson

Well-Known Member
Dec 14, 2008
2,680
467
78
Clarksville Tn
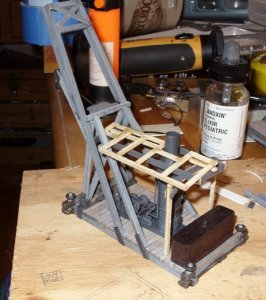
SMLSP#1bgnsofrf.jpg beginnings of a roof

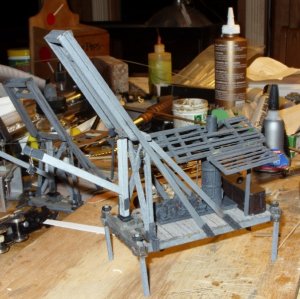
I'm toying with building a roof for unit #1. It is taking some time, as the roof needs to be removeable for rigging and maintenance, so there is a lot of engineering going it to the roof so that it will fit tight, and not have gaps under the posts.


It has been slow going, but the other side of the roof ; and the roof for the other unit, should go a lot faster, once I have an Idea of what I'm doing .


Bill Nelson
 
Last edited:

steamhead

Active Member
Apr 16, 2005
2,360
0
36
75
Brownsville, TX
Hey guys...Looks like you've been keeping busy....
Bill, the "hardware" end of things: piston, gears & such, where do they come from..?? Would they be appropriate (with some mods), to power a generator, as for a power house..??
Keep up the great work..!! :thumb:
 

Bill Nelson

Well-Known Member
Dec 14, 2008
2,680
467
78
Clarksville Tn
Gus, Both the boilers are scrarched, the ones I had on hand were to small, ant it would have taken me time to figure out which Rio Grande Models boiler was the right size, and then $$$ to purchase them, and more time to wait for delivery.

Unit #1's three drum hoist is a kitbash, with one drum from a lifelike two drumhoist, which is modeled as a flat car load, and doesn't have pistons or rods, glued on to an Evergreen Models A H & D two drum hoist, the boiler of which, being to small goes into my parts drawer. The other three drum hoist for unit #2 in an unmodified rio grande models kit.

I don't know much about generators, Rio grande models has a camp generator kit, which has a sled mounted Generator with a tractor providing the internal combustion power source it is on this page http://www.riograndemodels.com/HO.htm Check it out.


Western scale models is another option. I couldn't get their page to load, I think they equipment for a generator, can't remeber the details, and it might be O scale. I'm trying to check thier site, but it won't load; my internet here is satalite, and we are having some weather, but I don't think it is enough to make the internet strange, try googling western scale models. I have not played with thier stuff, but I understand they do good work.

Bill Nelson
 

Bill Nelson

Well-Known Member
Dec 14, 2008
2,680
467
78
Clarksville Tn
Now the western scale models site works, what they offer is a hydro power generating house. In their machnery kits they have a large bricked in boiler, suitible for a boilerhouse for a mill, or other large instalation.


Bill Nelson
 

Bill Nelson

Well-Known Member
Dec 14, 2008
2,680
467
78
Clarksville Tn
SML S-P #!w rffrm.jpg SML S-P #!w rffrm.jpg more work on the first roof!

I have the frame for the center part of the roof done and ready to paint grey to match the rest of the wood on the skider /loader there will be hinged panels on either side. I did something similar, and got them to work. I have been holding off, to see if I could come up with a hinge design that is easier to build. Nothing has come to mind, so it will be time soon to start making some hinges.


The big question, is do I get the roof for the other unit before proceeding to the hinges for the roof wings, and I think that I should, as other than the machinery, the two units are very close, in the level of completion. the 2nd unit's machinery is two or three days of work behind the first units. I want to keep the units at a relatively close level of completion, cause I want to photograph them together in a finished state, before delivering one to Tom's C&S, and I am looking forward to making that delivery.

Bill Nelson
 
Last edited:

steamhead

Active Member
Apr 16, 2005
2,360
0
36
75
Brownsville, TX
Hi Bill...
Thanks for the info...:thumb:
I checked out both sites and there's just a world of stuff there. I bookmarked them so I can go back when I get to the point of outfitting a couple of shops...:mrgreen:
 

Bill Nelson

Well-Known Member
Dec 14, 2008
2,680
467
78
Clarksville Tn
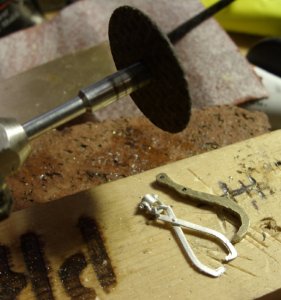
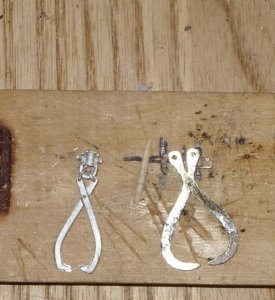
SMLtongs#1.jpg SML tongs #2.jpg SMLtongs#3.jpg SMLTOngs#4.jpg Tongs!

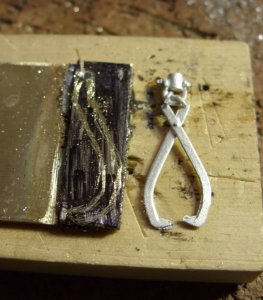
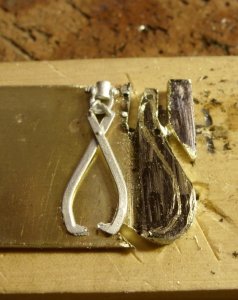
As I'm getting close I wanted to think about tongs. Now I had a real nice casting from Rio grand Models, but it is a solid piece. I'm thinking the loader will look a lot better with a log hanging from the boom. so how to make a working pair of tongs.

I cut a blank of brass off a bar and then soldered that blank onto the end of the brass bar, so it is two layers thick there. I took a sharpie and blackened the brass, so I could see the outline of the shape I wanted , which I scratched in with a scribe. I then used a dentist drill in a dremil to drill two holes. and then used a mini grinder wheel (THICKER AND STRONGER THAN THE THIN CUT OFF WHEELS THAT SHATTER TOO EASILY) to cut out the shape I wanted. after it was cut out, and filed smooth, I heated it up with a torch, and unsoledred the two halfs of the pair of tongs.


Next, trying to make them work!


Bill Nelson
 
Last edited:

steamhead

Active Member
Apr 16, 2005
2,360
0
36
75
Brownsville, TX
OK...That proves you're certifiably insane....:eek:

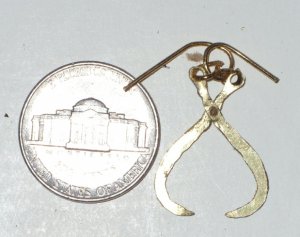
Never in a gagillion years would I attempt anything like that....Just for reference, take a pic of your tongs next to an object of known size...I don't think I could draw anything that small...Much less cut it out & make it look like the original...:cry:
 

Bill Nelson

Well-Known Member
Dec 14, 2008
2,680
467
78
Clarksville Tn
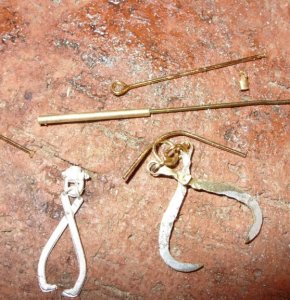
SML tongs#6.jpg tools and techniqes!

I resemble that!

until recently I would not have attempted something like this either.


#1. it is impossible for me to drill a hole anywhere near the center of something this thin. So I don't try! Cut drill the holes first, and then cut the material around them.

#2, It is impossible for me to make two pieces like this Identical. That's why I started with two blanks of brass soldered together. That is an old trick I read in an article in MR from way back in the dark ages when thy used to have articles about how to do stuff . Scratchbuilders of steam locomotives would solder the two pieces of brass that would become the rt & left side frames together, to insure that they were made exactly the same, so they could be built into a square frame, with the axles exactly parallel to each other.


#3. I didn't used to know about the mini grinder disks for a dremil. I had some of those cut off disks, that would make you think, this is great, untill you got one slightly sideways to your work piece, and the disk would shatter. I used to use a pnumatic die grinder in my former job as an auto tech, so I was very pleased to find mini grinder disks for a dremil. They look and work like a cut off didk, but they are about 3 times thicker and 8 times stronger, so they will burn through brass easily. wear safety goggles! no good having all these neat brass parts if you can't see to put them together!

#4 Jewelry pliees! these things have round Jaws, alowing you to get nice round curves benting brass wire. I got mine @ Hobby Lobby, in their jewelry aisle. while your there check out thier chain. slightly oversize for log chains in HO, but cheap! also in the jewelry aisle, I got these little eye and loops. don't know what they are for, or how I did without them. note the one stuck in the brass tube. stick the one that has a head like a pin through the pivot hole in the tongs, slide a micro tiny section of brass tube on it, crush it with a pair of pliers, and then you have a hinge pin.


You have to try doing stuff that streches your abilities. some of it will work, some of it won't. you show of what works, and hide the other stuff, but even when it doesn't work, you learn stuff, if only how not to do it. An old country saying I learned from a boss, who learned it from his dad goes "Cain't never could !" This was a particularly troublesome attitude in a supervisor, as the man wouln't acept that something couldn't be done. Fortunately, he was one of those good supervisors, who when he wanted you to do the impossible, would come down and help, most of the time we were able to make things work some kind of way!

Next I have to close them rings and solder them shut, and make some hooks (not to mention another **** pair of tongs!.


Bill Nelson
 
Last edited:

Doctor G

Well-Known Member
Sep 1, 2008
1,415
298
78
Clarksville, Tennessee
Beautiful Work Bill!!!!

WOW Bill what beautiful work you are doing. It looks like fine jewelry.

I am taking a break from doing my medical thing down here in Haiti and had a chance to catch up on what is going on in the modeling world. You have really accomplished a lot while I have been away from the "puter!!!!"

Will get back to USA tomm. and hope to make a showing at the club this week.

Love the close up photos you are now doing and watching the progress of these neat Surrey Parkers. Not to mention that I gets me one !!!!

Peace and looking forward to getting home, Doc Tom:mrgreen:
 

Bill Nelson

Well-Known Member
Dec 14, 2008
2,680
467
78
Clarksville Tn
Tom, I figured you was off doing good somewhere. I have been fixing my kitchen ceiling, have patched the hole, scraped off the nasty texturing, revealing the glories of the 16 X 16 feet of rough and crooked plaster lath . have got all of that painted, and am putting up trim. then it will be off to renovate another room, leaving me saying to myself "didn't I do this 25 years ago. At the club, Dave has been going hog wild improving sceanery out near where the rock quarry used to be. I've been working on a bridge in that vicinity, and have been working to put a bottom into the log pond.
I will be training you in the acrylic water technuqe soon.

Digging in the boxes of buildings I scrounged a rough old shed of some sort. As I was repainting It I thought This is the original Kit Tom # 1 building! it's repainted now, and will probably find it's way into the J E P C & L co complex in some unknown capacity.

Bill
 

Bill Nelson

Well-Known Member
Dec 14, 2008
2,680
467
78
Clarksville Tn
SMLtongs&nickel.jpg tongs and a nickel

Gus, they are huge! Taller than a nickel! Had to be to handle the big logs coming out of the bottom of Cave Cove

Nothing to making these things! trying to get them to work was a little harder!

My dad game me a small pair of the real McCoy They fell off the cable behind my tractor, probably off in one of the 21 acres of my woods. I keep hoping I'll find them, but it's been 8 or nine years.
If I bought another pair I'd find them in a week!

Bill Nelson
 
Last edited: