

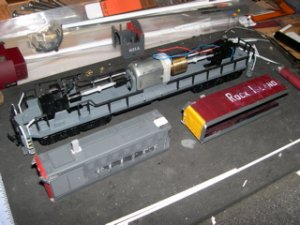
Our layout has a whole section devoted to PRR, with quite a few types of locos, but no Transfer Locomotive! It seems that no has bothered to create a plastic version, and the occasional brass item on eBay is way, way over budget. The only solution was to "do it yourself". We started with a Mehano chassis from an Alco Century. This gave us a low cost (we already had one, but they are still cheap), a unit that would be close to the correct length, and six axles.The truck side frames would be wrong and the couplers are not frame mounted, but it is available and easy to work with. A local RR flea market supplied 2 dummy Alco switchers(same manufacturer, I think). The first attached picture will show the first steps. Both hoods were cut about 1/2 inch from the cab end, the Alco stack was removed, a Lima type stack was put on, angled number boards were added, and plastic channel was added to all bottom edges to increase height. See attached pic......
Photo's From David Rosser
- Thread starter jon-monon
- Start date
You are using an out of date browser. It may not display this or other websites correctly.
You should upgrade or use an alternative browser.
You should upgrade or use an alternative browser.
I took one of the cabs, cut out most of the back, and removed the roof( much too much curvature),framed a new flatter roof and made the roof from old alum. step flashing. Cab is a tight fit around motor! Lima used oval bottom windows (three of them) I compromised and modified the 2 here to avoid building complete new sides and cutting in three small windows. Picture will show this in rough form. See attached pic.
Attachments
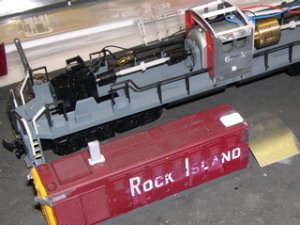
Test fit of all the major parts. Had to use a Dremel tool to skim off some thickness at the cab end of each hood inside to get a fit over the motor that was not so much stress on the glue joints at cab meets hood. Front step up railing will be removed and new rail fabricated from odd bits of the the original dummy units. If doing this again, I would cut them all off and go from scratch with Athearn type. See atached pic.
Attachments
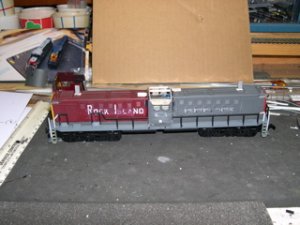
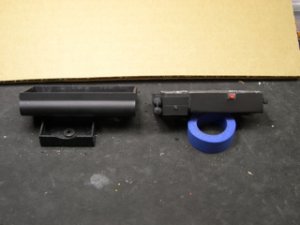
The original fuel tank is shown on the left; also served as a weight cover. I took the weight and attached a square metal fuel tank with filler cap, a tool chest with handle out of plastic, and spare air tanks from an old project with air lines. Unit is complete in primer. See atached pic.
Attachments
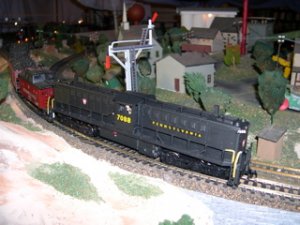
Final picture shown in pusher service. The new rail is in place, including the Lima style angle braces at four points. The PRR trainphone system is in place ( not too clear in this picture), glass is in, crew is in, unit is in Brunswick Green and lettered/numbered. A lot of fun, and now we have a Transfer Loco.! See attached pic.
Attachments
Chessie6459
Gauge Oldtimer
That's great!!!! An excellent bash! I wasn't familiar with these locos until just recently when one was pictured on Horseshoe Curve on the cover of TRAINS magazine. Looks just like it! Very cool!
Ralph
Ralph
Chessie6459
Gauge Oldtimer
Ralph, the pennsy had a handful of them. They were used for transfers on the railroad, and maybe some other things. They were built in 1951 from what i have researched.

Ralph (in St. Paul), You just did me a big favor. Both dummy switchers came with single horns, but I had no photograph that gave any location for horns on the Lima transfer. When you mentioned that it looked just like the one on the cover of 'Trains", I found the old copy and now I know where to locate the horns! Many thanks, Dave Rosser