I remember when I was part of an student exchange in 1988. The German students were in the US first, so one night we rented Robocop. A month later when we were in Munich Robocop was playing at the Munich film festival, so we went to see it. We were shocked to see how much it had been edited for the German audience.
"PaperLaul's Terminator 2: Hunter Killer Aerial - by DanBKing"
- Thread starter DanBKing
- Start date
You are using an out of date browser. It may not display this or other websites correctly.
You should upgrade or use an alternative browser.
You should upgrade or use an alternative browser.
- Status
- Not open for further replies.
I had exactly the same problem when living in South Africa....... Censorship!
The population was 'religiously' wrapped in cotton wool.............'for gods sake!'
I grew up thinking that all woman had read my second sentence in this post, I probably would of been deported back to England!
The population was 'religiously' wrapped in cotton wool.............'for gods sake!'
I grew up thinking that all woman had read my second sentence in this post, I probably would of been deported back to England!
Last edited by a moderator:
Oh yes, I remember another one...
MICKY MOUSE!
Oh, how I looooved that. It taught me a great deal about realistic and anatomically correct depictions of various mammals and birds. And it proved that all of them had hands with three fingers and a thumb.


MICKY MOUSE!
Oh, how I looooved that. It taught me a great deal about realistic and anatomically correct depictions of various mammals and birds. And it proved that all of them had hands with three fingers and a thumb.
Mickey & Buggs, Daffy & co. who let's face it are (were) much cooler than The Mouse.... 
Those were great 'cos they included physics in the lessons! For example, 16 ton weights can be held by a single strand of rope for ages!
Those were great 'cos they included physics in the lessons! For example, 16 ton weights can be held by a single strand of rope for ages!
And, on the subject of scary hair and pussies, (Tom and otherwise,) ..........
THIS VIDEO DOES NOT PLAY IN THE U.S., I have no idea why?
THIS VIDEO DOES NOT PLAY IN THE U.S., I have no idea why?
Last edited by a moderator:
... Tom & Jerry. BFF. Even if they bring some shotguns to the dinner.
The only time that I would bring a shotgun to dinner is, if there was even a tiny chance, that someone would play a "Hoff" song or video............

And if they did, then I guess the Baked Alaska for dessert, would end up looking like the last photos, from an (aforementioned) magazine photo series .....
- Apr 5, 2013
- 13,499
- 9,551
- 228
This thread must go back on topic IMMEDIATELY. Some side rib poking is O.k., but the words I have edited out is an indication of what I feel has gone too far (in this setting). If we were all sitting around having a beer or something, it would be fine, but when the 5 year old runs into the room, the conservation abruptly changes, reflecting what is appropriately or not. One could say "I (me) am the five year old. That's what sucks sometimes, I have to be the 5 year old to get the conversation back on track. I don't like to be "strict", I let this forum run itself, but I have not seen the self correction I have come to expect, so I will demonstrate it. That way, no one gets warnings, just a demonstration on how to present your collective conversation, without any negative feelings. The forum must remain "Family Friendly". I have been trying to see if I can put a more adult section, but then I fear some would push it too far, I am tempted to delete this last page.
No hard feelings. We have to keep it respectable. P.M.'s can be used for the "fun/risque things, or comments that one wishes to say. You can let your "hair down" in the P.M.'s. O.K.?
No hard feelings. We have to keep it respectable. P.M.'s can be used for the "fun/risque things, or comments that one wishes to say. You can let your "hair down" in the P.M.'s. O.K.?
- Apr 5, 2013
- 13,499
- 9,551
- 228
Back On Topic ..........! 
Things may seem quiet to you, on the building side of this model, but believe me, there has been a lot going on in the background!
Because of all the modifications I am doing to the model, it takes a considerable amount of forward planning. But, I think I have now at last got the build plan in order in my head!
Before I can close up the back of the fuselage, I will be doing some major mods in this area, for the support system for the legs. This support system will be intergral with the supplied internal support frame.
As I have already completed the lighting for the tips of the wings, I decided to get the wings built, so that I know what I have to work with.
As the panelling on the engines worked well, the wings will be the next part to receive panelling treatment!
So, all the parts for the wings were cut out ...........
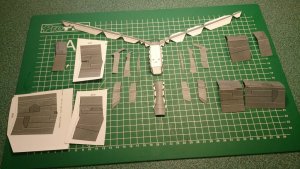
The center section of the wings was built up and the recommended strengthening pieces fitted to the trailing edge of the wings. I used 1mm card for this, to ensure strength. Holes were cut in the relevant places to feed the wires for the wing tip lights.
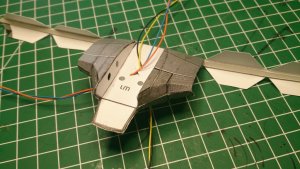
I glued up the jointing point of the wing trailing edges to the middle section and placed the assembly in a jig to keep everything in its correct place and shape while the glue set. (My smoking habit came in handy for supports )
)
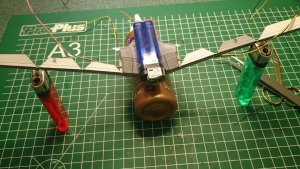
Once this assembly was dry, I built up the rest of the wing assembly as instructed, but, I cut off all tabs and edge glued and back tabbed all the joints.
This is the end result, top and bottom!
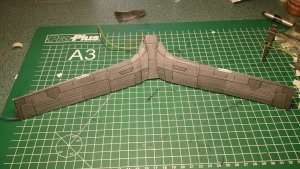
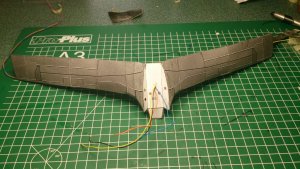
I cut a slot in the end of the wings to accomodate the wires.
The ends of the wings I left open at this point, as this allowed me to shove a 30cm steel rule up the inside of the wings to help with support and something to push against in the next stage of the wing assembly.
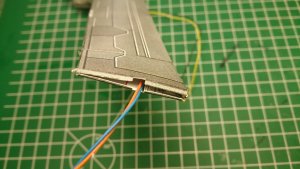
One side of the wing was sandwiched between the table top and a piece of tracing paper and taped down.
The textured panel pattern was then carefully traced from the wing. The panelling on the upper and lower side is mirrored on the other wing, so that meant only having to trace the upper and lower section of one wing.
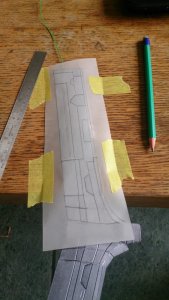
The tracing was then rubbed down onto a piece of 250gsm card. I used a marker pen that has the same line thickness as the distance between the textured panels and marked out the rubbing.
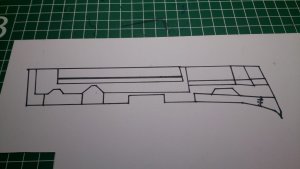
All the seperate panels were cut out, making sure that the black lines were removed, thereby giving the correct gap between each panel.
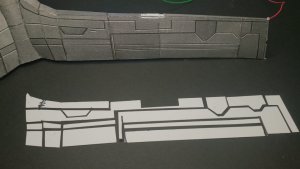
And, slowly but surely, the panels were glued into their respective positions on the wing. With the steel rule inside the wing, all the pieces were pressed down firmly......
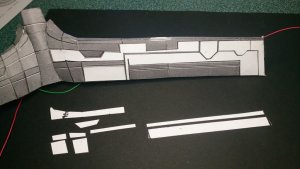
I am nearly finished with the panelling on the bottom of the wings, and I will post pics of the completed wing soon.
Stay tuned!!


Things may seem quiet to you, on the building side of this model, but believe me, there has been a lot going on in the background!
Because of all the modifications I am doing to the model, it takes a considerable amount of forward planning. But, I think I have now at last got the build plan in order in my head!
Before I can close up the back of the fuselage, I will be doing some major mods in this area, for the support system for the legs. This support system will be intergral with the supplied internal support frame.
As I have already completed the lighting for the tips of the wings, I decided to get the wings built, so that I know what I have to work with.
As the panelling on the engines worked well, the wings will be the next part to receive panelling treatment!
So, all the parts for the wings were cut out ...........

The center section of the wings was built up and the recommended strengthening pieces fitted to the trailing edge of the wings. I used 1mm card for this, to ensure strength. Holes were cut in the relevant places to feed the wires for the wing tip lights.

I glued up the jointing point of the wing trailing edges to the middle section and placed the assembly in a jig to keep everything in its correct place and shape while the glue set. (My smoking habit came in handy for supports

Once this assembly was dry, I built up the rest of the wing assembly as instructed, but, I cut off all tabs and edge glued and back tabbed all the joints.
This is the end result, top and bottom!


I cut a slot in the end of the wings to accomodate the wires.
The ends of the wings I left open at this point, as this allowed me to shove a 30cm steel rule up the inside of the wings to help with support and something to push against in the next stage of the wing assembly.

One side of the wing was sandwiched between the table top and a piece of tracing paper and taped down.
The textured panel pattern was then carefully traced from the wing. The panelling on the upper and lower side is mirrored on the other wing, so that meant only having to trace the upper and lower section of one wing.

The tracing was then rubbed down onto a piece of 250gsm card. I used a marker pen that has the same line thickness as the distance between the textured panels and marked out the rubbing.

All the seperate panels were cut out, making sure that the black lines were removed, thereby giving the correct gap between each panel.

And, slowly but surely, the panels were glued into their respective positions on the wing. With the steel rule inside the wing, all the pieces were pressed down firmly......

I am nearly finished with the panelling on the bottom of the wings, and I will post pics of the completed wing soon.
Stay tuned!!

A terrific example of added depth using 3d paneling. Looks great so far Dan.
.......
And as promised, the upper and lower wing panelling is now complete .......
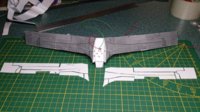
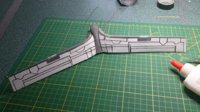
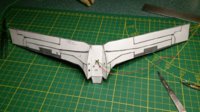
I am going to leave everything to dry thoroughly over night. I have noticed that I have a slight warp in two places on the wings.
So, before I attach the wing tip lights, I want to sort out the warp. I might need to dampen the wings with water and 'force' them into shape.
Will keep you posted, as I progress .....

And as promised, the upper and lower wing panelling is now complete .......


I am going to leave everything to dry thoroughly over night. I have noticed that I have a slight warp in two places on the wings.

So, before I attach the wing tip lights, I want to sort out the warp. I might need to dampen the wings with water and 'force' them into shape.
Will keep you posted, as I progress .....

A non-lick lollipop!
As the wing assembly is nearly complete and ready to attach to the rear of the fuselage, I decided to do a test of the leg to fuselage mounting idea that I want to use.
I will have to have the wings and the two rear leg assemblies attached before I can close up the rear fuselage.
Considering that I am making up the build modifications as I go along, I thought it best to have this step proven, before I continue with the other three leg assemblies.
The point where the leg attaches to the fuselage, via the domed structure, has the most stress, mainly lateral stress. If this joint is not strong enough, the weight of the model would make the whole thing collapse over time, and that just will not do.
So, time for some 'over-engineering!'
My general idea is to transfer all the stress to the main internal support frame of the model, thereby reducing any stress to the body shell/fuselage itself.
First up, I rolled a very tight tube of card to a diameter of about 3mm. This was glued up and this created a very stiff rod. The point where the leg attaches to the domed assembly has a very small surface area and I was afraid that this would not be strong enough on its own. So very carefully, I drilled out a 3mm hole in the centre of the mounting point of the leg. This hole will accomodate the end of the rolled tube and when glued in it should be very solid.
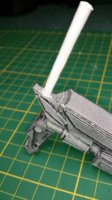
Next up, I made the domed structure that the leg attaches to. I used tabs on this, as I thought the extra card would give even more strength. I am not too worried about the roughness of the joints, as this whole thing will be sanded smooth later on. A 3mm hole was punched to accomodate the tube.
I cut 2 discs from 1mm thick card, punched out the holes for the tube and glued them inside the upper and lower pieces of the dome.
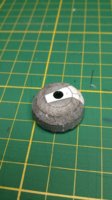
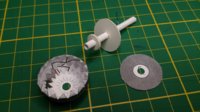
Before closing up the dome assembly, I added a little more internal bracing. Considering that the leg will be at a 90 deg angle to the mounting tube, I wanted to overcome any bending possibilities of this point.
The brace was cut to shape and glued to the inside of the dome and glued to the tube.
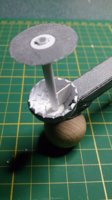
The dome assembly was then closed up, making sure that the short section of tube sticking out of the dome, fitted snuggly into the hole drilled in the leg. And here is where the lollipop reference comes into play.

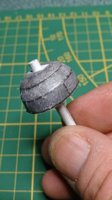
Next up I made the assembly that attaches to the fuselage and that the dome assembly attaches to. Again, I used a card disc to strengthen the swivel plate.
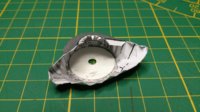
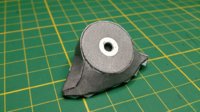
The tube and dome assembly was then mounted in position by pushing the tube through the swivel plate, without gluing.
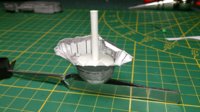
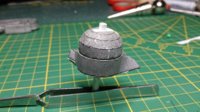
So far, so good!
Last night, I soaked the whole dome assembly in CA glue and left it to dry over night.
Later this evening, I will sand the dome smooth, and then continue with the rest of the assembly where the leg tube attaches to the internal frame.
See ya'll latersssss......

As the wing assembly is nearly complete and ready to attach to the rear of the fuselage, I decided to do a test of the leg to fuselage mounting idea that I want to use.
I will have to have the wings and the two rear leg assemblies attached before I can close up the rear fuselage.
Considering that I am making up the build modifications as I go along, I thought it best to have this step proven, before I continue with the other three leg assemblies.
The point where the leg attaches to the fuselage, via the domed structure, has the most stress, mainly lateral stress. If this joint is not strong enough, the weight of the model would make the whole thing collapse over time, and that just will not do.
So, time for some 'over-engineering!'
My general idea is to transfer all the stress to the main internal support frame of the model, thereby reducing any stress to the body shell/fuselage itself.
First up, I rolled a very tight tube of card to a diameter of about 3mm. This was glued up and this created a very stiff rod. The point where the leg attaches to the domed assembly has a very small surface area and I was afraid that this would not be strong enough on its own. So very carefully, I drilled out a 3mm hole in the centre of the mounting point of the leg. This hole will accomodate the end of the rolled tube and when glued in it should be very solid.

Next up, I made the domed structure that the leg attaches to. I used tabs on this, as I thought the extra card would give even more strength. I am not too worried about the roughness of the joints, as this whole thing will be sanded smooth later on. A 3mm hole was punched to accomodate the tube.
I cut 2 discs from 1mm thick card, punched out the holes for the tube and glued them inside the upper and lower pieces of the dome.


Before closing up the dome assembly, I added a little more internal bracing. Considering that the leg will be at a 90 deg angle to the mounting tube, I wanted to overcome any bending possibilities of this point.
The brace was cut to shape and glued to the inside of the dome and glued to the tube.

The dome assembly was then closed up, making sure that the short section of tube sticking out of the dome, fitted snuggly into the hole drilled in the leg. And here is where the lollipop reference comes into play.

Next up I made the assembly that attaches to the fuselage and that the dome assembly attaches to. Again, I used a card disc to strengthen the swivel plate.


The tube and dome assembly was then mounted in position by pushing the tube through the swivel plate, without gluing.


So far, so good!
Last night, I soaked the whole dome assembly in CA glue and left it to dry over night.
Later this evening, I will sand the dome smooth, and then continue with the rest of the assembly where the leg tube attaches to the internal frame.
See ya'll latersssss......

- Status
- Not open for further replies.


 or
or 