

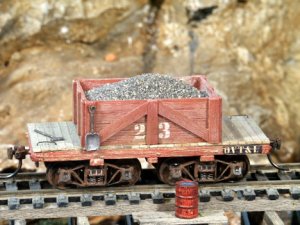
Last month I posted a photo or two of the OVT&L's tie and rail car. Here's its companion, the ballast car. I plan to build a couple more of these, except the others will be based on a 26' frame (identical to the tie and rail car frame) instead of a 21' frame and the gon body will probably be full length.
OVT&L's Ballast Car
- Thread starter Casey Feedwater
- Start date
You are using an out of date browser. It may not display this or other websites correctly.
You should upgrade or use an alternative browser.
You should upgrade or use an alternative browser.
As usual with your work train cars, another work of art!  These work cars of yours hold special interest to me because if I can pull off the Great Climax Caper, I want to build some cars like that to go with it. Keep on inspiring me!!!!!!!!!!!!
These work cars of yours hold special interest to me because if I can pull off the Great Climax Caper, I want to build some cars like that to go with it. Keep on inspiring me!!!!!!!!!!!!That's another beautiful piece of rolling stock. I second the request for a photo of the whole string of cars.
Gary
Gary
Thanks, guys.
Unfortunately, I don't have any photos of the entire train right now. When I get some free time to set up a shot, I will. But I do have these photos which I took a few months back. Obviously, several more cars, including the one above, have been added to the train since these pictures were taken.


Unfortunately, I don't have any photos of the entire train right now. When I get some free time to set up a shot, I will. But I do have these photos which I took a few months back. Obviously, several more cars, including the one above, have been added to the train since these pictures were taken.


I can just here that old wore out work train a clanking and clunking it's way down the tracks making so much noise it's scaring the daylights outta the wildlife for miles around (and Pete and Errol don't normally scare that easy )!!!!!
)!!!!!Another one of your great little models!
Casey, I love your mixture of mechanically precise and exact modeling which - just the same - shows the charming decay of a small backwoods railroad. (From that standpoint, this ballast car looks if it came straight out of the OVT&L car shops.)
Thanks for sharing it with us!
Ron
Casey, I love your mixture of mechanically precise and exact modeling which - just the same - shows the charming decay of a small backwoods railroad. (From that standpoint, this ballast car looks if it came straight out of the OVT&L car shops.
)Thanks for sharing it with us!
Ron
Absolutely beautiful, Casey. Now just PM me and I'll send you my mailing address so you can get them out to me....
Michael
Michael
Hey Casey,
I agree, very nice indeed! Those are just the kind of rolling stock I want to build for my garden railroad. Something the guys in the carshops would build (on a small shortlines' budget) to work for what they needed. How did you paint the ballast car? I like the color and weathering.
Steve
I agree, very nice indeed! Those are just the kind of rolling stock I want to build for my garden railroad. Something the guys in the carshops would build (on a small shortlines' budget) to work for what they needed. How did you paint the ballast car? I like the color and weathering.
Steve
Beautiful!
Yet another absolutely exquisite addition to the OVT&L roster. I just love the weathering on the trucks. How did you do that?
Gawd, to be able to visit your layout.....
Yet another absolutely exquisite addition to the OVT&L roster.
I just love the weathering on the trucks. How did you do that? Gawd, to be able to visit your layout.....
Thanks again, everyone.
To answer the questions:
Steve, the paint on the ballast car was fairly simple. I sprayed the frame (it's actually white metal) with Floquil Earth. After that dried, I semi-drybrushed it and the ballast gon with Apple Barrel's "Indian Red" acrylic craft paint. (I use a lot of Apple Barrel/Plaid/Ceramcoat/Americana craft paints; they're easy to find and very inexpensive!) Finally, I lightly dusted the whole car with raw umber and gold ochre chalks.
As for the weathering on the trucks, this is also a simple process. I pour approximately 1/8" of alcohol in a small jar. Then I scrape two or three different rust-colored chalk sticks into the alcohol until I have a nice rusty "slurry." Using a soft, round brush, I paint the slurry on the trucks and springs (also the coupler heads). If it looks too heavy after it has dried, I use a stiff bristled brush to remove as much as necessary.
I also use the slurry mix to "rust" rivets, nail heads, corrugated roofing, etc. It's quick and easy.
Casy, Its beautiful, Like all your modeling I have to take a twenty pace step back.
Love your web page by the way, Been there for a visit or three
Thanks for the tips re weathering
Love your web page by the way, Been there for a visit or three
Thanks for the tips re weathering