

absolutely beautiful....:thumb: :thumb: :thumb: the detail really makes it interesting. I could look at this module for hours looking for all the little pieces. Any more shots of how this module is packed up for travel?
NTrak module 98% complete - phew!
- Thread starter Bill Pontin
- Start date
You are using an out of date browser. It may not display this or other websites correctly.
You should upgrade or use an alternative browser.
You should upgrade or use an alternative browser.
Your Module
Bill,
Really excellent work, the trees, the structures, the placement of figures, the background, the rock work…….all just terrific! That rock work above the river, to the right of the fallen pine…….is that “Face” intentional? I see a chin, mouth, nose, eyes, and a forehead, too cool!
:thumb: :thumb: :thumb:
Thanks everyone for the complements it has been a fun winter project.
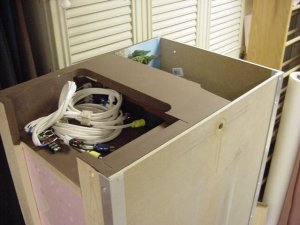
Satokuma - here is a shot of the module packed up. The module size is kind of interesting in that it fills the only space I have left in my van after the other two are packed. Packed it up tonight to move it to the clubs location where I have my other two modules stored. Have to marry it to the other two and blend the scenery. Arlaghan will take some shots when they are together.
Charlie it is a little on the hefty side, sixty two pounds, that is why I have my hand truck. Goes together real easy and I don't realy have to lift it. It can be assembled on it's end and tipped into position.
Jack, I never noticed the face until you pointed it out. Now I cannot look at the gorge without seeing it, kind of creepy looking thing.
Jim on the rocks, I base coat the entire surfaces with watered down light grey latex paint. Well watered it runs into all the crevices and penetrates the plaster castings and sculpta mold material. I keep painting until the entire rocks have a uniform covering. Using a spray bottle I spray on a mixture of black paint. This is watered down thinner than the base coat. Find this has a tendency to seep into the cracks and darken them. Now the key, using acrylic paints, the cheap stuff at the craft stores, I dry brush on various colors. Dry brushing only and in one direction for each color. Browns in a side motion, darker greys or browns up motions, lastly light greys to white downward motion. Cannot stress the drybushing enough. I use paper plates and newspaper. I put a quantity of paint on the plate and dip the end of the brush bristles into it, just the end. Then I keep dabbing the brush on the paper until it seems like the brush is clean. You will be surprised at what is still left on the brush. I add silver and purple by dabbing the dry brush here and there. For my drybrush I use those 2" throw away things they sell at the home improvement stores. Hope that answers your question.
Attachments
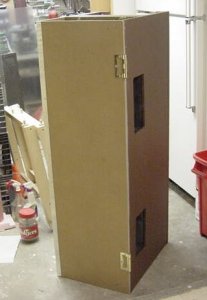
should point out that the legs can be seen in the first picture off to the left. The dowels are used to lock the module into position. They protrude up through the masonite work surface and go into the blind holes in the module itself. Don't know if that is clear enough?
Bill, your module is genuinely beautiful! :thumb: :thumb:
I love all the detailing and mini-scenes. Great work! :thumb:
I love all the detailing and mini-scenes. Great work! :thumb:
Your Module
Bill,
Wow! I thought for sure that “face” was intentional. At any rate it adds a bit of mystique to your mountains. Really nice work and your packaging for transporting is really slick!:thumb:
Bill,
Wow! I thought for sure that “face” was intentional. At any rate it adds a bit of mystique to your mountains. Really nice work and your packaging for transporting is really slick!:thumb: