I do quite a bit of miniatures photography for a trade magazine and for myself. I have a helpful tip for those wishing to maximize the potential of their digital cameras in capturing the details of their models in a nighttime setting. But, actually, the principles apply in all shooting situations.
The main issue is depth of field. Your basic digital point and shoot cameras offer limited manual control and, therefore, little, if any, chance to control depth of field (DOF) which is the apparent in focus sharpness of foreground and background visual elements.
You efforts to control DOF, thereby enhancing the visual richness and clarity of your photos, will be easy if you use even a low-end, non-professional digital single lens reflex (SLR) camera coupled to a wide angle lens, say 18-25 mm. Here, you can stop the lens down to f22-27, depending on the make, and have foreground and background elements in focus.
To achieve adequate exposure for simulated nighttime photos, you need to uncouple either the positive or negative lead to the electric motor. You train will be fully powered, but the motor will not run. Set your camera on a tripod with the center of the lens approximately .8" above the "ground." (n HO scale, this approximates a person 6' tall taking a picture. The closer you can get to this the better.) Set your camera to manual aperature priority. Pose your model. Compose the shot by aiming the camera appropriately.
Set the aperature to the minimum aperature and adjust the shutter speed accordingly. I opt for an ASA 100 setting. Use white poster board as light bounce cards. You can actually "aim" the light to hit the appropriate spots.
Focus is the critical issue. You will NOT necessarily focus on the subject. Rather, you will focus at a point between the foreground subject and the background element. Having a DOF preview feature on the camera to check focus is a definite help. But, with digital, you can always shoot and visually inspect the clarity of your image.
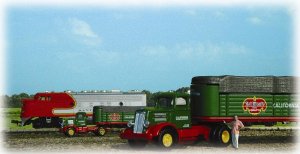
I actually have a shooting board with a section of track. I use it as a shooting base. The attached image is one I did for the magazine. The distance between the foreground and background elements is only 6 inches. This is an example of forced perspective. The foreground model is 1/43 scale. Immediately behind, the models are both N scale. I am Photoshopped into the image. Image details hold up under 200% magnification. Setting the shot up as as simple as placing the models and selecting a suitable section of trees for the background.
Hope this helps. I will try to answer specific questions if you have any. I am not a professional in the sense that I make a living doing this. But, I am self-taught from the days of darkroom processing and manual exposure. I've been doing this stuff for over 30 years and have some experience to share.
Regards
The main issue is depth of field. Your basic digital point and shoot cameras offer limited manual control and, therefore, little, if any, chance to control depth of field (DOF) which is the apparent in focus sharpness of foreground and background visual elements.
You efforts to control DOF, thereby enhancing the visual richness and clarity of your photos, will be easy if you use even a low-end, non-professional digital single lens reflex (SLR) camera coupled to a wide angle lens, say 18-25 mm. Here, you can stop the lens down to f22-27, depending on the make, and have foreground and background elements in focus.
To achieve adequate exposure for simulated nighttime photos, you need to uncouple either the positive or negative lead to the electric motor. You train will be fully powered, but the motor will not run. Set your camera on a tripod with the center of the lens approximately .8" above the "ground." (n HO scale, this approximates a person 6' tall taking a picture. The closer you can get to this the better.) Set your camera to manual aperature priority. Pose your model. Compose the shot by aiming the camera appropriately.
Set the aperature to the minimum aperature and adjust the shutter speed accordingly. I opt for an ASA 100 setting. Use white poster board as light bounce cards. You can actually "aim" the light to hit the appropriate spots.
Focus is the critical issue. You will NOT necessarily focus on the subject. Rather, you will focus at a point between the foreground subject and the background element. Having a DOF preview feature on the camera to check focus is a definite help. But, with digital, you can always shoot and visually inspect the clarity of your image.
I actually have a shooting board with a section of track. I use it as a shooting base. The attached image is one I did for the magazine. The distance between the foreground and background elements is only 6 inches. This is an example of forced perspective. The foreground model is 1/43 scale. Immediately behind, the models are both N scale. I am Photoshopped into the image. Image details hold up under 200% magnification. Setting the shot up as as simple as placing the models and selecting a suitable section of trees for the background.
Hope this helps. I will try to answer specific questions if you have any. I am not a professional in the sense that I make a living doing this. But, I am self-taught from the days of darkroom processing and manual exposure. I've been doing this stuff for over 30 years and have some experience to share.
Regards