

New Layout - Updated 6/4/06
- Thread starter 91rioja
- Start date
You are using an out of date browser. It may not display this or other websites correctly.
You should upgrade or use an alternative browser.
You should upgrade or use an alternative browser.
I would think adding a little bit of coarse in with the fine would make for a nice texture, and I would also make all my ballast grey and black. This combo looks good too though
ballast
Hey guys,
I would kind of agree a darker ballast would look more proto to NS, I do however think you'd be better off painting and weathering the track first without the ballast it is a whole lot easier, then you can shade the center and edges after balast.
I use a fine line airbrush, with watered down rust and a grimmy black mix. Then hit the center of the track with engine black and grimmy black. Clean the tops of the rails off and then ballast. and then weather your ballast as needed.
Give it a shot on a test bed, You'll find the results are excelent and compare well with the real thing. :thumb:
Hey guys,
I would kind of agree a darker ballast would look more proto to NS, I do however think you'd be better off painting and weathering the track first without the ballast it is a whole lot easier, then you can shade the center and edges after balast.
I use a fine line airbrush, with watered down rust and a grimmy black mix. Then hit the center of the track with engine black and grimmy black. Clean the tops of the rails off and then ballast. and then weather your ballast as needed.
Give it a shot on a test bed, You'll find the results are excelent and compare well with the real thing.
:thumb:What I was thinking
My thinking in the mix and match theme of things was this:
The ballast in the prototype is grey, the tracks are iron. Iron + water = rust, and thus the smattering of the rust color in the stuff I made is supposed to simulate the rust from the rails over time. The black is supposed to be grime/gunk. I guess I could give it all a light wash in something else to make it more grimey. What was the stuff, India Ink? What is it and where do I get it?
I work in the printing industry, so I guess i could find some good grime back by our presses; we call it pressroom black.:thumb:
I found india ink at a craft store in the calligraphy section ( or for dopes like me, THE FANCY WRITING section)tooth1
I did a search here and found Jetrock's excellent explaination of how to use it....THANK YOU JETROCK !
jetrock
Spelling Bee Champion
[URL="http://www.the-gauge.com/image.php?u=1393&dateline=1140814891"]http://www.the-gauge.com/image.php?u=1393&dateline=1140814891[/URL]
Join Date: Dec 2003
Posts: 715

Rails and ties don't end up exactly the same color, but they're close--the same gunk gets dripped on them. By airbrushing or spraying them a dull grayish-brown, you will cut down on the rails' shine (as well as the unwanted plastic shine of the plastic ties) and make them less noticeable--which adds greatly to realism. The object of painting track is as much to disguise them as to detail them.
Once they are painted, if you are of a mind to do so you can make them more realistic by adding extra paint to make 'em look a little different--I like to use microbrushes to add a light coat of rust to the webs of the rails, and sometimes add different shades of brown and dark gray to the ties.
Also, I find that when I add ballast, using an ink wash (isopropyl alcohol mixed 60:1 with India ink) both helps the glue penetrate better and helps bring out track details. It reacts differently with the paint on the rails and the paint on the ties, which helps differentiate them a little bit.
The result looks kinda like this:

I like my layout looking a little scruffy. Sometimes a *lot* scruffy.
Thanks again Jetrock,
As for myself, I'm not going to do a wash....If I want to darken it a bit after the ballast hardens, I'll break out the airbrush and lay down the "grime".
I did a search here and found Jetrock's excellent explaination of how to use it....THANK YOU JETROCK !
jetrock
Spelling Bee Champion
[URL="http://www.the-gauge.com/image.php?u=1393&dateline=1140814891"]http://www.the-gauge.com/image.php?u=1393&dateline=1140814891[/URL]
Join Date: Dec 2003
Posts: 715
Rails and ties don't end up exactly the same color, but they're close--the same gunk gets dripped on them. By airbrushing or spraying them a dull grayish-brown, you will cut down on the rails' shine (as well as the unwanted plastic shine of the plastic ties) and make them less noticeable--which adds greatly to realism. The object of painting track is as much to disguise them as to detail them.
Once they are painted, if you are of a mind to do so you can make them more realistic by adding extra paint to make 'em look a little different--I like to use microbrushes to add a light coat of rust to the webs of the rails, and sometimes add different shades of brown and dark gray to the ties.
Also, I find that when I add ballast, using an ink wash (isopropyl alcohol mixed 60:1 with India ink) both helps the glue penetrate better and helps bring out track details. It reacts differently with the paint on the rails and the paint on the ties, which helps differentiate them a little bit.
The result looks kinda like this:
I like my layout looking a little scruffy. Sometimes a *lot* scruffy.
Thanks again Jetrock,
As for myself, I'm not going to do a wash....If I want to darken it a bit after the ballast hardens, I'll break out the airbrush and lay down the "grime".
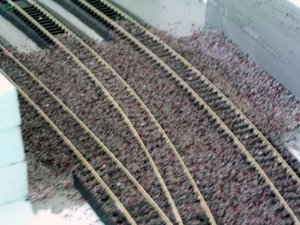
The Ballasting Begins
UGH :curse: This is going to be a pain.
I painted the underside and insides of my 1st level some dark grey and started ballasting the tunnel openings today. This is going to be hard work. Now I know why most people build their railroad over a lifetime.
The pics are a little blurry, but you get the idea.
Attachments
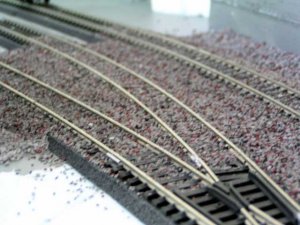
Hey Chris, Ballast can be a pain. Something to think about, When you ballast your switches put a pipe cleaner in the frogs and rerailers, I use a piece of scotch tape over the points and throughs. It will make your life a lot easier when it comes time to clean it all up and run trains, especially in tunnels.
Tony
Tony
Aw come on now it could be worse?? I'm trying to figure out how to put my rails down so they look like there in ashphalt or comncrete?
Just remember a little at a time and if you dont like how it comes out you just start over
Just remember a little at a time and if you dont like how it comes out you just start over
Yeah, a Little at a Time. Especially now.
balloon6 balloon6 It's COLLEGE FOOTBALL season!!!bounce7 bounce7
Can you tell I'm happy. I can say that I won't get much done on Saturdays for the next 16 weeks.
balloon6 balloon6 It's COLLEGE FOOTBALL season!!!bounce7 bounce7
Can you tell I'm happy. I can say that I won't get much done on Saturdays for the next 16 weeks.
Another trick to use when ballasting switches is to put a little plastic compatible oil where the points swivel, and where they slide over the ties as well as in the frogs and between the rails and the guard rails. The glue won't stick to the oil, so any ballast that gets in the wrong place is easily swept out with a small brush after everything else sets up.
Chessie6459
Gauge Oldtimer
Ballast = EVIL
Steve,
You are 100% correct. I think I got about 1.5 square feet done in about 2 weekends time. At that rate, I'll be 90 before I complete the ballasting of this layout.
Steve,
You are 100% correct. I think I got about 1.5 square feet done in about 2 weekends time. At that rate, I'll be 90 before I complete the ballasting of this layout.
What to do, What to do?
Hey all,
Things have been a little crazy here lately. It has gotten cooler here in NC, and with the last hard rains we have had, my yard started growing AGAIN :curse: . So, needless to say, I haven't gotten much done lately.
So I have a what to do question. I'm putting in a truss bridge, and after reading some of Nazgul's (Steve) and Ocalicreek's (Galen) posts, I want to do this right (thanks guys for making me think about that). No really, thanks.
I have looked at this last issue of MR, and about ran into many a bridge while driving trying to discover what holds them up, and how to model the structure correctly. The bridge is going to be the first thing you see as you walk into my room, so I want something nice. What would ya'll do to hold this one up?
Attachments
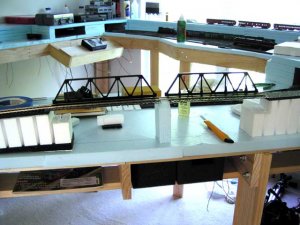
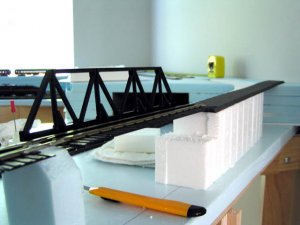
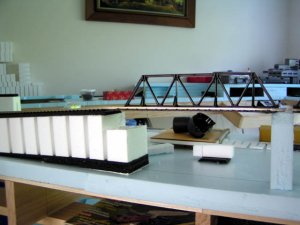
Chris,
A word of caution...It looks like your incline ends at the point where you have your first bridge placed. This is not a good thing. I suggest you cut the track on the incline a few (4"-6") inches back, and move the bridge a few inches to the right (as seen on your first picture. Then use a piece of track to "bridge" the transition to level track. Otherwise you're going to get a very audible "click" from every wheel set as it goes over it, and, worse still, you can pit and scratch the wheels of your locos quite badly. Not to mention an increased danger of derailments.
Good luck...!!!
Gus (LC&P).
Gus:
Thanks for the advise. In all actuallity, that bridge is on a 2.5% incline, and at the end, it still has about 24 linear inches to continue before it flattens out again.
Thanks for the advise. In all actuallity, that bridge is on a 2.5% incline, and at the end, it still has about 24 linear inches to continue before it flattens out again.
Check out these pics:
http://siskiyou.railfan.net/operations/rules.html
http://www.narrowtracks.com/mySRRL/strongToPhillips.htm
Dr Wayne has some good ones in his gallery.http://www.the-gauge.com/gallery/browseimages.php?do=browseimages&c=47&page=8
You can tell by these photos that he's kinda getting the hang of modeling! LOL makes us look like novices!!...oh yeah, we are.
Chris if you find the right way to do it....clue me in!
Bridges
Steve,
Someone else in here had a great link to some great photos of bridges. I'll have to find the link again for you.
Steve,
Someone else in here had a great link to some great photos of bridges. I'll have to find the link again for you.