N Scale Road Lines

rob164

New Member
Feb 16, 2004
49
0
6
34
Visit site
Does anyone know the best way to make the road markings that you see out on streets? (fire lane, parking spaces, road lines)
Also, does anyone know who makes the best road signs?
thanks
Rob
 

Matthyro

Will always be re-membered
Dec 28, 2000
4,550
0
36
86
Georgetown, Ontario,Canada
Rob, I have used a Pen-Touch white marker which is a quick dry opaque white ink that is permanent. I made a stencil out of cardboard which lasted long enough to do the job I wanted.
 
Rob,

I have used Letraline flexible tape - available in yellow and white at 1/16th and 1/32nd inch widths.

Here's a photo of me applying the double white lines (you can use yellow if that is common in your area).

Gavin

(Well, here ISN'T a photo because my 400 x 495 image is "too big" to be submitted to The Gauge! )
 

roryglasgow

Active Member
Jun 3, 2001
1,223
0
36
55
Huntsville, TX USA
web.wt.net
I used a set of gel pens that I got at Walmart to draw in the road stripes on one of my old layouts. I think it was maybe Robin who suggested it to me...or was it Charlie? Or maybe Tyson? Well, at any rate, it was someone here on The Gauge. I think I made each stripe 6 scale feet long, which is a little less than 1/2 inch in N-scale. The roads were painted plaster. The gel pens were really easy to use.

Here are some links to pics:

http://web.wt.net/~glasgow/RnKRR/images/Bryan1.jpg
http://web.wt.net/~glasgow/RnKRR/images/Bryan3.jpg
 

roryglasgow

Active Member
Jun 3, 2001
1,223
0
36
55
Huntsville, TX USA
web.wt.net
I used heavily watered down plaster. It wasn't very easy to work with, though, and I will probably not use that exact method again. One of the problems I had was with levelling the road. I probably didn't make it watery enough. I thought I could fix one of the low spots by pouring in more plaster. Big mistake! As soon as the new batch of plaster hit the road, the water from the new batch was immediately sucked into the older plaster! The new batch ended up just being a sort of flattened blob on top of the road. I had to wait for the whole thing to dry, and then I sanded it down. After I painted it, my mistake was somewhat hidden.
 

rob164

New Member
Feb 16, 2004
49
0
6
34
Visit site
thanks... The woodland scenics road system was pretty easy to make..you just take the power and add water (2 parts powder 1 part water). I just finished painting it black with the Asphalt top coat... still having trouble with the lines and everything..ill find a good way sometime
 
Rob,

I prefer to use plastic sheet cut to shape rather than anything I have to "mix up" and apply (I am sure I would mess that up and wouldn't be happy with the end result!).

I used to use cardboard sheet but found it expanded when water fell on it during scenicking.

Plastic sheet is perfect because it sits flat, doesn't curl up and isn't affected by water. Painted grey and weathered it provides a nice flat road surface.

I prefer this method over liquid-type solutions because I can test fit, lift up, re-align, re-cut, even paint it and line it off the layout.

Here is a photo of a grade crossing "custom made" out of plastic sheet to fit the location.
 

Attachments

  • layout04a(text).jpg
    layout04a(text).jpg
    43.2 KB · Views: 297

Papa Bear

Member
Dec 28, 2003
606
0
16
South Alabama
www.route29.com
I used 2 mm thick foam sheets to build roads for my layout. These are available in the craft section at Wal-Mart. I cut out the sections and painted the lines on at the table, and then glued them on the layout with white glue.

For the stripes, I used very fine tip paint markers that I bought at Michaels. The yellow didn't turn out very well at first. Later, I found a yellow gel marker which seems to work much better on the black background.

As for signs, Blair Line has a large selection of highway signs from the 30's to today.

John
 

Attachments

  • mvc-013s.jpg
    mvc-013s.jpg
    37.5 KB · Views: 207
Originally posted by ddavidv
1) How do you cut/get nice corners? Some of mine are pretty tight.
2) How do you hide the seams (doing asphalt type pavement)?
I purchase large sheets (eg 2'6'' x 4') of HIPS (High Impact Polystyrene Sheet) from a local plastics manufacturer. MUCH cheaper than buying it in small quantities from the local hobby store.

The sheets are large enough that I have so far managed to cut the sections I need without joins. However I have tried joining sections edge-to-edge with liquid polystyrene cement and it was quite easy - lightly sand off the join after, then paint. If you have ever built plastic kits you should have no problems.

Tight corners are probably easier than gentle curves. I just find something of about the right diameter (eg paint tin lid), hold it down on the plastic, score around it with a hobby knife, then flex the sheet and pop the road section out. Finish by sanding the curve smooth.

Gavin
 
Originally posted by Gavin Miller

Tight corners are probably easier than gentle curves. I just find something of about the right diameter (eg paint tin lid), hold it down on the plastic, score around it with a hobby knife, then flex the sheet and pop the road section out. Finish by sanding the curve smooth.
It might help if I added that to get the corresponding curve on the OTHER edge of the road I use a draftsman's compass (with a metal point in each leg) set to the desired width of the road to scribe a "parallel" curved line (by dragging one point along the initial scribed line and using the other point to scribe a fresh line).

Clear as mud? :)

Gavin
 

akonpittbull

New Member
Jul 2, 2010
3
0
1
I am also suggesting the white market for the road marks and for the sign board you can use the plastic sheet of yellow color which can give you the best atmosphere like real sign board.
 

Denyons

Member
Nov 2, 2006
100
0
16
85
Sherwood Park,Alberta, Canada
Roads & Road Lines

This was from my old thread at My layout progress (
multipage.gif
1 2 3 ... Last Page)
Denyons
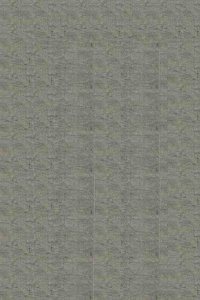
I picked the brains of a friend who had managed to extract the general road background from a game that he plays on the internet.
I have the background saved on my computer and I printed it onto several 8.5" x 11" sheets of AVERY Label paper. The paper is self adhesive and easy to stick down. You do need to have a smooth surface to put the roads down or you will have a very bumpy road.
I used arborite cuttings that I obtained from our local lumber store. I glued the arborite down with contact cement.
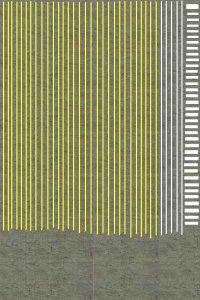
For the yellow or white lines I just brought up the road background on my computer in my PAINT Program then used the mouse to draw lots of straight lines in the 2 colours. (Choose a thin line)
The benifit of putting the lines right onto the road background is that you don't have to worry about cutting the lines right up to the yellow as it will just blend into the main road that you have put down.
I hope this makes sense as I am not that great at explaining.
If anyone would like the background drop me an email and I will send it to you.
 

Attachments

  • Road (for printing).jpg
    Road (for printing).jpg
    89.6 KB · Views: 21
  • Road Lines (for printing).jpg
    Road Lines (for printing).jpg
    114 KB · Views: 26
  • Making Roads 4.JPG
    Making Roads 4.JPG
    66.7 KB · Views: 19
  • Making Roads 3.JPG
    Making Roads 3.JPG
    62.6 KB · Views: 21