My Y-Wing Build

leofirebrand

New Member
Jul 24, 2012
97
0
6
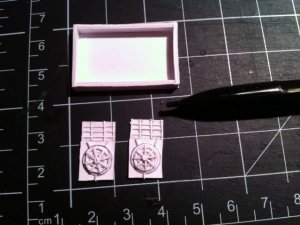
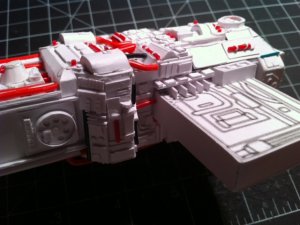
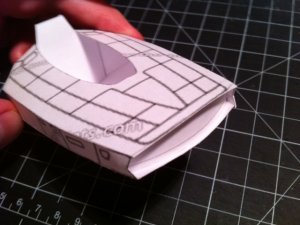
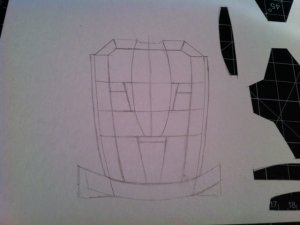
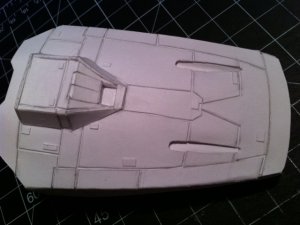
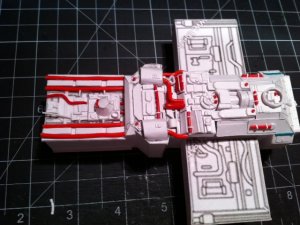
I always wanted to scratch build a Y-wing because of all the little greebles and details and decided my skills had progressed where I should be able to do a decent job of it. I found a 2D blueprint online that I thought would help with the basic shape and scale but I have had to fine tune and correct it alot so far.

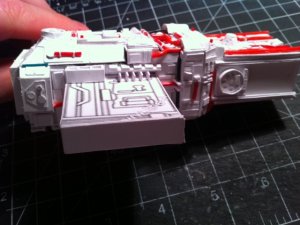
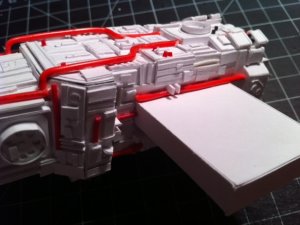
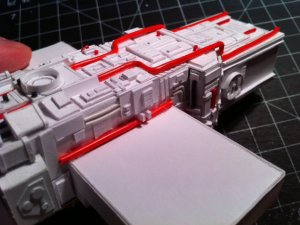
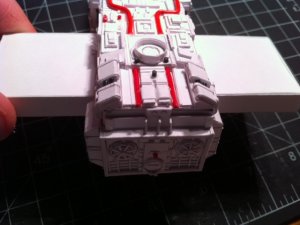
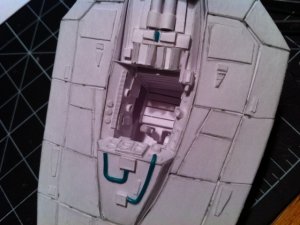
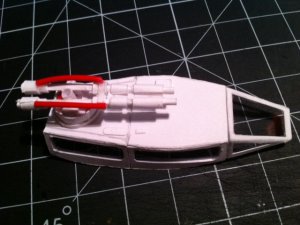
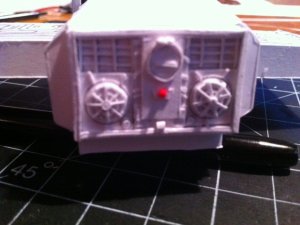
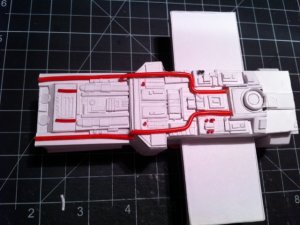
You can see in the pics below I am starting with the basic shape and then layering on detail from there. Im using bits of wire for some of the tubing. The model is proving pretty tough since alot of the detail is between 1-3mm at most.
 

Attachments

  • image1.jpeg
    image1.jpeg
    95.1 KB · Views: 13
  • image2.jpeg
    image2.jpeg
    109.9 KB · Views: 12
  • image3.jpeg
    image3.jpeg
    111.1 KB · Views: 12
  • image4.jpeg
    image4.jpeg
    100.5 KB · Views: 9
  • image5.jpeg
    image5.jpeg
    131.5 KB · Views: 12
  • image6.jpeg
    image6.jpeg
    110.2 KB · Views: 12

Rhaven Blaack

!!!THE MAN BEHIND THE CURTAIN!!!
Staff member
Administrator
Moderator
Jun 12, 2009
12,516
9,891
228
Oregon
www.deviantart.com
OK, this is ABSOLUTELY AWE INSPIRING!!!
The amount of detail that you are putting into this model, is PHENAMINAL!!!
You are doing an ABSOLUTELY AMAZING job on this model.
Keep up the GREAT work.
I will be following this thread.
 

dnalor

Well-Known Member
Oct 28, 2011
917
186
58
Belgium Europe
Wauw...she looks great..

That is why i wanted one..
but didn't find one because of the details (i think)...
and you've done a great job so far.

i will be following this.
 

trt

Member
Jul 23, 2011
116
10
18
Durham, England
That's me speechless. It's all been said. Utterly superb, fantastic details.
I'm still amazed at what can de done with paper. I am in awe
 

leofirebrand

New Member
Jul 24, 2012
97
0
6
Thanks for all the kind words, it definately is keeping me going with this build. I have been wanting to do this for a while but all the detail was intimidating. In reality the individual pieces are very easy to make it's just the sheer quantity. Here's hoping I retain my sanity by the time I am done. Here is another pic showing some of the cuts next to a mechanical pencil to get a better idea of scale. I hope to have everything except the "wings" done tonight or tomorrow and then I will update with more progress shots.
 

Attachments

  • image2.jpeg
    image2.jpeg
    112.8 KB · Views: 15
Z

Zathros

I don't think there is anything you cannot do. I would like to some see some greeble detailing instructions. They are awesome!! :)
 

dnalor

Well-Known Member
Oct 28, 2011
917
186
58
Belgium Europe
HUM...a step by step how to build a y wing...:)
How to greeble an y wing :)

Maybe a template of the main structure..

ah....dreams..:-D
 

leofirebrand

New Member
Jul 24, 2012
97
0
6
Here is an update on where I am at. Got alot done last night and I am almost done with the sides. just have part of the neck to finish. As far as the questions; Sadly my process does not use 3D modeling so templates would be difficult. I normally do 2D blueprint but for this model I found some online. You can find them here just remember there are some inconsistencies with the actualy screen used ywing:

http://www.the-blueprints.com/blueprints/sciencefiction/star-wars-rebel/2746/view/y_wing/

If anyone would like the 50 or so reference photos I collected from google let me know and I can share that as well.

I would love to share my greebling process. The other forum I post progress on does not really do much card modeling so I have gotten in a bad habit of not documenting my process well. Once I am done with this build I will post a more detailed tutorial. Until then I will make a separate post with some basics. Sorry to double post. There is just a limit on the number of pics per post.
 

Attachments

  • image9.jpeg
    image9.jpeg
    108.4 KB · Views: 7
  • image10.jpeg
    image10.jpeg
    100.6 KB · Views: 9
  • image11.jpeg
    image11.jpeg
    117.3 KB · Views: 9
  • image13.jpeg
    image13.jpeg
    110.7 KB · Views: 8
  • image12.jpeg
    image12.jpeg
    90.7 KB · Views: 9

leofirebrand

New Member
Jul 24, 2012
97
0
6
Greebling really is very easy, just time consuming. Here are some common tools and tricks I use:
  • Strips of paper - In .5,1,3,5,and 6mm widths (for this project) on 110pd cardstock. I also create another set at these width but laminated 3 sheets thick. The vast majority of the details on this model were made by layering different shapes and width onto the model. If you look at the pics you can see how each section can be broken down into these basics.
  • Leather hole punches - I discovered these a few years back and love them. They are intended for leather so they last a while and come in a large range of sizes so you can make perfect circles every time.
  • Drafting stencils - These things tend to be pricey for what they are but will give you all the circles, squares, triangles and other shapes you need. A cool trick with these is to shape the strips into circle shapes by shaping them inside the stencil holes. that way when the paper natural tries to spring straight it will just fill the form. Just add glue and voila! perfect circles.
  • Sand Paper - great for giving rounded/beveled edges to shapes cut from the thicker strips.
  • Wire - Doing small cylinder shapes out of paper over and over requires more patience then I have so this is a cheap effective solution.
I include a progress shot below that shows me making the basic form. After that I used the same shape I did for the top portion and traced out the panel lines (The ones on the blueprint were not accurate). Once that was done I just cut it out and glued the panels to the basic shape. I then used some of the strips and my stencils to add the little raised details.
 

Attachments

  • image7.jpeg
    image7.jpeg
    106.1 KB · Views: 10
  • image8.jpeg
    image8.jpeg
    84.4 KB · Views: 12
  • image14.jpeg
    image14.jpeg
    96.2 KB · Views: 10