My first Model RR project

n-scaler-dude

New Member
Nov 22, 2002
68
0
6
Lebanon, MO
Visit site
Ok, since my first scratchbuilding project has come to a temporary halt (need some detailing parts), I decided to take the next big jump....a diorama, as was suggested in my inital thread.

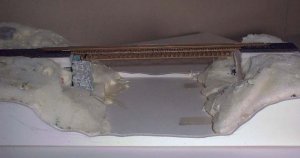
Here is the first picture of what I have done so far. Basically just a shell, entirely of foam core. I chose this for a couple reasons. First, I don't know any better. Second, because it was cheap, as in free to me.

It's not an operational thing so I wasn't worried about it being heavy duty. Just cut the pieces and Elmer them together.

Roadbed is attached. I used foam-type from Woodland Scenics. Whatever happened to good old cork roadbed, I couldn't find any?

Track is just setting on it right now and not attached.

With this diorama I will get to experience general scenery, small rock-casting, scratchbuilding, simulating water, and a some other fun things.

The gap in the roadbed will be home to the scratchuilt covered bridge I am planning.

diorama.JPG
 

n-scaler-dude

New Member
Nov 22, 2002
68
0
6
Lebanon, MO
Visit site
Thanks for all the positive support, this board is awesome!

Yes cpr, this is my first attempt. But after years of reading magazines and how-to books, I feel like I've always had the basic knowledge. I'm sure as things progress though, I'll run into areas that require answers to questions I'm pondering, such as now:

Is there a "best" way to proceed? In otherwords: Track and ballasting or surrounding scenery, which normally comes first?

I seem to recall both avenues described in articles. My personal feeling is to do the surrunding scenery up to the roadbed first, that way the ballasting can be applied over the transition from scenery to roadbed? Opinions?

Also, I've always had a problem with the shiny blackness of the ties on flex-track, what is the best color to use to paint it to look more real?

And while I'm at it...I've also read that some people paint the sides of the shiny nickel silver rails, which makes the big, clunky rails "look" smaller? Anyone try this? If so, what color to use?

I have a Paasche airbrush from past hobby experiences so I can use it if needed.

I'm going to Joplin, MO this weeknd where they are having some kind of train swapmeet or something, maybe I'll be able to pick up some supplies there. It'll be my first time at such an event also. Hope it's worth the drive (130 miles).

Will post pic's when I get something significant done.
 

davidstrains

Active Member
Aug 29, 2002
1,014
0
36
Stafford, VA
Visit site
While I do not claim to be in the category of the Shamus's, Casey, Tyson, Pete, et.al., I have been building a layout for the past 8 months or so. Here are a couple of suggestions based on my "if I had it to do over" list.

(This assumes that you have decided on your track plan up front.)

1. Build benchwork, tabletop (cookie cutter or flat)
2. Draw trackplan on tabletop and lay road bed
3. Lay Track. Solder your track feeders as you assemble the track!!! Also attach your switch machines as you assemble the track. Solder the wires to the connectors at this point also.
3a. Connect a DC power pack and test the track as you go with an engine and a few cars for continuity. (it also lets you run a train to break up the tedium of track laying:D )
4. You didn't say whether you are going straight DC or DCC but either way you will install your power bus(es) and solder your track feeders. You can use a 12v lamp connected to the track to watch for shorts as you solder the feeders.
4a. You will also need to connect your switch machines to the "switch power bus". Solder carefully and test as you go.
5. Construct your scenery - I am doing it the way you suggested - before putting the ballast down.
6. Ballast and clean and test the track with your DC power pack and engine again.
7. Put your structures in place.
8. Run your trains to your heart's content.
9. Take pictures and post them here:) :) :)

Again just suggestions. Results may vary, see an expert for serious problems:D :D

Have fun!!!
 

kettlestack

Member
Jan 18, 2002
859
0
16
84
Scotland UK
Visit site
"With this diorama I will get to experience general scenery, small rock-casting, scratchbuilding, simulating water, and some other fun things. "

An excellent choice of scene n-scaler and a top notch start to the sequence of construction!

I always maintained that modellers should try their hand at dioramas before starting on a full blown layout.
All one is likely to loose in doing this is a length of track.

If I may make suggestions? ....
1) (Tunnel approach) Leave sufficient space between track and foam contour upright to form a good looking cut through rock or whatever. A timber retaining wall in the cut always looks good too.
2) Fit a scratchbuilt bridge after you detail whatever is to be underneath it.
3) Paint the roadbed (to hide any traces of white foam before laying track last. The ballast is then likely to merge better into the scenery it touches.
4) Yes you are correct about painting the sides of the rails. (Shamus has this off to a fine art :) check out his photos ).

The experience you will gain from your diorama will be priceless.
Keep us posted with your progress. Already all your reading has held you in good stead my friend.

Errol
 

n-scaler-dude

New Member
Nov 22, 2002
68
0
6
Lebanon, MO
Visit site
davidstrains - Your suggestions are great, and I'm glad you posted them here as someone who has gone through them, as I will sometime. I will be using them, and others here, for reference when the time comes.

Since this is a non-op diorama, I won't be able to experience benchwork, working switches, or any other electronic gizmos. Unfortunately all that will have to be tackled when layout time comes.

If you look at the wallboard in the photo, behind the diorama, you'll notice it's unfinished. Before I even think about what kind of layout I am going to be able to construct, I need to: fix a hole in the roof in order to finish the ceiling, build an interior wall, finish drywalling the room, install a washer/dryer, re-wire the room, finish ceiling and lay carpet. Then I can install a choo-choo board.:) Until then I will have to be content with scratchbuilding, dioramas, and small projects. I don't want to look too far ahead and get disappointed that I can't do it right now! .

kettlestack - I thought about a tunnel entrance at the left , but thought it would be too much, with the covered bridge being so close. It will be a simple cut through a hill.

Which leads to a question - What is a good scale distance to keep between the trains and the cut-through?

Fit a scratchbuilt bridge after you detail whatever is to be underneath it.

This is something that also crossed my mind and came up with the same answer - water first, then place bridge. I can see myself trying paint details while reaching under the bridge...not!

About painting roadway - This is also something I thought of (boy, great minds think alike, ehh?:D ) . What is a decent color to use for this, and what type of paints?? I was thinking that one of those camoflage colors used in military modeling might be ok, possibly a dark tannish, brownish, color??

Gotta go to work now, will catch up with answers later.
 

n-scaler-dude

New Member
Nov 22, 2002
68
0
6
Lebanon, MO
Visit site
Hello everyone!

I hope everyone's Thanksgiving was as delicious as mine.

Here are a couple more pictures of my slow progress:
I decided to try the E-X-P-A-N-D-I-N-G foam, and boy does it expand! After it calmed down and hardened a bit, I did some preliminary carving down, I'll probably do some more.
You can also see one of my scratchbuilt abutments at the far side, temporarily installed to check the fit. The abutment is not finished yet but I decided to trysomething different....I made it with real stones from my front yard:D . Not sure if the whole process I have in mind is going to work or not so I'll keep my fingers crossed. X
dio2.JPG


And her is also another new skill to me....soldering. Since I am going to scratchbuild the bridge it's going to need a guard rail, so I took a couple rails from some scrap flex-track, bent the ends, filed the ends down so they would join fairly straight, and soldered them together. Then I had to file the lumpy bits off. It is just sitting in that track piece right now, eventually it will be installed between the rails of the bridge flooring.
dio3.JPG
 

n-scaler-dude

New Member
Nov 22, 2002
68
0
6
Lebanon, MO
Visit site
Thanx!

Here is a closeup (note to self: Next time use a tripod!:mad: ) of the abutment with an N car for size comparison.
dio4.JPG


In case anyone is interested in trying my experiment, or expanding on it here is what I did:

Rocks:

1)Sifted handfuls of crushed rock and dirt through 1/4" mesh screen.
2)Took what fell through and washed it in a common kitchen strainer, which gets rid of too small stuff and dirt.
3)Used a hairdryer on low setting to gently blow away and small twigs and such, also helps rocks dry.

Abutment:

1)Cut, from styrofoam, the approximate shape desired but slightly smaller than intended size.
2)Spread a thin layer of florists clay over the styrofoam. This will hold the rocks in place.
3)Started placing rocks around the bottom first, gently pressing them into the clay. Then, working my way up, I used Duro Quick-Gel, in small drops, to hold rocks together, but still pushing them into the clay.

My first problem:

The clay is dark green and shows through the cracks between the rocks.
My solution:
1)Mix a tiny drop of black acrylic paint into a small batch of joint compound, making a concrete grey color.
2)Using an old, small brush, I dabbed the mixture between as many cracks as I could, trying not to get it on the rock face (Harder than I thought).
3)Then while the compound is still a bit wet, I took a damp but clean brush and gently wiped the rock faces clean and dabbed then with a paper towel.

Some thoughts on this experiment:

I'm sure this has been done before, at least in some fashion, but it was a true learning experience and I will try to use it on other things as well.

For this, I might have chosen smaller stones, but the result is satisfactory for me on this particular project.
 

n-scaler-dude

New Member
Nov 22, 2002
68
0
6
Lebanon, MO
Visit site
Update:

Sorry, nothing really to update. I did just get back from my first train show/swap meet in Joplin. Boy, I'm glad my funds are limited, cuz I coulda spent a lot!

I refrained though, thinking I better just stick to the present rather than buy too much for the furture.

A quick inquiry: Am I rught in guessing that Life-Like engines are not exactly top of the line??

Reason I asked is because everyone had them rather inexpensively, at least compared to most of the other makers.

Even so, I couldn't pass up 2 Frisco E8 loco's for $20 each. #2016 named "Citation" (Famous triple crown winner) and #2020 named "Big Red" (Nickname of famous race horse Man O'War).

Also picked up some much needed materials for me to keep moving ahead with my diorama, including a small batch of casting plaster and some liquid latex, for trying my hand at rock casting.
 

n-scaler-dude

New Member
Nov 22, 2002
68
0
6
Lebanon, MO
Visit site
Tyson - The only thing I have to compare the Life-Like E8 with are old (10+ years) Bachmann engines that I have. But, after running it up and down on a straight piece of track, I am very pleased with it's performance. N-sale technology sure has advanced.
 

n-scaler-dude

New Member
Nov 22, 2002
68
0
6
Lebanon, MO
Visit site
Here is the latest picture of my project.

I decided to get the abutments settled first before doing the scenery. But, in able to do that I felt the need to at least get the flooring portion of the covered bridge finished in order to get the abutment placing right.

Here is the semi-finished bridge flooring temporarily sitting where it will eventually be placed.

It was rather tedious work for me since I can't really read blueprints very well (in otherwords I had to fudge and cheat). I'm hoping that the bridge, when completed, will at least be a representation of the prototype.

Now comes the real fun part....all that lattice work for the bridge sides! Eeegad!
 

Attachments

  • dio7.jpg
    dio7.jpg
    23.4 KB · Views: 159